


LAMBRETTA CLUTCHES
It is without doubt questions about clutches and setting them up is the second most Tech question – next to jetting!
As with jetting, once you get your head around it building a clutch and making them work is easy.
Normally a standard type engine works, especially if it is a factory untouched item – except these days they are old, from new they worked well as we all know with correct cable adjustment. Today most people have an uprated cylinder so a clutch is a very important part of a tuned engine.
LAMBRETTA CLUTCHES
All Series 1, 2 and 3 Lambrettas from the factory use a 4 plate clutch set up – that means 4 friction plates. From early models parts of the clutch were slightly up graded into the GP range. Most parts are all interchangeable. Generally parts were improved to prevent wearing out. Apart from stronger springs on certain models nothing was done to stop clutch slip. Baring in mind the most power standard engine was around 10 horse power – this isn’t powerful enough to find clutch slip if good quality correct parts are used.
High powered tuned engines are too much for standard Lambretta clutch set-ups! By using modern parts – especially improved friction compounds and increased number of plates then you can cure clutch slip on high powered engines.
CLUTCH SLIP
Symptoms of clutch slip is where the engine does not accelerate in proportion with how you work the throttle – i.e. on a non-slipping clutch you pull back the throttle quickly and the engine accelerates quickly. Pull it back slowly and it accelerates slowly. When you have clutch slip, you wind on the throttle – the engine revs up so it’s screaming and the bike pulls as though it’s being very gently revved. Basically the engine revs up but your not going anywhere. This is a bad case, clutch slip can come on slowly, the clutch may be slipping but the motor is still driving as it should. You may feel or hear it or you may not. Try it going up a hill, into the wind or driving two up and it gets worse.
With TS1’s, RB’s and other powerful kits producing very high Horse Power more and more people suffer from clutch slip and these engines really do need an uprated clutch. You can get slip on a mild tune and on standard engines when a clutch is going off. This can be because of weak springs, wear and tear, or poor quality parts or just set up wrong.
With the correct standard parts a modern standard clutch can work fine on engines up to around 20bhp. If you don’t ride like a racer you can get away with it on 20+bhp engines! Ride constantly like you’ve stole it – the chances are you really need to look at a modern set up.
Our most popular clutch is our 4 plate clutch kit which works in most engines and consists of…..
- Clutch plates
- MB Clutch springs
- Maxima oil
In the past when I’ve built powerful engines for customers I’ve asked what clutch do you want? They weigh up the price and say a 4 plate, usually they get to just over the running period where they start to ride the bike and feel the power and then experience clutch slip. After replacing the clutch a couple of times and not getting the best from the engine they returned for one of our special 6 plate clutches which totally cured slip and drag!
Today there’s no option – I just say I’m only fitting our MB 5 – 6 plate CNC clutch kit. This works on a bog standard 125 all the way up to a 40bhp motor.
Decent 5, 6 or even 7 plate clutches are quite new to Lambrettas, before that we didn’t have a lot to play with so we just added stronger or extra springs.
Take a standard 4 plate clutch, you can tweak the internals to make them work better or worse. So many people have made a mess of how a clutch works and struggle with clutch slip or clutch drag and they struggle with the basics of mechanics!
CLUTCH SLIP AND KICK STARTS
One of the main problems causing clutch slip on a standard clutch set up is a faulty kickstart assembly. If you strip an engine and look at the top plate you will see it polished or worn away. You will also see the kickshart shaft polished and worn away. This can be for a number of reasons
- Outer kickstart circlip bent or come out of the groove
- Outer kickstart washer bent or the wrong thickness used
- Wrong kickstart fitted in the casing
- Large clutch spring can pop out
Dont fit a GP kickstart in an Li, Sx, Tv casing without doing the side casing mod. Li type thin kickstart levers are thin in the area closest to the top clutch plate to give clearance – they are weak and snap in this area. Later mod Gp type kickstart shafts are thicker here so if a Gp shaft is fitted it will lock on the top clutch plate, so the side casing needs machining down to suit. Some kickstart shafts are thicker or not machined correctly at this area where it can touch on the clutch top plate – the kickstart can be ground down to clear. Kickstarts vary in length so you need something other than a standard 1mm kickstart shim. We do a stronger kickstart circlip with tags which spread the load. You could also fit a slightly thicker side casing gasket to lift a little more – standard is 0.8mm MB also do a 1.2mm thick gasket. GP kickstart shafts fitted into the Li early side cover needs the shaft machining where the 18mm circlip goes to clear the kickstart ramp.
MB Scooters Kickstart parts to improve
- 1mm Kickstart shim
- 1.5mm Kickstart shim
- 1.75mm Kickstart shim
- Kickstart circlip
- Side casing gasket thick type
- Kickstart modification tool
CLUTCH DRAG
The opposite to clutch slip is clutch drag – this is when in gear with the clutch lever pulled in the clutch doesn’t disengage correctly and the bike creeps forward and you have to hold the bike with your feet or brakes and its difficult to knock it into neutral. This is down to set up and the parts fitted inside the clutch.
STANDARD CLUTCHES
All clutches in Series 1, 2 and 3 Scooters have used
- 4 x 3.50mm clutch friction plates
- 3 x 1.50mm clutch steels
- Li, Sx and Tv engines used the thinner 2.50mm top plate
- Later Gp style engines used 3.00mm top plates
- Springs have varied from models
CLUTCH FRICTION PLATES
There has been lots of different friction plates made by numerous manufacturers. All clutches in all models use a 4 plate set up. This means 4 x friction plates and should measure around 3.5mm each. Some plates were a pain to use and were soft and when hot they would expand and cause drag, if they were yellow then these are the ones that cause problems. Others would be too hard and cause clutch slip.
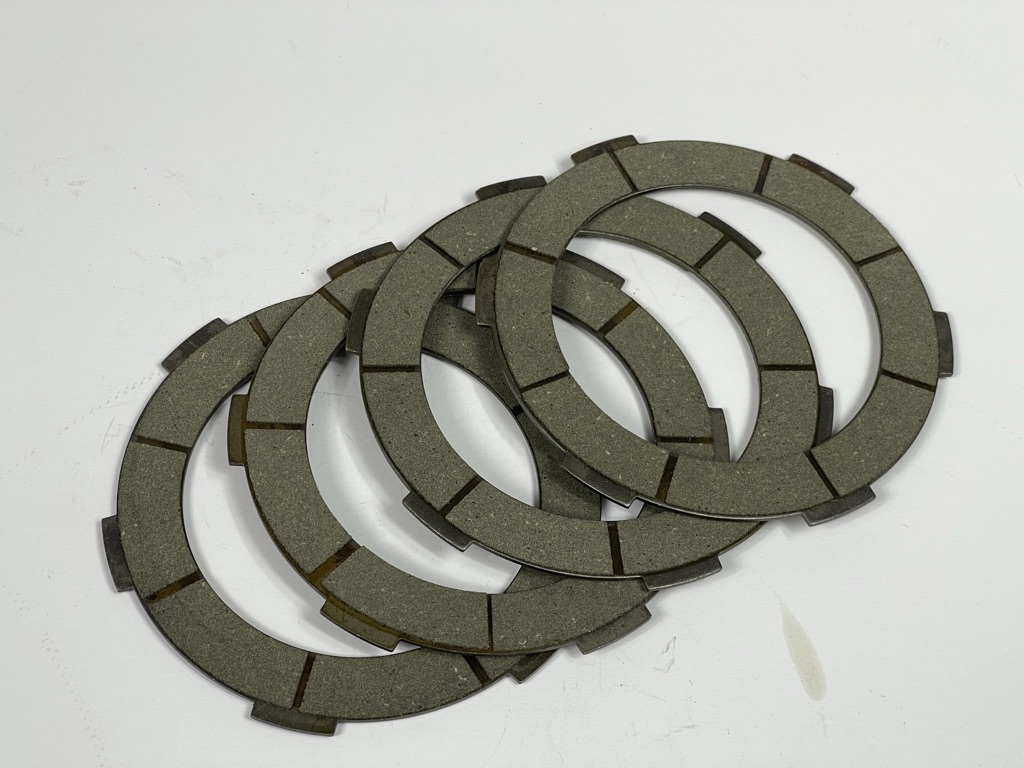
MB CLUTCH FRICTION PLATES
We were so fed up with other plates that we made our own. This was a long winded experiment!
MB clutch plates are a greeny/grey colour which grip and don’t slip and don’t drag – as long as you build the clutch correctly. We only sell plates as we know they work well in all engines. Standard type engines can use the standard 4 plate, these are even good to 20bhp. For engines over 20bhp we mainly use the MB CNC 5 plate kit. You can also do a 6 plate version.
We make standard 3.5mm and the thinner 2.5mm.
CLUTCH SPRINGS
There has been various springs used over time from the factory, these came in different lengths and strengths. The more famous ones were the Tv/Gt types these been the strongest to handle the very high gearbox ratios which made clutch slip worse. Forget genuine springs they are too old and are coil bound so don’t work. Today there’s been plenty of people making after market springs, some good some bad.
People have made springs and totally over looked what is going off! People have doubled up springs by adding a front brake adjuster spring with shims top and bottom. Some have added Vespa springs to the outside, some have added a Lambro center spring – yes it loads the clutch by having stronger springs – but makes pulling in the clutch harder and some can bend down the pressure plate causing a problem. These stronger springs help create clutch drag as its harder to find a gap inside the plate area.
Others have made stronger springs which are just too strong and you need 2 hands to pull the lever – this is not good at all. Others have made springs that do not compress correctly which causes clutch drag. Most springs are 16mm long when fully compressed this creates a tight clutch because when the pressure flange is fully compressed it locks up on the springs but there is still room for the plate to go further towards the crown wheel.
MB designed their springs to compress at around 14mm – look we’ve just found 2mm movement when the lever is pulled in – suddenly your finding a clutch that has strong springs to do their job but allows the free movement to prevent clutch drag – this also allows extra or thicker plates to be used to an advantage. MB springs are to be considered the best springs in standard clutch set ups.
Clutch springs should be straight and the same length.
When people phone and want a new clutch they ask for clutch friction plates and they over look the springs or say I’ve got springs – but what you don’t know is the springs go off over the years. For the price just swap the springs as well.
CLUTCH STEEL PLATES
All clutch steels on all models have been 1.5mm. 3 are used in a standard 4 plate clutch set up. Thinner steel plates have been made by various people to suit 5 and 6 plate clutches.
MB Scooters steel plates
- 1mm (0.9)
- 1.2mm
- 1.5mm
- 2mm
Thinner steel plates can be used to an advantage if your experiencing clutch drag. Swapping 1 x 1.5mm to a 1.2mm or a 1mm gives just enough extra clearance inside the clutch to stop drag. If your wanting to add a 5 or 6 plate clutch into a standard crown wheel/spider set up using thinner 2.5mm friction plates then depending on which kit you will need 1/1.2mm steels.
MB use a combination of steels in our clutch kits. Usually the bottom 2 (nearest the gearbox) steel plates will chew up first so we fit thicker steels first and work up to thinner ones towards the outside as these hardly ever chew up. We fit a 2mm steel first, then a 1.5mm then 1.5/1.2mm. If you use a 2mm steel you need to reduce the others to compensate the difference of 0.5mm compared to a standard 1.5mm. 1mm steels tend to mash up on the tangs that run on the spider as there is no load spreading from the thin area and require more maintenance.
CLUTCH SPIDERS
Clutch spiders all looked the same and are interchangeable but did vary in height due to where the big circlip groove was machined. This effected the space within the assembled clutch. This on it’s own could effect if a clutch worked or didn’t work. Ideally the only way to measure it is to compare one spider to a few others by laying the spider upright and comparing the machined groove.
I’ve been asked ‘are all spiders hardened! And can they work with needle roller bearings in a GP crownwheel’ You can use a spider with needle bearings but most GP crown wheels are not hardened in the center and will wear out using the two loose bearings. So play it safe and use the GP bush. But I have come across hardened GP crown wheels. I have never come across any spiders where it has not been hardened on the bearing surface and I have used needle bearings in lots of spiders whether they are Italian, Spanish, Indian or after market, so this should not be a worry!
CLUTCH FLANGES
Clutch flanges have altered through the models over the years. These have all been interchangeable providing matching parts are used when needed. There has been two types of Li, Sx, and Tv flanges, both use a small nipple on top of the flange, these have to be matched to a Li type crankcase side. One type has a long rod below the nipple and fits into a gear cluster which is drilled out. This rod on the flange can be burnt off (as they are hardened steel) and you can then use it with a solid gear cluster if you want. The later type of Li flange comes like this as standard when using later solid gear clusters. I have known drilled gear clusters to snap if you over tighten the clutch nut, beware! The later Gp type is different again it has no centralising rod and doesn’t use the loose nipple and works with a solid cluster. The later Gp type uses a flat pad which operates from a brass plunger housed in the special Gp crankcase side. Today we only have remade clutch flanges or SIL ones and all vary in quality. Sometimes the pressure plate can be a bit longer which helps making 5/6 plate conversions. Always use a hardened clutch nipple with early types. If you do not and you use a soft one it will wear and you constantly have to adjust the clutch cable until it totally wears out. This also happens with some Indian Gp pressure pads which can be soft as well and will mushroom over.
Which is to be preferred? Well all three types work, some set ups are to be preferred by others. In the old days I just used what ever an engine came with. I’ve only ever had one in my own Sx 150 where the clutch juddered setting off in 1st. This could have been a nipple riveted off set or the flange bent and welded wrong in the factory or a loose nipple machined wrong making the flange run like an egg shape. From memory it used the flange with the centralising rod which some say is best to cure this problem. You can get these symptoms with poorly machined Gp flanges as well. When I was developing our special extended flanges I would flat bed grind the flange area and everyone was not true! Add to the fact that the Gp flange is wider there can be more friction of components and the egg shape feel can be greater. At the end of the day the original design is very poor – been a pressed part, welded and riveted so lots could be off set from the factory! Our own MB special flange has addressed the issue as our CNC ones are machined from solid.
CROWN WHEELS
Crown wheels varied in design but were all interchangeable. All models used 46 tooth crown wheels it was only the GP 200 that used a 47 tooth as they change gearing set up with a bigger 18 tooth sprocket to help clutch load and slip. You can get after market 45, 48, 49 tooth crown wheels in standard form but I’ve never needed to gear an engine using these.
- Early Li crown wheels had springs in the middle to take the shock off sprockets and chains when changing gear, the springs would break. This type was riveted together and rivets could shear. The area were the friction plates ran was soft and would wear. The inner bearing bush was hardened and used the better 2 needle roller bearings.
- Later Li/Sx/Tv crown wheels looked similar to early ones but had no springs and were still riveted together. Early and late types where deeper where the bottom clutch friction plate drops down into the crown wheel – this could help with thin 5 plate conversion. You can weld these to stop rivets shearing but where the plates run they are also soft so not worth using. Early and late crown wheels shouldn’t be used on anything other than a low mileage standard motor.
- Later Gp crown wheels where a solid cast type which used bronze bushes instead of bearings. These are softer and loose needle bearings can not be used. Where the bottom friction plate went these were machined higher up so the clutch friction plate could lock on full compression which made it impossible to add extra plates as it makes a tight clutch. This area could be machined down to give more space to add a thin type 5 plate or just give a bit more room.
MB have made CNC crown wheels and have covered all the bases and can be used in a standard 4 plate set up or the thin 5 plate set up. The bottom plate area has been addressed so the plate drops lower. The height is correct so top plates don’t spin around and the bearing area is hardened.
MB Scooters crown wheels
- 46 tooth
- 47 tooth
CLUTCH TOP PLATES
All models originally used a 2.5mm top plate, Gp’s used a 3mm top plate. All are inter changeable, today MB make these plates and also make a 2mm top plate. Always check on a rebuilt clutch that the top friction is supported in the crown wheel. If it is out the plate will spin and you get clutch slip. The ears or tangs can be bent down easily down by gripping them in a vice and slightly bending each one. Or you can use a vice grip to twist each side down. This problem becomes worse using a 2/2.5mm top plate. Some crown wheels vary in height where the top friction plate goes making this problem better or worse.
If you are having clutch drag then the simple cure is to swap to a thinner top plate. If you are having clutch slip you can add a thicker top plate.
MB Scooters top plates
- 2mm
- 2.5mm
- 3mm
CLUTCH BEARINGS/BUSHES
All clutches used 2 needle bearings – it was only Gp’s that used a Bronze bush or these days a Brass bush. If you can use the loose needle bearings as they never go wrong, this is why we designed our CNC clutch to use needle bearings. You can get different types of Bronze bushes usually from India – Bronze is to be preferred over Brass as it has self lubricating properties. Today a couple of companies make Brass bushes with lubricating slots. It doesn’t matter who makes them the sizes vary. You can have a bush tight in the center – loose on the outside. Or loose in the center – tight on the out side! This usually comes down to wrong machining! It’s rare you get a perfect bush as tolerances on the spider and crown wheel also vary. If anything is loose the crown wheel will rock which you don’t want at all as it will wear the chain and the teeth.
MB Clutch needle bearings
- Clutch needle bearings, MB
- Clutch needle bearings, Named brand
- Clutch bush
TIGHT AND LOOSE CLUTCH AREAS
Armed with this information you can miss match parts so a clutch could be tighter or looser! What does this mean? Well you can build a clutch with some parts so the free area in the assembled clutch can have ‘room’ to be ‘loose’ or it can be ‘tight’. What you need is an area inside all the clutch parts so when you pull the clutch lever in the plates part and have a gap so there is no drive so you can sit in 1st gear with no drive even when hot. If it is tight it has less room inside, you pull in the clutch and the gap between the plates isn’t big enough and the bike wants to creep forward in 1st gear. When this happens the friction plates get hot – expand and make things worse!
Think of it like this
- when you assemble a Li type clutch using 4 x friction plates at 3.5mm, 3 x steel plates at 1.5mm and a top plate of 2.5mm this adds up to 21mm.
- when you assemble a Gp type clutch using 4 x friction plates at 3.5mm, 3 x steel plates at 1.5mm and a top plate of 3mm this adds up to 21.5mm.
Its only 0.5mm but 0.5mm can be the difference of a clutch slipping, working or dragging. From the factory we know a clutch works, but when you miss match parts clutch slip or drag can occur. I’ve already mentioned the area of the crown wheel at the bottom, Li types are slightly deeper so this gives a bit more room. Gp types are higher up, use a low spider circlip groove and you get less room to get the 21.5mm of plates inside and still have a gap when the clutch lever is pulled in.
Now at this point there are things you can do. You can fit a thinner 2 or 2.5mm top plate this gains 0.5 – 1mm free play. You can machine down the bottom of the grooves in a GP crown wheel to gain another 1mm! You can swap the steel plates for 1.2mm plates and gain another 0.9mm free play. Or even 0.9mm plates to gain 2.4mm if you wanted. You can miss match 1.5mm steels with a 0.9mm to find 0.6mm. You can have a mixture of 1.5, 1.2, 0.9 or even a 2mm steel plates. You can even swap a standard 3.5mm friction for a 2.5mm if you wanted. But of course you can over do it, thinner steels means the clutch pressure pad will raise towards the side cover – in some instances the side cover may not fit. Tighten down the side cover and you have clutch slip. The more gap you create the less pressure the springs have on the plates and you could find clutch slip.
- Li, Sx, Tv crown wheel was ‘loose’
- Gp crown wheels were ‘tight’
Use the deeper Li type crown wheel with a thinner top plate and it creates more room. Use the Gp with a thick 3.0mm top plate and it’s tight. Add the thicker 3.00mm top plate into the Li type and it tightens up the clutch or add a 2/2.50mm top plate into the Gp type and you gain 0.5mm movement……….. it’s the difference between a clutch which slips, works or drags.
STANDARD 5 PLATE CLUTCH KITS
From the early 80’s after market 5 plate kits have been available from various manufacturers namely Adige, Surflex and Newfren. These came in kits with thinner corks at 2.5mm some came with thinner steels and strong springs. It was rare you just fitted a 5 plate and it worked! Ideally a 5 plate needed fitting in the Li crown wheels which had more room. People would rightly swap crown wheels to the stronger Gp type but the 5 plate conversion wouldn’t part enough to work. The simple cure if you were capable, was to machine the Gp crown wheel down where the bottom cork plate would lock up, this was also a good conversion using modern 4 plate Surflex or Newfren plates which were thicker and softer and needed more room for expansion when warm.
Armed with this information you can miss match parts to give even more clearance in to the clutch area which will help with 5 plate conversions. I’ve never been a fan of the 5 plate kits. It seemed every time we sold one the customer had nothing but problems as described. The main problem with these kits were the clutch springs which were either too strong or too long, swap the springs and you could make them work.
Our MB 5 plate kit comes with 5 x 2.5 friction plates, 4 x 1.5mm steels and 3mm top plate. This equals 21.5mm the same thickness as a standard Gp 4 plate kit – so it all should fit.
MB Scooters 5 plate clutch kit for standard crown wheels
- Comes with 5 x 2.5mm frictions, 4 x 1.5 steels, 2.5mm top plate, clutch springs
CLUTCH INTERNAL ASSEMBLY
Clutch assembly and clutch set up in the engine is important, you can read more in the Spanners manual which I helped to write. There are some simple things and some basics which you have to do or things will not work.
SETTING CROWN WHEEL TO DRIVE SPROCKET ALIGNMENT
First when assembling any clutch be it standard or up rated ALWAYS make sure you set the crown wheel height, this aligns the front sprocket to the rear sprocket. There are so many remade after market crown wheels available I’ve never come across a good one, that’s why we made our own MB 46 and 47 tooth crown wheels. As soon as these where made it made my life much easier on engine rebuilds. Front sprockets are made all over and again vary in height, it seems no one can even copy correctly. Today we’ve made our own front sprockets.
MB Scooters drive sprockets
- 15
- 16
- 17
- 18
- 19
- 20
- 21
With some crown wheels to get alignment correct you may have to reduce the drive sprocket oil thrower or add a thicker one. We now make three sizes.
MB Scooters drive oil throwers
- 0.5mm
- 1.00mm
- 1.5mm
This saves measuring every sprocket for perfection. We already make UK made high tensile rear sprocket shims and cover all sizes required………………. get the shimming correct and the chain will last much longer. We also make our own MB chains in 80 and 82 links. And also offer the more expensive Iwis chains in 80, 81, 82 and 83 links. We tried all the other makes and even aligned correctly would wear out quickly so be warned don’t use Indian Rolon or Spanish Iris chains. ALWAYS check the circlip in the end plate that holds the gear cluster, this circlip can be thicker internally and can fowl on the clutch adjustment shim and lock things up. Also cheap clutch adjustment shims can bow and when the clutch nut is tightened can lock up the crown wheel.
MB Scooters clutch shims
- 0.8mm
- 0.9mm
- 1.0mm
- 1.1mm
- 1.2mm
- 1.3mm
- 1.4mm
- 1.5mm
- 1.6mm
- 1.7mm
- 1.8mm
- 1.9mm
- 2.0mm
- Evens, set 7 shims
- Odds, set 6 shims
- Full kit, 13 shims
MB Scooters chains
- 80 link
- 82 link
MB Iwis chains
- 80 link
- 81 link
- 82 link
- 83 link
MB Scooters crown wheels
- 46 tooth
- 47 tooth
The crown wheel and clutch bush and needle roller bearings are VERY important. Li, Sx, Tv crown wheels used two clutch needle bearings which run in a hardened bush, these are the best to use but can only be used in the early crown wheels which are no good. We use this method in our improved hardened MB crown wheels as the needle bearings are much stronger and don’t wear like the GP clutch bronze bush and stops crown wheel rock. Gp crown wheels are not hardened in the middle so wear out very quickly if needle bearings are used and they become scrap. The Gp bronze bush is simple but wears too easy and there are a lot of cheap rubbish aftermarket bushes on the market so beware! Some bushes come with lubrication slots and some don’t, slotted ones are best as they hold oil but these are rare. A good bush made from phosphor bronze which is self lubricating should be good. Today brass bushes are made and have lubricating slots cut into them. Usually these bushes come in different sizes internally and externally add to the fact that most crown wheels and spiders vary in size means you can have a tight crown wheel assembly or a loose one which is the most common. A loose one will rock from side to side when assembled, which wears the chain. Some clutch bushes are too long and will lock up the crown wheel when tightened. Even modern remade bushes vary in size and you can go through 20 to get one perfect to suit your crown wheel and spider. Ok the bush and bearings are simple but important as explained. You can use a Gp bush in a Li crown wheel but don’t use needle bearings in a Gp crown wheel.
To throw a spanner in the works some crown wheels are machined short or the clutch spider is machined too long, especially Indian ones which I’ve known to be up to 0.5mm too long which gives far to much ‘up and down lift’ this lift needs sorting out before you attempt to set the chain height to the front sprocket. If you have a long spider where the crown wheel lifts up and down you can fit MB shims between the crown wheel and spider, these come in a pack of 4 (not to be confused with the clutch shims).
Clutch spiders and crown wheels can be mounted in a lathe and turned down to get them right. Don’t be tempted to hand grind them the clutch will feel like an oval with an on off snatch feel. An easy way to check if the crown wheel and spider will have the correct up and down lift is to lay the spider down on a hard straight surface with bearing surface upper most, drop the crown wheel over it, put a straight edge across the spider where it fits onto the clutch shim, there should be around .004” (0.10mm) gap between the crown wheel and the straight edge, slot a feeler gauge in or use a vernier or depth gauge to measure it.
SETTING CROWN WHEEL HEIGHT TO FRONT SPROCKET
Before you try to set the clutch up, make sure the gearbox is fitted correctly and the cluster spins by hand freely, if it does then the clutch can be assembled. Start with a 1.00mm clutch shim fit the crown wheel, bearings/bush and spider, fit the tab washer and tighten the nut. Don’t fit the chain. Fit a standard drive sprocket oil thrower washer, fit the castellated spline, tap it down so it’s in place, fit the front sprocket.
You can check alignment in a couple of ways.
1) With a chain guide tool. This is an alloy or steel bridge that goes from one side of the gasket face to the other and a dial guage is mounted in the middle. Mount the bridge and gauge over the front sprocket so the dial gauge tip fits on the flat of the sprocket and zero the gauge. Carefully remove it and swap it around and place it over the crown wheel and let the point of the dial gauge touch the flat of the sprocket. Now take a reading, is the crown wheel plus or minus the front sprocket? If it is higher than the front sprocket then the 1mm clutch shim needs reducing by the amount, working from 1mm is much easier to work out. If the crown wheel is lower then the clutch shims needs increasing the same.
The allowance should be within + .002” – .010” (+ 0.05 – 0.25mm)
Originally these shims where available 0.8, 1, 1.2, 1.4, 1.6, 1.8mm. MB made in between sizes so you can get a perfect clutch set up. If you cannot get a perfect set up with clutch shims then a front sprocket can be raised up or lowered by 0.5mm either way using our drive sprocket oil thrower shims. No need to double up on the clutch shims.
FITTING CROWN WHEEL, SPIDER AND CLUTCH
It’s best to soak the friction plates in gearbox oil over night before you fit them for good. Once the crown wheel height is set then the clutch can be assembled. Do all this dry as the chances are you may need to do some tweaking. Make sure the clutch pressure flange slots down the clutch spider, this should be free and easy, if not slightly file it with a fine file as both flange and spider are usually soft in genuine items. Some modern 5 – 7 plate spiders and flanges are not perfectly matched from different suppliers, some of these can be hardened and can be tweaked with an angle grinder gently or a diamond file. How ever it’s done the flange must be free to run up and down. Whilst your at it check the clutch cork plates run down the crown wheel and also check the clutch steels on the spider, sometimes they need a quick file on the tangs, again these are soft.
The second limiting factor for a clutch to work apart from where the bottom cork plate drops to, is how far the flange can drop. This limiting factor is usually set by the clutch springs. WITHOUT springs drop a flange down into place and it will drop to the bottom of the crown wheel pivoting around the clutch nut and a bit of whats left of the cluster shaft, drop the bottom cork plate into position and you will see if it drops to the flange or locks up on the crown wheel. The limiting factor when fitted will be the springs, as most springs are too long and when fitted in position and compressed fully the springs go coiled bound and don’t allow the flange down far enough. When this happens in operation you think you are adjusting the cable tighter to allow for free movement but what you are doing is pushing the flange into a lock out position so you always get clutch slip or drag. We designed our special MB clutch springs to be strong and short so it eliminates this problem, others don’t design like we do so again beware, cheap is not best. Our springs compress in a vice to be coil bound at 14mm – others coil bound at 16mm giving our clutches 2mm of extra free movement, remember it’s this room that is needed to get clutches to part.
Other clutch conversions like the thin 6 plate in a standard set up will also lock out so the clutch doesn’t work, their recommendation is to get more free play by grinding the clutch center nut! Not my way of thinking, check the spring compression before grinding a clutch nut and cluster, there is no need. I made a tool so I could cut pressure plates up and re weld them into position so they could be extended further into the crown wheel, a simple idea no one else thought of! In the end we developed our MB RT extended clutch flange which cured the poor Innocenti design, this is all well and good but drops the friction plates too far at the bottom of a standard clutch spider and they just spin. This is why we made our own MB clutch spider which drops further down so the frictions don’t spin and suddenly everything works and you can add extra plates.
If you are not sure, assemble the clutch with no springs, It should assemble and the cork and steel plates should be free from top to bottom. Add springs and assemble it again with the clutch compressor, once the top circlip is fitted then unwind the compressor to let the clutch settle in position then turn the clutch compressor to just touch, then turn it 1 1/2 times to compress the springs, this is about the movement the clutch lever and actuating arm moves. You should be able to place a flat screw driver between a friction plate and a steel plate and they should have at least 1.5mm free play, this will work once assembled. If you don’t have this free play and you have to force the plates then you will have clutch drag problems, if you get more than say 2+mm then you may get clutch slip so add more or thicker plates.
CLUTCH ARM LEVER ON THE ENGINE
All models used the same engine clutch lever which is quite long, matched to the standard handlebar lever you had no extra adjustment to help problem clutches. Set up right with weak springs the pair worked fine. MB designed a shorter engine clutch lever – for the same movement on the handlebar lever the shorter engine clutch lever pulls inside more – parting the plates more.
Simple and obvious but the engine lever needs setting correctly to work right. Simple it maybe but nearly every complaint about a clutch can be this! The lever needs setting on it’s splines so when the clutch handlebar lever is pulled onto the grip the engine lever needs to be 90 degrees or more to the cable, this is maximum torque for the cable. Anything over 110/100 degrees or under 90/80 degrees and the cable design is inefficient. Always grease where the cable trunnion fits and grease the adjuster screw and around where the cable comes out of the adjuster screw, make sure there’s enough grease to stop water entering into the cable inner. We offer our improved MB improved adjuster block longer stainless MB adjuster screws, stainless MB trunnions and MB Clutch lever and MB return spring to make for easier clutch adjustment and operations.
HANDLEBAR CLUTCH LEVER
Along with the internal problems there was a very obvious external problem from day one and has been overlooked by all the dealers until we addressed the problem in the mid 80’s. The clutch lever design was too far away from the handlebar grip and people struggled to have an easy reach to the lever and also the action of the lever on it’s fulcrum didn’t have enough pull on it to part the clutch inside. This became apparent even more when using stronger springs and old NON nylon lined control cables and even worse with Sundance/bubble grips as the lever couldn’t get close enough to the handle bar to free the last part of the clutch, so setting up the clutch was much harder.
I looked at hundreds of motorcycle clutch levers and decided on a very common Yamaha item, it wasn’t a direct fit and needed the clutch housing and lever modifying, but it also matched the Yamaha hydraulic brake master cylinders which we were using. This lever was longer and stuck out of the side of the handlebars grips which was easier to hold and pull. The center of the 8mm pivot pin to the center of the clutch cable trunnion on the Yamaha item was longer giving more of a pull inside the engine. The down side to the increased fulcrum effect was the dog leg hits the grip before you get maximum pull – but still worked well. We used the same idea with our own purpose made MB clutch lever but made the dog leg shorter so it was neater and you could also still use our bar ends and to finish it off we used our own Yamaha TZR handlebar grips. We also offered our MB front brake lever to match the drum brake set up. The extra leverage of the MB/Yamaha lever meant you didn’t have to pull the lever as far to get the clutch to work, with that ‘extra bit’ clutch drag is eliminated which means the clutch is easier to set up.
If the original manual is to believed you should have 1/16” of free play between the edge of the lever to the clutch housing. Too be honest I’ve only ever got this to work with poor weak clutch springs and thin plates in a standard engine but this set up will have clutch slip with a strong engine. Setting up the clutch adjustment should be a case of having enough pressure on the lever and cable so when the lever is pulled in the kick start pedal should go down without trying to turn the engine over. Get the cable adjustment too tight and even though you don’t experience clutch slip in use the clutch is slipping and can burn out.
CLUTCH CABLE
With stronger springs the clutch lever needs to be able to compress the springs which causes friction in the lever through the cable and the left hand has to over come the pressure of the springs. Adding Vespa springs over Lambretta springs or adding brake adjuster springs inside Lambretta springs or adding a center spring will make it hard to part the plates as the spring pressure is too strong, add that with friction in a cable and lever and the capability of your forearm muscles is reduced. Providing the clutch inside the engine is built correctly and has free play then the clutch lever should be easy to pull in. In the old days this friction in the clutch cable was made worse with different quality standard clutch outer cables and how they were lubricated.
There are two basic types of outer cables
- Coiled round wire, these have no strength and compress when the lever is operated
- Coiled flat wire, this is stronger and works well
When Nylon lined friction free cables were introduced to us in the 90’s suddenly pulling in the clutch lever became easier. But a Nylon lined friction free clutch cable is not the be all and end all to a perfect clutch. Cable routing with any cable is very important, they need to be routed to be as free as possible with as little sharp kinks as possible. This is not easy with a Lambretta, think how and where the cable has to be routed, think about making the cable as straight as possible, obviously this is impossible because of the frames design. But think about trying to route the cable with as many kicks as possible, you can do this quite easily especially if your trying to fit a cable which is longer than it should be of which there are a few on the market. Our MB friction free clutch cables are cut to suit the Lambretta frame, they are as short as they need to be and do not need cutting so it teaches you to route the cable in its shortest straightest route.
MB Scooters Friction free cables
- Black
- Grey
CABLE LUBRICATION
Along with cable routing, lubrication is very important. Using the older standard type of cables needs gear oil running down the outer cable and the inner cable needs covering in grease as it’s fitted and both ends needs greasing where it runs into the lever and at the bottom end around the adjuster screws. Some used thinner 3 in 1 oils or 2 stroke, these oils tend to be thinner and runs down the cable drying out in the top section so needs doing more often.
With nylon lined cables there is no need to lubricate the outer or inner cable, but always grease around the lever and adjuster screws as normal. You can use a PTE or silicone spray which can help as well. Latest MB inner cables are 0.2mm thinner than normal – this creates less friction and makes clutch use easier.
6 PLATE KITS
I’ve pointed out the areas which cause clutch slip or drag, for a little more detail on how to fit engine parts refer to the Spanners manual. Providing you follow my tips then there is no reason why a standard new rebuilt 4 plate clutch shouldn’t work correctly. There’s no reason why a modern 5 thin plate clutch set up shouldn’t work………. except some clutch friction plates were to soft and would expand when hot then drag and slip. Some were too hard and would not grip and slip.
On powerful engines ultimately, the only cure for clutch slip is to move up to a 6 plate conversion. This adds an extra 2 cork plates and increases the surface area in your clutch. MB don’t claim to have invented the 6 plate conversion. What we have done, using our engineering background, is to make conversions that are durable, reliable and easy to fit.
Over the years we have done 2 conversions
- Early type 6 plate external clutch
- Later type 6 plate internal clutch
EARLY MB EXTERNAL 6 PLATE CONVERSIONS
Having gone down the stronger clutch spring route and adding extra Vespa clutch springs over Lambretta springs to stop clutch slip and trying various 5 plate kits I gave up! Perhaps I was producing higher powered engines than others many years earlier, I always found the way I rode with my engines I would find clutch slip. I always abused my own motors it’s the way I am and it’s the only way to prove what works, if I can not break one of my motors then a customer can not so it’s got to be good for my customers.
I eventually looked at a 6 plate conversion for one particular bike I had rebuild in the 80’s which was a Liquid Cooled Sx230 both in the cast iron route and TS1 route it suffered from clutch slip. Both versions where quick bikes it would lift the front wheel in 3rd and could do 60mph in second and that was a full body work road bike! Looking back it was so simple, but at the time it was complicated. I’m not confessing to be the first to invent the 6 plate conversion, racers had been using them for a few years these were all hand made jobs cutting up bits and pieces.
To cure clutch slip ideally you need extra plates to add friction, there’s not many performance bike engines using a 4 plate clutch is there! Basically I looked at adding 2 extra standard friction plates and measured what that difference would be, which was exactly 10mm using standard 3.5mm plates. By using the thinner 5 plate frictions you could add 8 plates. By cutting up 2 spiders and extending and welding them to be 10mm longer and doing the same with 2 crown wheels you can add 2 friction plates and an extra steel plate. This then means the crankcase side needs extending 10mm by adding a packer. Originally I machined down crank case sides but these got rarer so in the end we made 10mm CNC alloy packers. Some used 2 x 5mm steel packers and 1 x 10mm steel packers! HEAVY MAN. Race engines didn’t need packers but needed the crankcase side modify to blank off the kick start and the clutch actuating arm needed grinding to clear the new extended clutch, this was no good for the road so a kick start shaft needed extending the same 10mm and the slot altering so the plunger could lock on the 1st gear.
And this is how we did our external 6 plate conversions and it worked, we proved it worked even up to 40 bhp with our incredibly fast sprinter. After the first sample clutch which is still in operation today we made CNC clutch spiders which needed welding to a clutch spline from a donor standard spider. If our 6 plate conversion worked on our 40bhp motor then it was perfect on our 30bhp road engines so at last you could have a fast engine and actually use it daily and for the hundreds we did they are still working today 20+ years later and are still sort after as they never broke. Except kick start shafts which – if you didn’t use a SIL shaft – they would bend or snap, yes I did say SIL as these are the strongest of them all.
I was asked for an interview for Scootering many years ago ‘what was my proudest part I’ve ever made’ I had no time to think it was on the spur question, the answer was my 6 plate. Looking back there are thousands of parts I have made, this clutch conversion certainly is a quality product and it has proved it’s self. Today there are many parts as good or if not better that I have designed but I learn daily and move forward.
The only down side of the conversion was the crankcase was the crankcase side was 10mm further out making fitting some exhausts difficult, we went one step further with our exhausts where I designed them to fit a standard side casing or with a packer by just swapping a bracket around and required no extra cutting and welding.
MODERN MB INTERNAL 5/6/7 PLATE CLUTCH
Some times it’s a case of ‘why try to fix something that isn’t broken’ this was the case with our early external clutch kit, it worked so well. Ok it wasn’t cheap because of the CNC spiders and CNC packers, the rest was labour intensive and involved either using second hand supplied parts or modifying new Indian parts, but it worked for the people who wanted one and wasn’t bothered about extending an exhaust. Function came at a price as does all things well made.
I had looked at the external kit for years with the view to pushing the extra 10mm internally, my problem was, we had parts made in batches which cost us money. If I developed a new version we would have been sat with stock we couldn’t sell, this delayed me in bringing out our new clutch and others jumped in and made an internal 6 plate spider and took the lime light. One person threatened us with court action over the fact they thought I copied their design! Wrong, I had never even seen one! Anyway as usual it was a person full of bullshit and couldn’t prove intellectual rights to the 6 plate design………… funny my clutch was nearly 20 years old, fully recorded in magazines etc so I could have argued I design the 6 plate clutch but I didn’t, I’m not like that.
My new internal clutch was made with one off parts as usual by cutting up one of my external spiders and extending the spider downwards towards the gear box, this allowed extra plates in place with out them spinning. To get the plates in correctly the flange needed extending and welding to allow for the extra plates, but you could not get the magic 10mm but you could get enough room to fit an extra 1 standard plate or an extra two if using the thinner 5 plate frictions. Suddenly with our new spider and flange you could add extra plates internally which worked in a standard crown wheel, all very simple and I wondered why Innocenti never did this design, but then again I’ve given up wondering about Innocenti’s designs. To do this conversion the usual mods needed doing to the crown wheel to allow the bottom friction to sit far enough down. We then went one step further and redesigned our CNC lightened crown wheels to suit.
By using our new special designed MB spider, 46 and 47 crown wheels and MB extended flange with our MB clutch springs you could use all the other standard parts that a clutch is assembled with. This makes our clutch have the beauty of, if anything goes wrong you can use standard springs, clutch steels, frictions, top plate, clutch nut, washer and circlip supplied from any where! Unlike some of these new cassette clutches, you can also miss match crown wheels and spiders that others have also made with similar ideas. But non of these other 5 – 6 plate crown wheels or spiders used the ‘TRICK’………… our MB extended flange. They always add thin plates and bend this and that and customers complain all the time about setting them up! Ours are a straight fit, making them easy for anyone to assemble using the same methods as building a standard clutch.
MB Scooters Clutch assemblies
- Clutch assembly 46 tooth
- Clutch assembly 47 tooth
- Clutch assembly 5 plate friction/steel kit
- Clutch assembly 6 plate friction/steel kit
Clutch plate set ups in our MB internal clutch kit
- 5 plate kit – 5 x friction plates at 3.50mm, 1 x 2mm steel plate, 2 x 1.50mm steel plates, 1 x 1.20mm steel plate, 1 x 2.5mm top plate = 26.2mm
- 6 plate kit – 6 x friction plates at 2.50mm, 1 x 1.20mm, 1 x 2.5mm top plate = 25.5mm
- If you want you can modify to a 7 plate kit – 7 x friction plates at 2.20mm, 1st two steels at 1.50mm then 3 x 0.90mm steels, 1 x 3mm top plate
INFO ON MODS
- Standard friction plates do vary in thickness from 3.50mm to 3.65mm, thin friction plates vary from 2.60 – 2.20mm. You can mix thick and thin friction plates if you want, but fit the thin plates towards the side casing.
- You can swap steel plates to increase or decrease clearance inside the assembly, these are available 1.50mm, 1.20mm and 1.00mm (usually 0.9mm) and 2mm, it’s best to fit the fatter plates first as these take the hammer
- You can fit any top plate 3.00mm, 2.50mm or 2.00mm but be aware the top friction plate may spin so may need bending down to stay locked into the crown wheel
- What ever combination used add the friction plates and steel plates and measure them, 27.10mm is too much, 26.50 – 25.5mm is fine
- Our latest MB springs measure 13.5 – 14.00mm fully compressed, this makes for a much better freer soft feel clutch
I’ve taken the same ideas and redesigned the crown wheel, spider and flange so you do get that magic 10mm drop and you can get 11 plates internally with no packer! These are for our very special engines and are only required in silly bhp engines that we do.
For 99% of engines our internal 5 plate using standard 3.5mm clutch corks work perfect in engines over 25bhp, for higher powered engines just add more thin plates to gain friction making a 7 plate.
All very easy and very simple and I think if I’m asked again ‘whats your most proudest part I’ve made’ it would be one of my newer MB clutch kits.
LATEST LAMBRETTA CLUTCH’S
Today its a mine field – everyone is at it, back street Freds in a shed and dealers, these are made in the far east, India, UK, Europe. Its your preferred choice. Some assemble as with a standard set up and others are a cassette type motorcycle clutch. Most use 6 or 7 plates. I find these fiddly and horrible to work with. AF offer two types – Surflex and Indian and vary in quality and price. Measure the area of the 6 frictions and its less than a standard 4 plate kit. I’ve stopped working with these after them always slipping on the dyno! LTH offer a 7 plate version, bgm offer a 6 plate with 10 springs, Casa and others offer various clutch types.
Some are made from special parts so be careful if you need plates and spares these can be will be limited – that’s the beauty of the MB clutch you can miss match parts and get them anywhere!
STANDARD TYPE CLUTCH PLATES
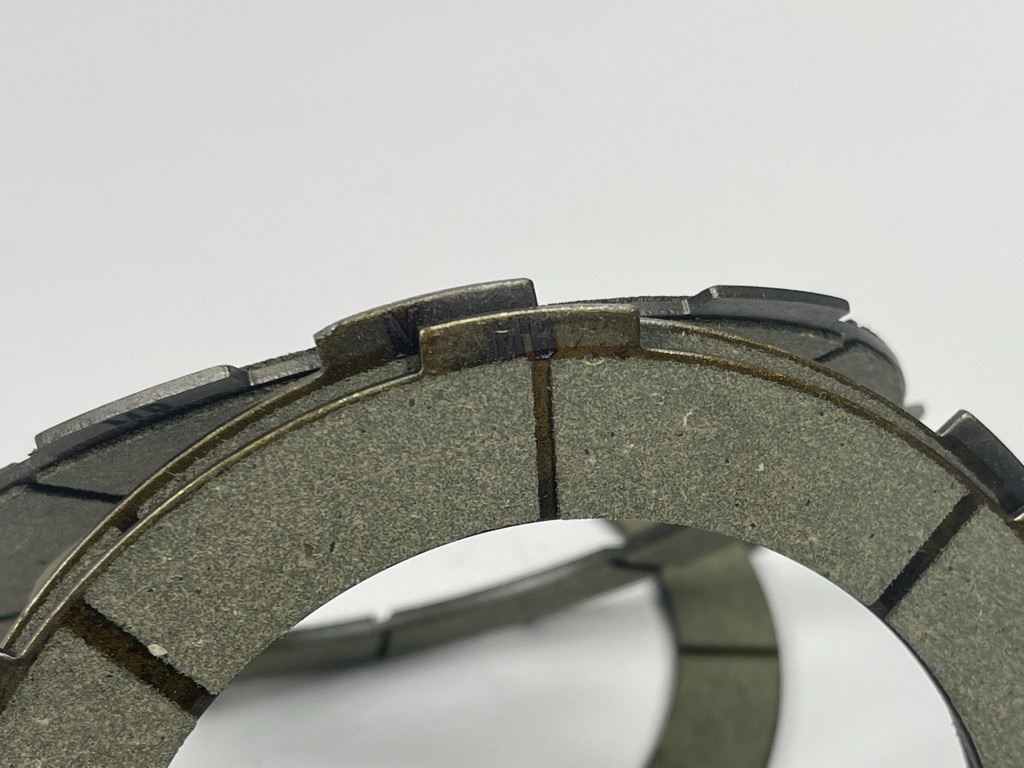
MB Clutch frictions, MB marked on the tangs
MB 4 x 3.5mm plates
CASSETTE CLUTCH
Various parts for a cassette clutch
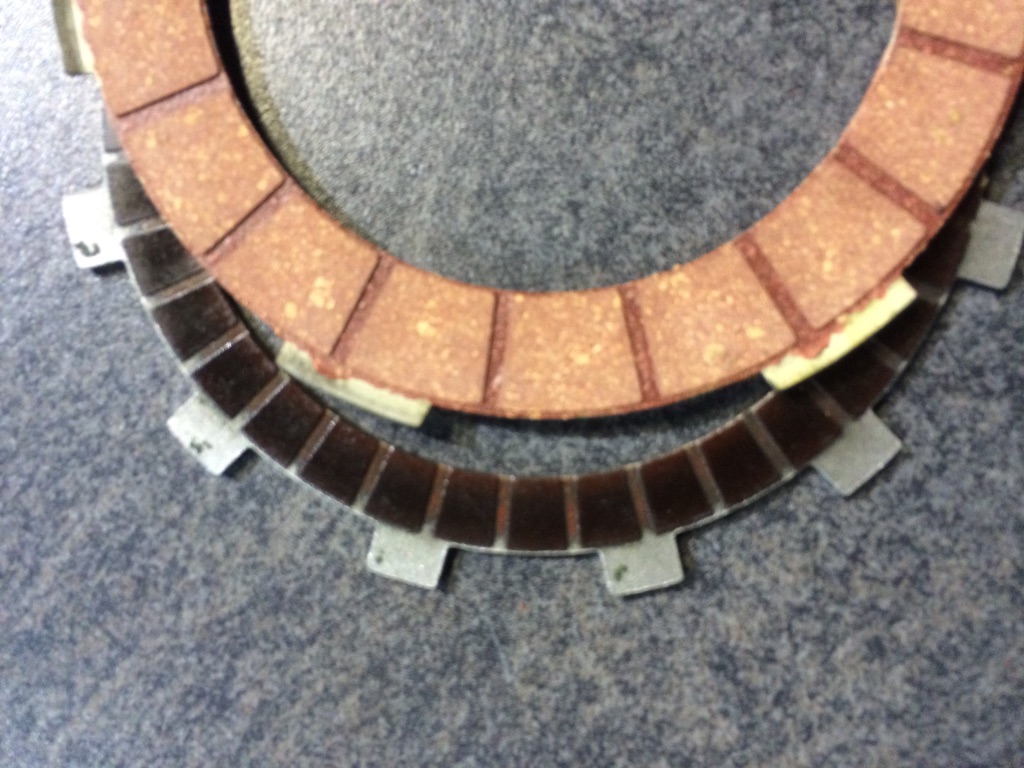
This shows the surface area of a standard Lambretta clutch friction plate compared to the cassette clutch plate, a 6 plate only has an area of a standard 4 plate!

This ones suffered clutch slip you can see the plates have burnt
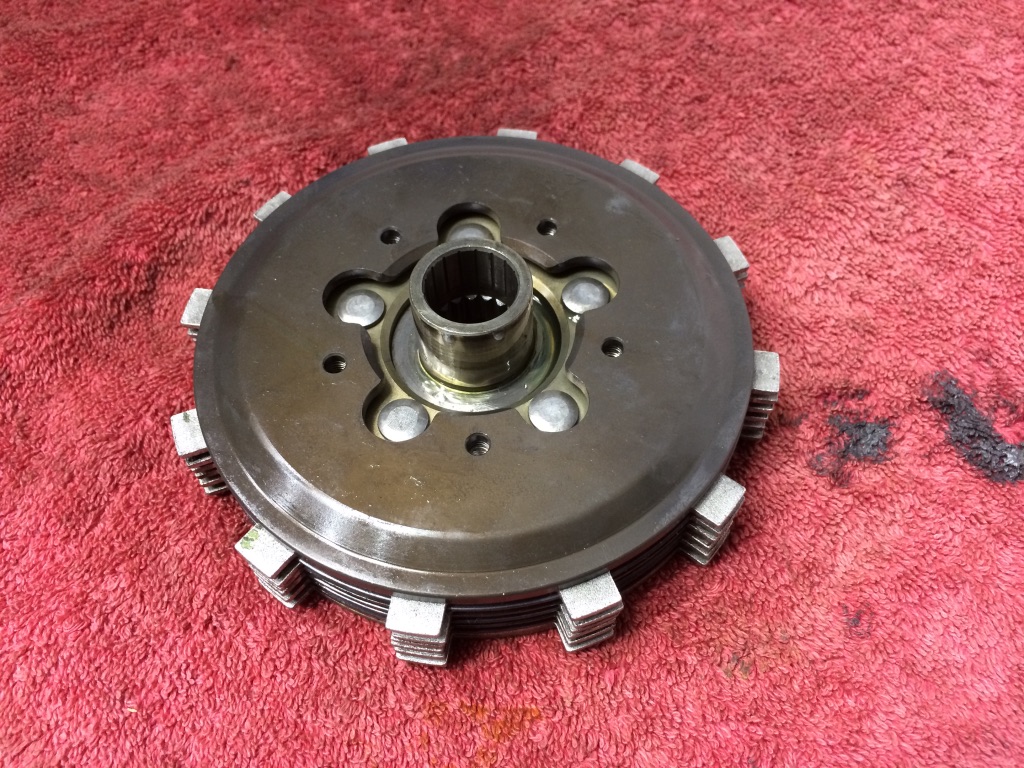
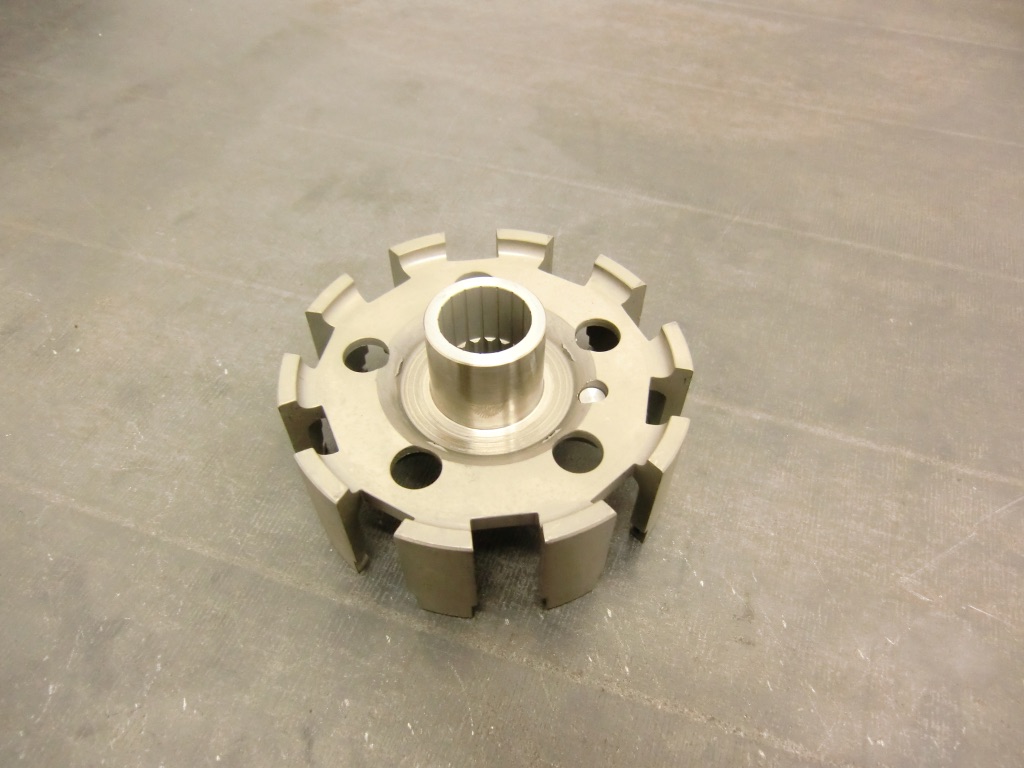
Cassette clutch built ready to drop into the basket
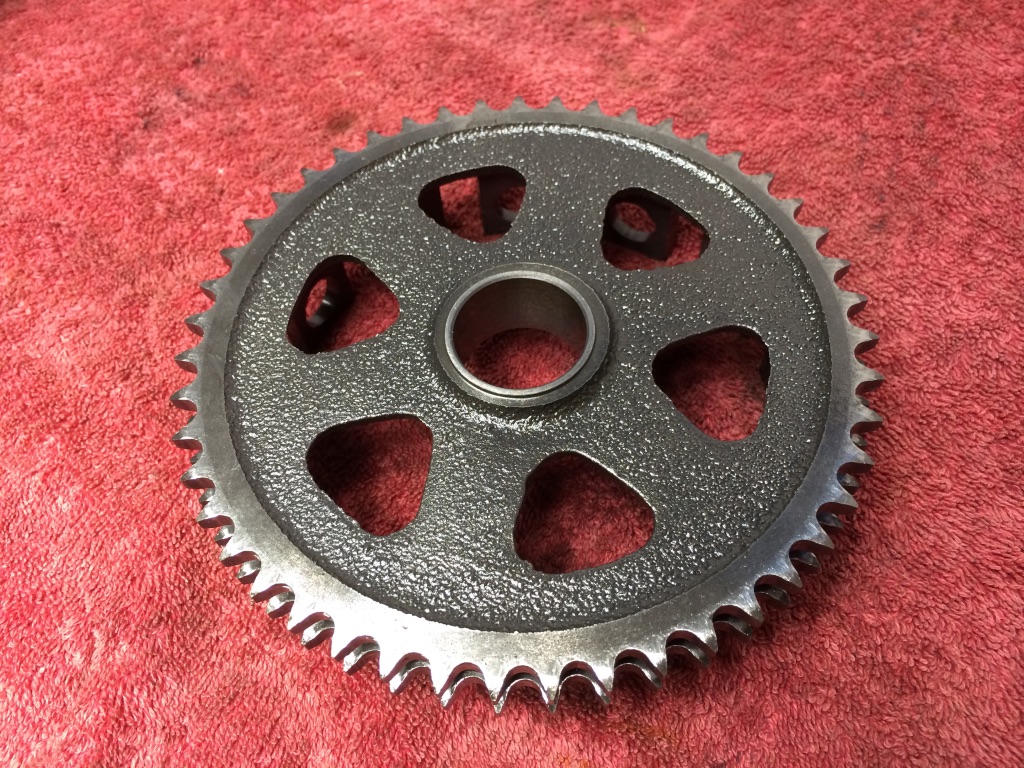
Rough casting for the crownwheel
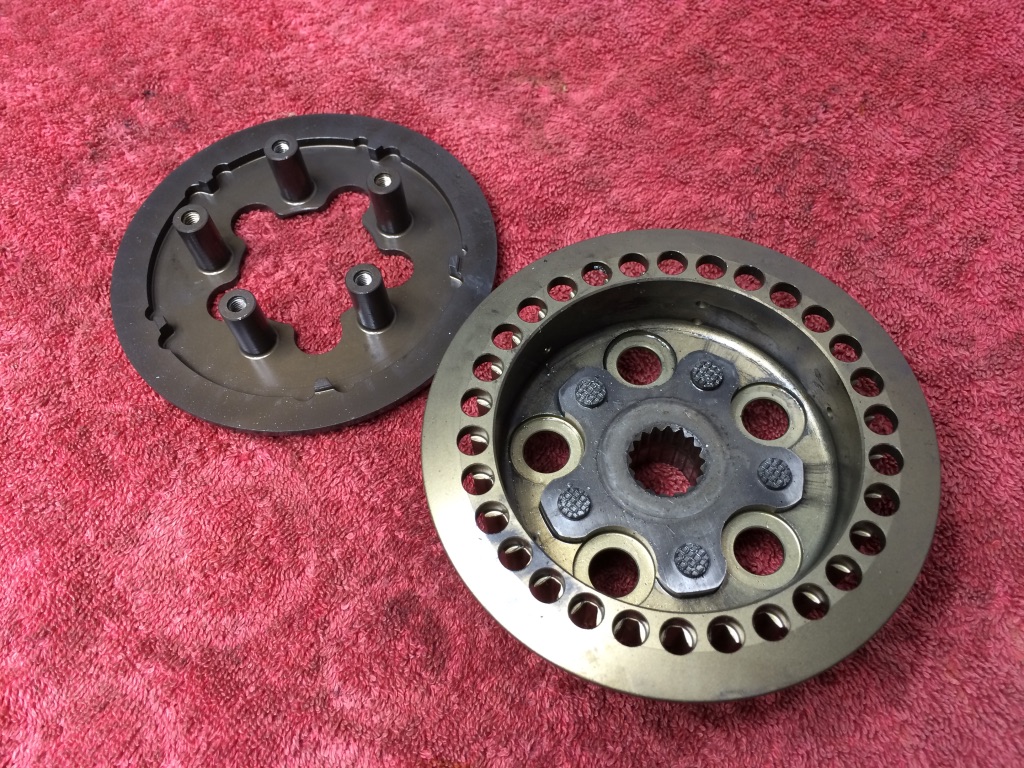
More parts of the cassette clutch, these pegs tend to break
MODERN MB CLUTCH ASSEMBLIES
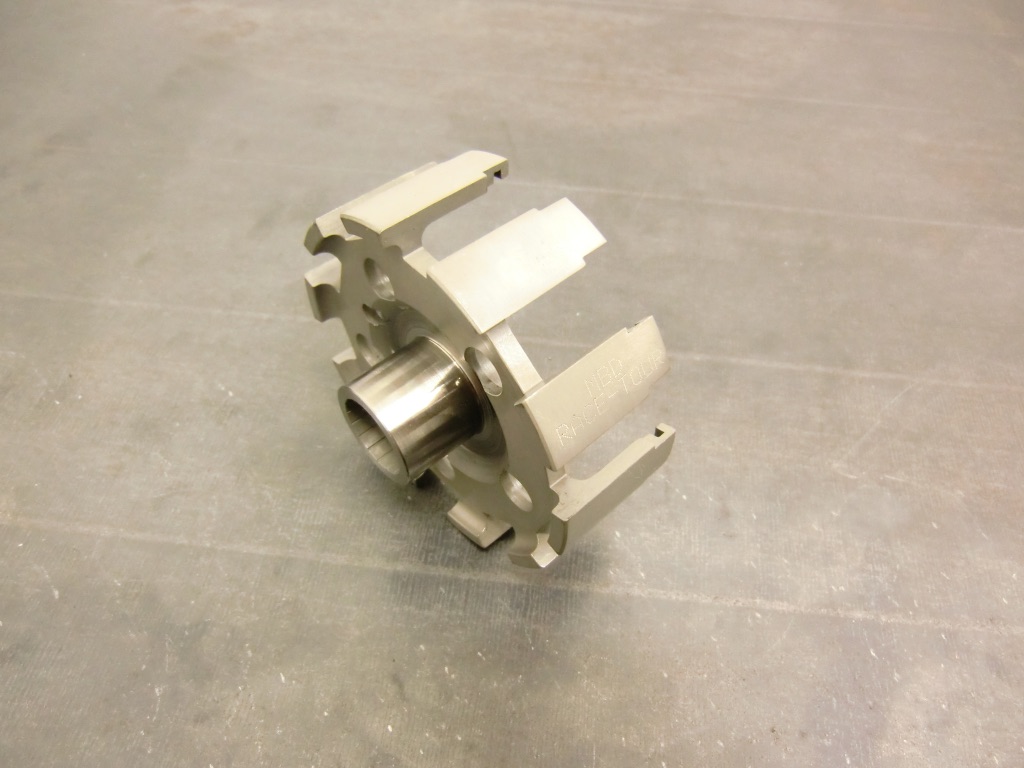
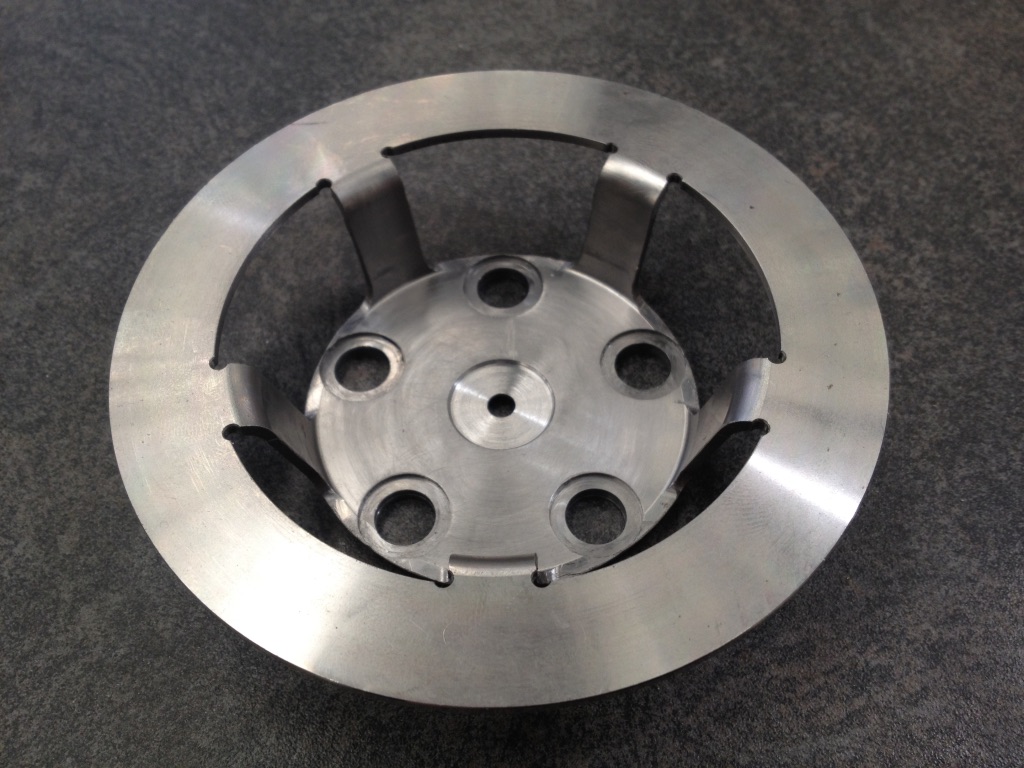
MB one piece extended CNC clutch spider
These are machined deeper to get more plate inside without them spinning the bottom plate
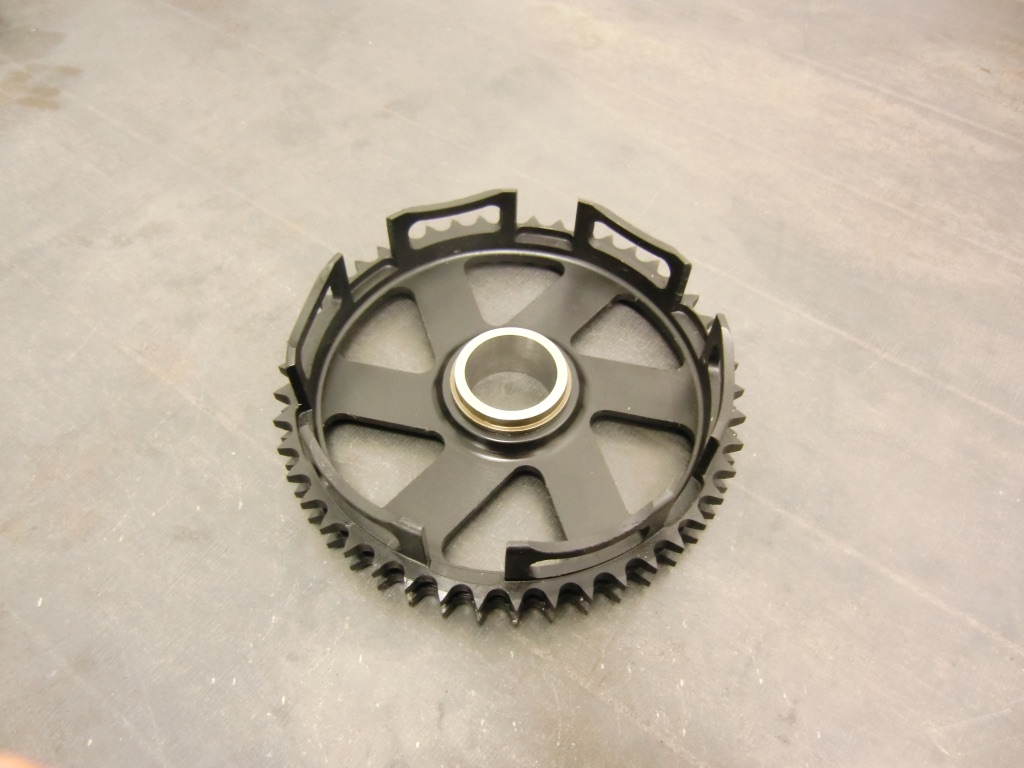
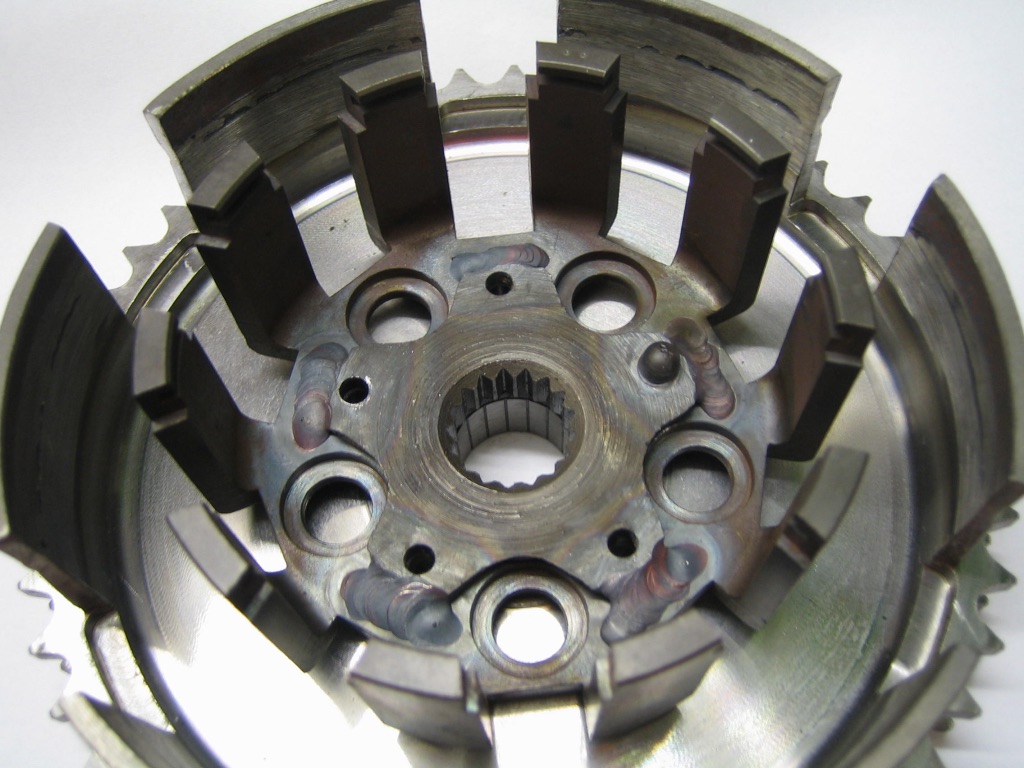
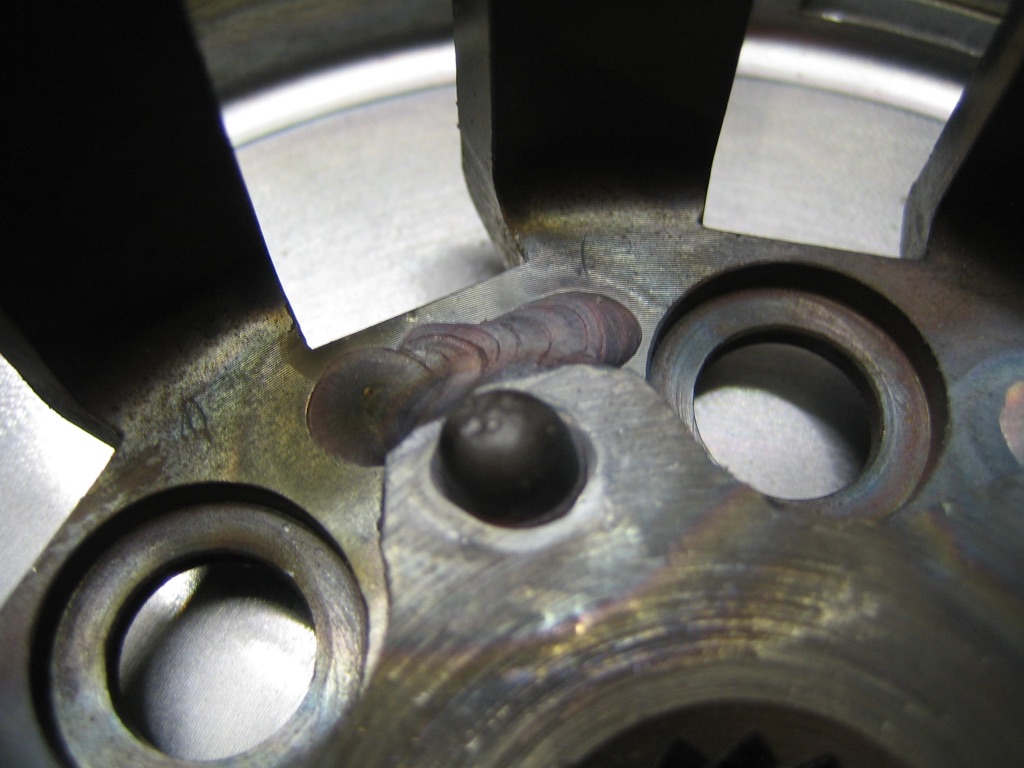
MB lightened 46/47 tooth crownwheels, some had a loose pressed in inner bearing some were one piece
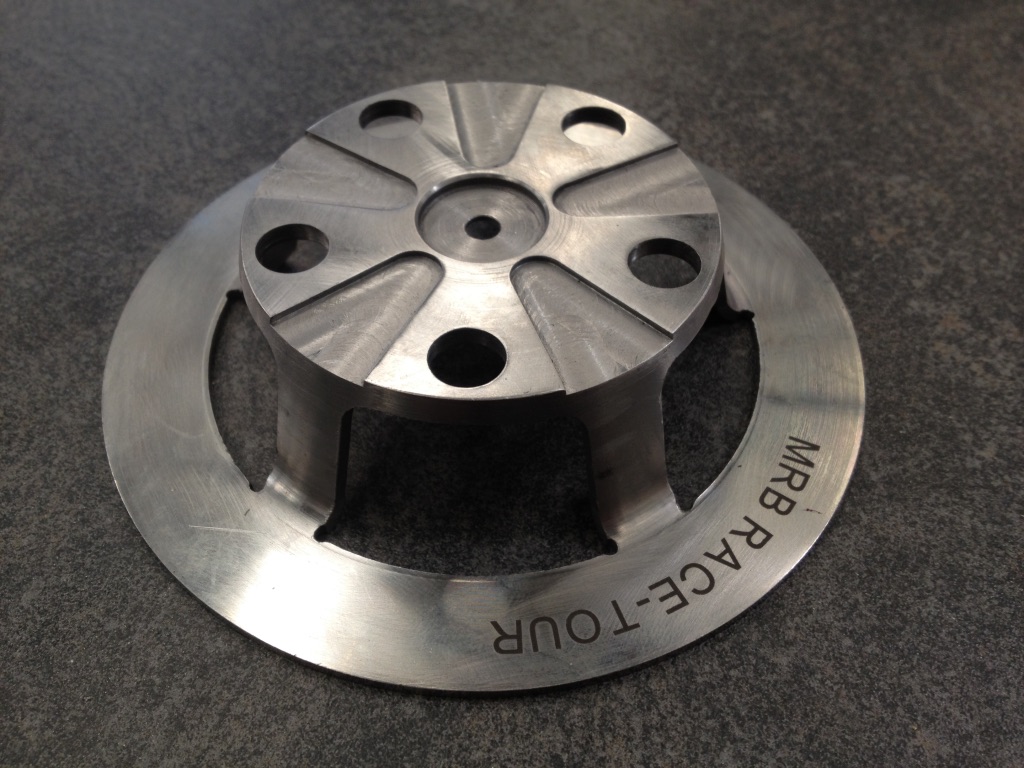
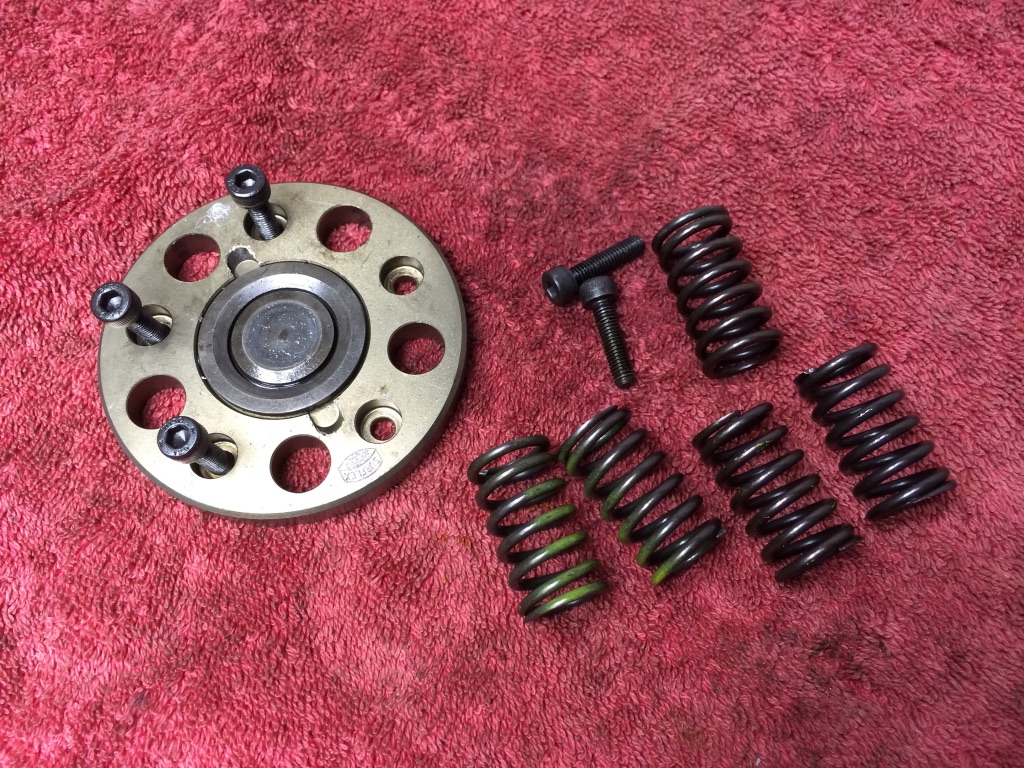
MB CNC one piece clutch pressure plate, deeper to take more plates
MB CNC pressure plate, note the recesses for the clutch springs
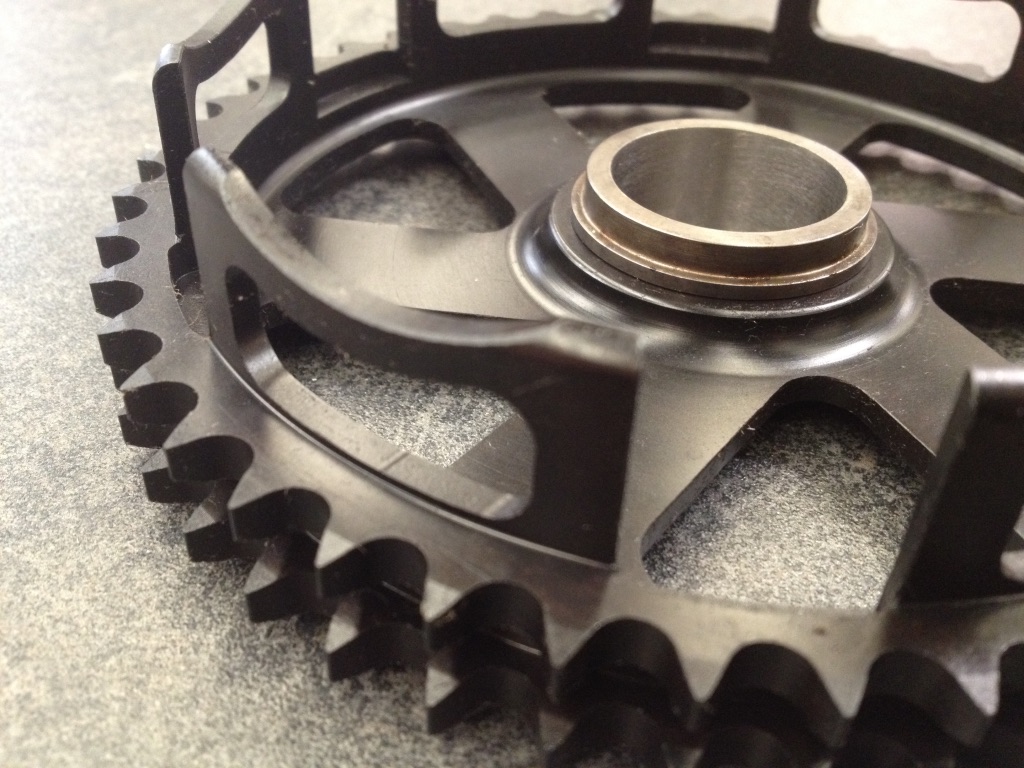
MB crown wheel, shows the quality

MB clutch nipples, you get 2 one for Li type and one for Gp type side covers, just use the one you need
OLD TYPE EXTERNAL CLUTCH KIT
Early MB external clutch, which used a 10mm crankcase side packer
We had to use the splines from a standard spider and weld on our extended spider

Our external conversion used 2 crown wheels welded together and machined to suit
Any questions ask Mark mark@mbscooters.co.uk


