


SMALL BLOCK TO LARGE BLOCK CONVERSION
There have been a number of engine casings from the early days of the Series 1. Forget the TV175 Series 1, it was totally different so does not count. The Series 1 set the standard design for 6 decades, very little has changed over that time.
The only difference from the Li125/150 Series 1 to the Series 2/3 Li, Sx, Tv or Gp casings is on the drive side, the casing was scooped out to accept the drive side oil thrower washer in and attempt to improve the drive bearing area. All the casings are basically the same but there has been tiny changes, an extra exhaust mount was added under the casing, stud sizes increased for the main exhaust mounts, some had grease nipples, engine mounts changed but the casting itself was the same, apart from the very important, if important engine number!
A 200 engine casings are the same as the early models but the crankcase mouth was increased in size to accept the large cylinder and the 4 studs were moved out to suit. Later SX200/GP200 casings varied from the early TV200 and early SX200’s as the casing mouth was slightly more beefed up (not for strength but shape).
Basically that’s it, Innocenti produced 2 different casings! All internal parts gearbox, clutch, crank and mag housings are all interchangeable between the Small Block 125, 150, 175 to the Large Block 200’s. The down side is a 200 cylinder can not fit on a Small Block casing and a 125, 150 or 175 cylinder can not fit on a Large Block casing.
There’s no substitute for cc’s as they say, dealers and tuners have tried to improve engines capacities over the years, this can be done in a number of ways
- Bigger piston
- Longer stroked crankshaft
But you are limited with the piston size based on cylinder wall thickness as explained in the Small Block section to 66/68mm and 72mm as explained in the Large Block section. The stroke of the crankshaft can be swapped quite easily to gain cc’c but it wasn’t until the 1980’s that these came along as explained in our crankshaft section.
Some have taken a 200 cylinder, bored out the cylinder studs and turned down the spigot to fit into the Small Block, it’s not a conversion I have ever wanted to do there are too many problems for long life. If it was a good conversion then all the dealers in the last 40 years would have done it, they haven’t so it must say something. Some people say they don’t have problems with these kits, personally there are better ways to improve a Lambretta engine.
These days for ease we would recommend our Race-Tour 195 cylinder kit where we see around 20bhp very easily and then add a 60mm crank and you could turn a boring Small Block into a modern day 205cc with very reliable power. Whatever you do you will need to buy a crank and cylinder, this way you save money on the casing.
There are plenty of big bore kits for the Small Block and Large Block but the demand has been from some people to increase a Small Block to fit a 200 cylinder.
SPANISH AND INDIAN SMALL BLOCK CASINGS
There is, however another version of the Small Block! These were originally made in Spain for the Li150 in the early 70’s. This new casing was actually a 200 casing but the spigot area where the cylinder drops in was different. The Spanish had tooling for the 200, by swapping a small part of the tooling at the crankcase mouth one casting could be a Small or Large block. This meant a Small Block casting had more material around the the transfers but had the smaller transfer feeds. In later years SIL did exactly the same. As an engineer it’s such a simple idea, why didn’t Innocenti do this from the beginning in the 1950’s. The fact is, the 200 engine came much later on through demand from British Scooterists who wanted a higher powered bike than the Tv175, the 200 engine was an after thought! Done the other way round and it would have saved money on tooling. Suddenly there was potential to convert Small Blocks to 200cc.
SPANISH 125/150 CONVERSION TO 200cc
I first looked at these conversions in 1988. Tv, Sx and Gp 200 casings were never that common, if they were they were knackered, everyone had piles of Small Block casings that no one wanted. Everyone wanted 200 blocks, especially when the TS1 turned up. SIL did supply 200 casings but these have always been intermittent on supplies and quality. There was a time when we wouldn’t have touched these Indian casings, but needs must when you have to. Nearly every 200 casing that we came across needed welding and thread repairs. I too, had piles of Spanish Small Block large faced casings, I looked and thought……. If I plug the holes, then re drill 4 new ones and bored out the casing a 200 cylinder would fit! And it did and worked, and as far as I know I was the first to do it or to offer it commercially. The first conversions used threaded 8mm alloy bar screwed into the stud holes, loctiled then filed flat. I wasn’t happy with the first few as the half moon plugs eventually worked loose, easily cured by welding up the holes using strengthen alloy welding rods.
These conversions were steadily becoming more popular, in the end you had to weigh up spending a lot of valuable time doing conversions over using what was available and was nearly the same price, it was much easier to buy and sell and use an Indian SIL 200 block which we did for many years and the conversion was put on a back burner!
Well apart from the fact it saved me money when doing some Group 5/6 engines where it gave me more scope with transfer port directioning. These engines were getting welding to increase port size anyway, so why use a 200 when a spare cheap Small Block was available.
This was when SIL casings were easy to get and when they were cheap. Today the casings have dried up and have increased in price three times as much in two years. We have been offered bare casings from Indian wholesalers for the same price as we were retailing them!
SIL also did as the Spanish had done and manufactured the same casings, these are rare in assembled engines and bikes from India but are available new.
THE CONVERSION
The job is quite involved and needs a skilled welder and machinist to convert a casing. You need a totally gutted engine casing, ideally with the drive bearing and plate still fitted, it needs de greasing then the 4 stud holes grinding out into a V shape. The casing needs pre heating getting it ready to weld, this usually finds porosity holes and cracks in the casing where it’s been ground out, which until heat is added and the oil comes out you can not see by eye. 99% of casings are like this, so again you have to grind or drill into as many of these holes as possible to get rid of the oil and find solid alloy to weld on. Again you need to pre heat as a big casing zaps heat away from the welder and you need heat. Even a second time will find more holes and oil that has soaked up over the years, so you may have to re drill the holes again. If you don’t, these holes spit and spurt black carbon like a mini volcano that will just not disappear even with a very good water cooled TIG set. It takes skill to get behind this contamination, bring it to the front and get a good weld from the bottom upwards. The problem is you can not see underneath the weld and it’s so easy to fill over a hole to hide it. But machine into it and there will be a hole! It’s common, you see it all the time and it can not be avoided! The trick is – do your best! I use a TIG set with a self cleaning High Frequency unit that cleans the alloy as it goes, without the HF it would be impossible to weld correctly. TIG is by far the best way to alloy weld. I have seen casings from the 1960’s gas welded and I’ve seen people MIG weld them……. this does not work, so if you are going to have a go yourself, don’t weld this way!
Once the 4 ground out holes have been welded and you make sure the top face has the weld high enough. Then the casing needs fitting and clocking up square in a vertical miller. You can machine the face flat, this is only needs around 0.10mm 0.004” removing to square up the welding, the spigot needs boring out and drill and tap the stud holes to large block sizes. Then the casing needs flipping and the mag side face needs flattening off as the weak alloy near the transfer port sags and usually anything up to 0.5mm needs removing. We supply thicker mag gaskets to help here upon assembly of a crankshaft to allow for crank to mag housing clearance. When welding a casing you do get distortion, it can not be helped, as with the mag face sagging the hole for the mag housing deforms so a little grinding and polishing with a flap wheel helps to fit the mag housing. Depending on what cylinder is been used the transfers will need tuning to suit as well.
That’s it a cheap 125/150 Spanish casing turned into a 200 block and from the outside you can not tell and it keeps a matching engine number if need be!
As mentioned new casing prices are increasing. Second hand Tv200 casings where fetching £600 and some years later I’ve seen them sell for over £1000! Where as you can pick up a 150 casing for only a few pounds and if your lucky one may be a Spanish casing cheap enough to spend on this conversion!
IDENTIFYING A SPANISH BLOCK
The easy way to identify a Spanish casing is to look in the casing where the chain adjusters go. There is a little triangular mark like an upside down kite mark near the engine part number. Also Spanish casings didn’t have a rear brake cam grease nipple. Usually I like to do batches of these casings. A dealer brought a hand full to convert – everything was going to plan until I got to boring out one of the mouths, something wasn’t right the face looked thin. I realised it was just a normal 150 casing but couldn’t understand why such a simple mistake! To be honest I never checked I trusted the dealer to have checked, when we looked it had the kite mark! When I checked the engine number it was a very rare Winter model casing! So always beware! Check it out! On this one we got around the mistake by using liquid metal on the outer edges of the transfer ports.
EARLY SMALL BLOCK 125/150/175 CONVERSIONS
This simple mistake made me look at the early Small Block casings. You have to weld the casing for the conversion, a bit of extra weld to the outside of the transfers and you could do the conversion………….. but top and bottom of the face was to thin………… SO if you welded all the way around and built up around the transfers ports you could convert an Early Small Block to a 200 engine!
And so this is what we do now, it’s much more involved, harder to do and takes much longer than the Spanish conversion as all the outside weld needs grinding, chamfering and cleaning up to look natural. And you can keep your engine number!
If you are adamant that a really well set up 195/205cc kit is not for you and you want a 200 and keep your original engine casing then we can now help you out. As explained these conversions take time, many years of experience and expensive equipment and are done as one off jobs! Not saved up into batches of 10! So the price is reflected in the job. When you check the links to our pricing, you will think how much? Well we value our time, we do not work from wooden sheds with cash only payments.
To do this job you need expensive equipment, there are no short cuts, 4 hours later without a break a conversion should be done!
- Drill, die grinder
- Tig welding machine, gas welding equipment
- Milling machine, boring and mill tooling
- Die grinder and bits
Compare our work and parts to others and you will see its no where near LIKE for LIKE in workmanship and quality.
- Small Block later type Spanish 125/150 – 200 and later Indian 150 converted to 200cc
- Small Block early type 125/150/175 – 200
- Stage 1 and 2 transfer port tune
- Stage 3 transfer port tune
To do the work we require the casings to be
- Degreased and clean the best you can
- All external studs removed
- Dowels removed from the side cover
- Leave the drive bearing and drive plate in place
- If not these things take time so we have to charge a little extra
- We need your mag housing to check fitting
- We need your cylinder if you want the transfers matching
- Ideally a perfect casing, no cracks or thread repairs, but we can do these as well
Showing how a Spanish casing is ground out on the inside of the casing ready to weld
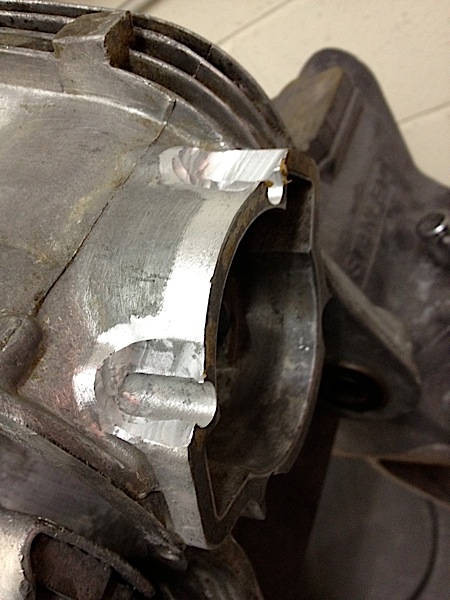
This is a 125/150/175 early small block casing ground on the outside
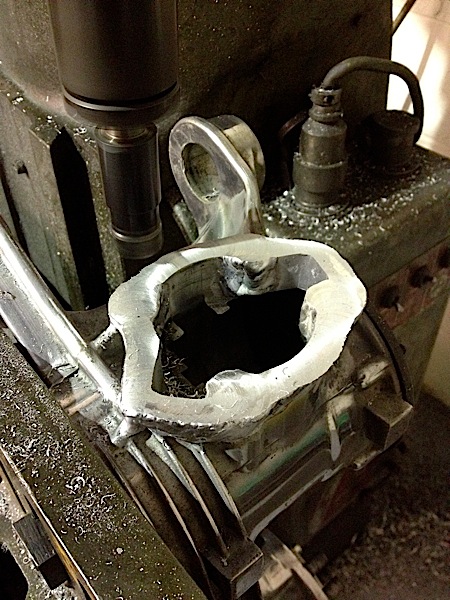
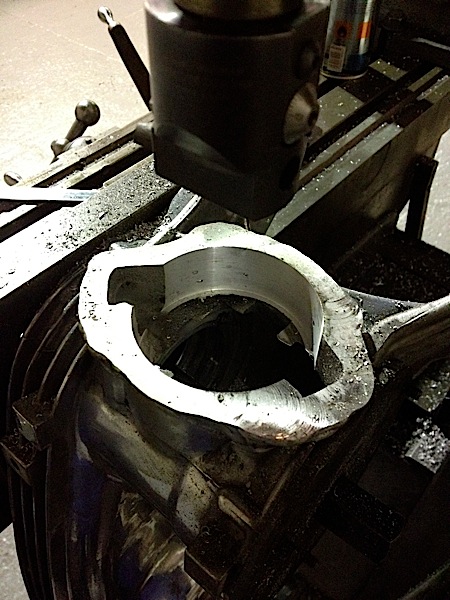
Small block casing fully welded all the way on the outside set up in a milling machine to clean up the welding
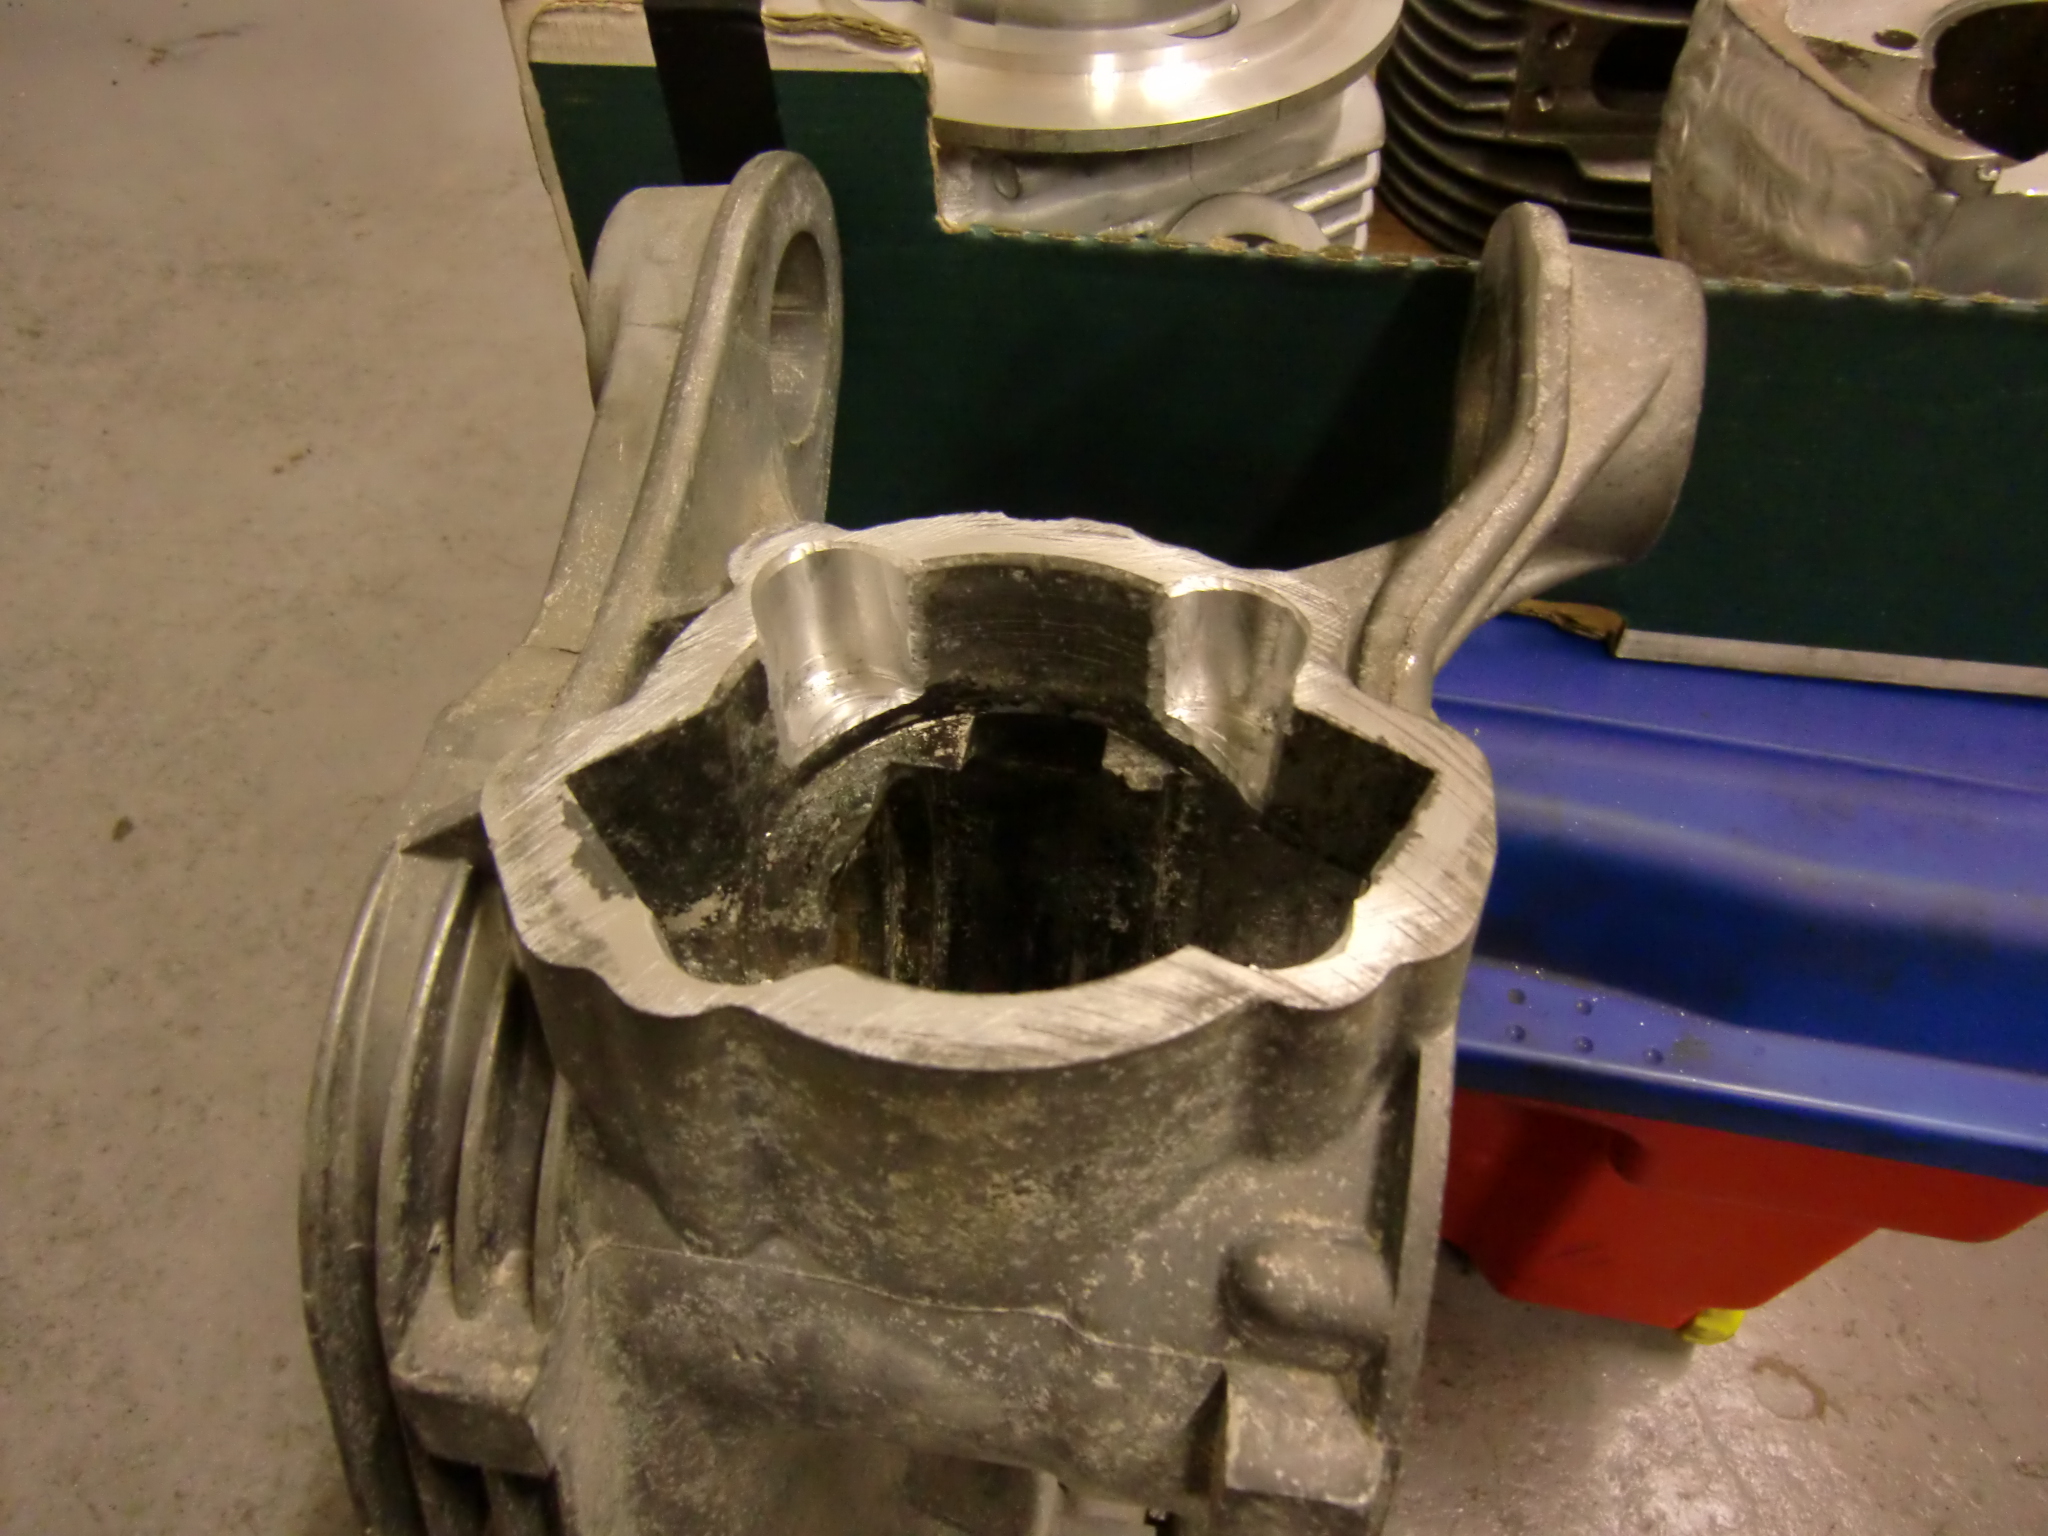
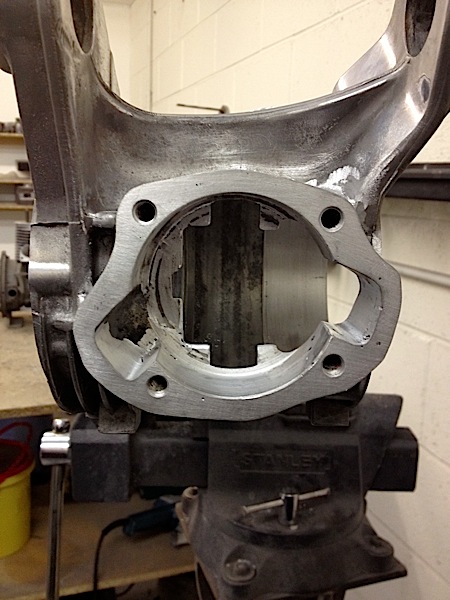
Casing bored out to large block
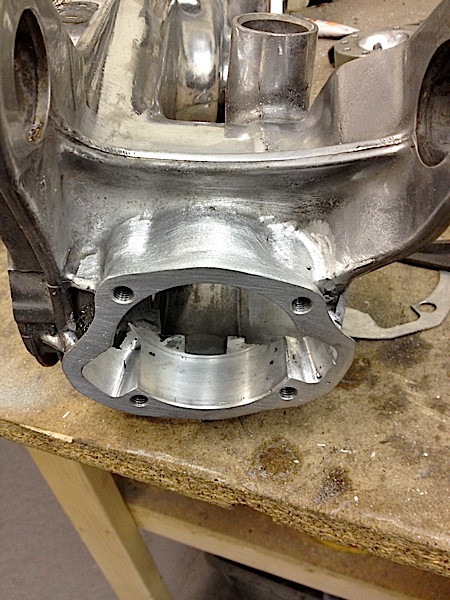
Small block bored out, machined flat, transfers tuned to suit a large block cylinder and the welding is clean up
Transfers part tuned, this depends on what cylinder is to be used.
Note the holes in the welding! These can be porous and can leak on a leak down test. They especially can leak from the 4 stud holes and shows at the cylinder head nuts on a rebuild. A simple cure is loctite the second half the cylinder stud threads that screws into your casing, this seals them and stops the studs rattling loose! If a casing leaks to the outside theres nothing for it but drill out the hole and start again or some have used liquid metal. Today – our new welder hardly ever creates these holes.
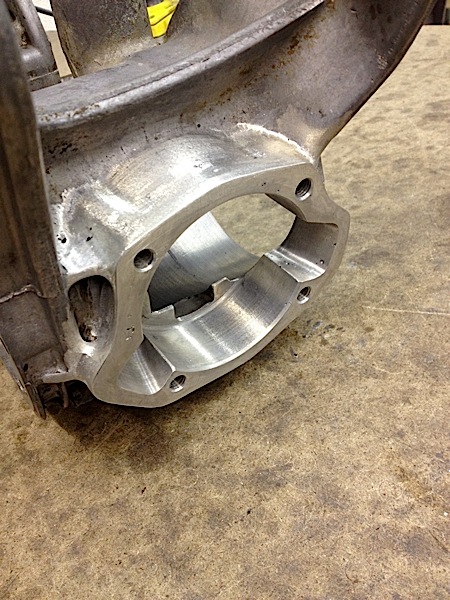
All areas are cleaned ready
Ask mark@mbscooters.co.uk


