


REPAIRING YOUR OWN LAMBRETTA THREADS
If you’re not an auto fitter or some kind of mechanical engineer the chances are you don’t know how to repair a thread correctly, without giving it to someone who does know how to repair a thread.
But beware – there’s plenty out there, that says ‘they know what they are doing’. They have a go and causes more damage than good – this is the majority of repairs I have to do – repairing other peoples poor work!
I’m going to show you how to repair threads the correct way using our own MB thread inserts and MB stepped studs. But will also cover Helicoils, Timeserts and Tappex inserts. But we need to start with some basics first so you understand what needs doing when.
A thread is the hole, where studs and screws turn and screw into the casing or a casting. All Lambretta threads are the standard metric right hand thread. This means you turn the screw or nut clockwise – ie right hand to tighten up – left hand to undo. The only threads used in a Lambretta that are left hand are the flywheel nut thread and the hub stud threads. These are left hand (anti clockwise) so as you’re driving or running the engine the thread is constantly tightening its self up through rotation.
Lambrettas use various thread sizes and thread pitch (the distance between each thread).
LAMBRETTA THREAD SIZES;
- 3 x 0.5mm – Head light rims, head set switches, some rear lights.
- 3.5 x 0.5mm – Some rear lights.
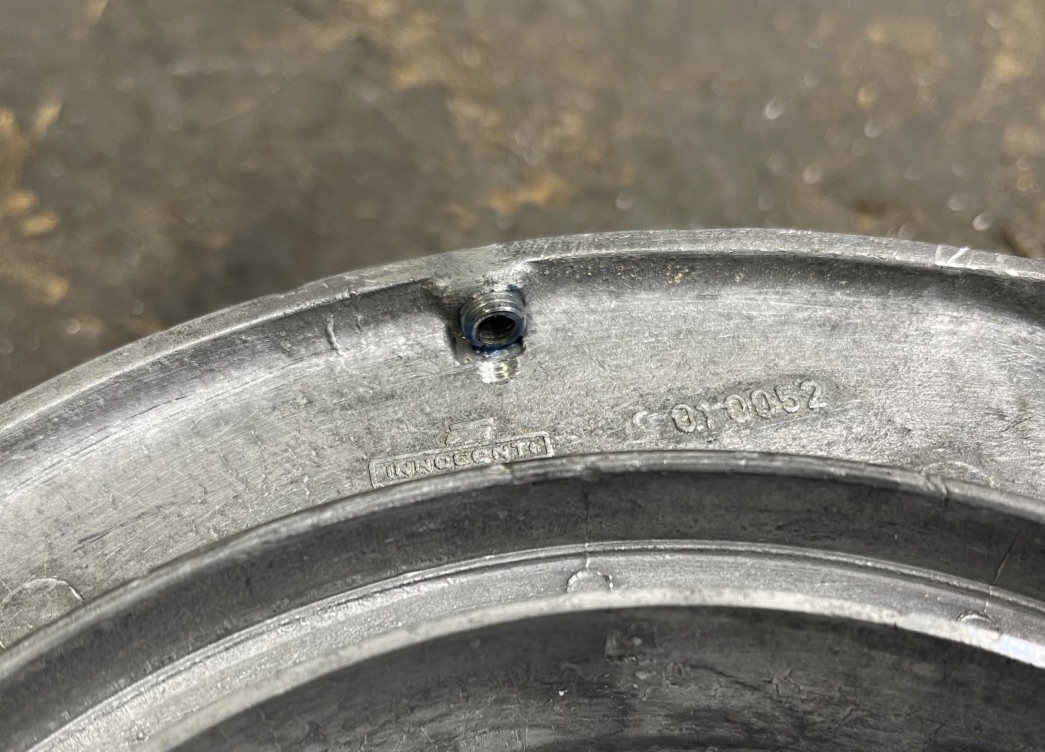
- 4 x 0.7mm – Mag housing sealing plate holes, horncast horn grill holes, early headsets
- 5 x 0.8mm – Horn castings, mag housings, headset tops.
- 6 x 1mm – Engine threads, Li/Sx fork buffers, frame, front hub,
- 7 x 1mm – Engine gearbox, damper fork links, Runner dog leg.
- 8 x 1mm – Crankshaft drive side thread – this is a special fine thread only used here
- 8 x 1.25mm – Engine cylinder stud, main exhaust mounts, brake pivots, wheel nuts, seat
- 10 x 1mm – Hub screw holes are a special fine left hand thread, hub nuts are 8 x 1.25mm
- 12 x 1mm – Crankshaft flywheel nut thread – this is a special fine left hand thread only used here
- 12 x 1.25mm – Some fork link bolts
- 12 x 1.5mm – Some fork link bolts, hub spindle
- 14 x 1.5mm – Gear cluster
- 16 x 1.5mm – Engine bar, rear shocker mounts, layshaft
LAMBRETTA TAPS
Taps are used to clean out or cut new threads. This could be a nut that’s a bit rusty and doesn’t screw down easy. It could be used to clean out threads on parts that have been painted, powder coated, chrome plated or zinc plated. Or can be used if you drill a hole then cut a new thread. Like if you’re going to repair a thread thats stripped and you tap the next oversize to fit a stepped stud.

Various threads used in a Lambretta
OTHER TAP USES
- 3.5 x 0.5mm tap – is also used to tap out headset head light rim holes when the 3mm thread has gone.
- 4 x 0.7mm – tap is also used to tap out headsets where the 3mm rim screw has pulled out and you can not use a 3.5mm screw.
- 6 x 1mm – tap can be used to tap out damaged 4mm threads when using MB oversized thread repair inserts – early horncasts.
- 7 x 1mm – tap can be used with MB thread inserts to 7/5mm, and used for stepped stud repairs.
- 8 x 1.25mm – tap can be used with MB thread inserts 8/6mm and used for stepped stud repairs.
- 10 x 1.5mm – tap can be used with MB thread inserts 10/6mm, 10/8mm, 10/7mm and used for stepped stud repairs.
- 12 x 1.5mm – tap can be used with MB thread inserts 12/8mm.
LAMBRETTA DIES
There are three types of ‘die’
1) Split die – these are used with a holding handle that can be adjusted when cutting threads. You can adjust so the thread can be cut to the correct size. These are only really used when making fresh threads by hand to a round bar. These are handy and can be used to clean damaged threads easier than the fixed die nut through the adjustment of them. Ideally you use the holder which should have 3 screws. Leave the two outer screws loose and tighten the centre screw which spreads the die. If you cut like this it doesn’t cut a full thread to size. Then you undo the centre screw and tighten the two outer ones slightly and keep doing it until the threads are cut correctly and a nut screws down the thread perfectly – good for mushroomed heads(but ideally first chamfer the mushroom off).
2) Round fixed die – these are similar to the split die without the split, (but you can use these and cut with a 1mm grinder to make a split die). These need a die holder to use. These are used to run down and chase a thread on a screw or stud to repair it.

Round fixed dies, you can cut a slot in them to make a round split adjustable die
3) Hexagon die – these are an easy to use tool. They come with a fixed thread, looking like a big nut with a thread in it. These are used to run down and chase a thread on a screw or stud to repair it. Just use a spanner or socket with these.
If you’re really into working on a Lambretta, a professional/enthusist would keep these dies for restoring, rebuilding and repairing a Lambretta.
- 3 x 0.5mm
- 4 x 0.7mm
- 5 x 0.8mm
- 6 x 1mm
- 7 x 1mm
- 8 x 1mm
- 8 x 1.25mm
- 10 x 1.5mm
- 12 x 1.25mm
- 12 x1.5mm
- 14 x 1.5mm
- 16 x 1.5mm
THREAD FILE
There is a tool called a thread file, as it says it’s a file but usually has 8 sides with all different thread pitches, these you run around a damaged thread to re cut the threads to repair it. There are inside and outside thread files – too be honest these are hardly used if you have a good selection of taps and dies. The only time you would really need a thread file is to clean up damaged steering column threads where the threads are really too big to use a tap and die and you hardly ever need to repair these threads.
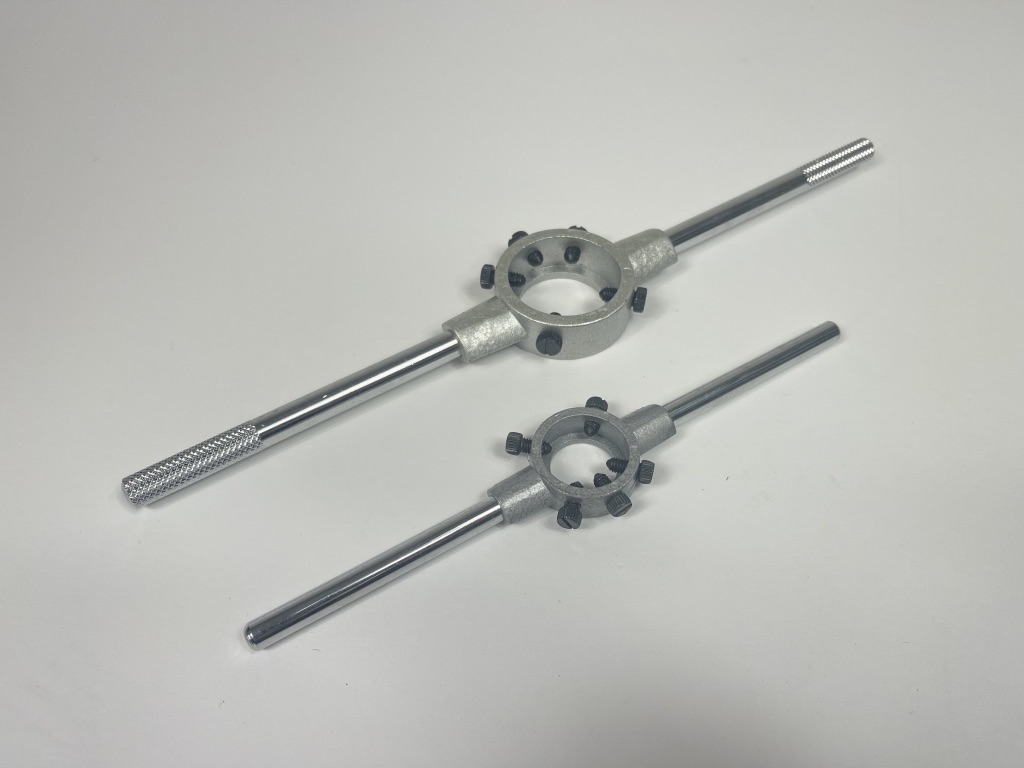
HOLDERS
There are various handles/tools to hold taps and dies. If you’re going to tap a hole, you’re going to need a tapping handle or a tapping T bar holder. These are adjustable to suit the different sized squares on the taps that stops the taps spinning with the tool in use. When you’re tapping, you need to control and hold the tap to cut the threads. Split and round dies need a special handle to hold them and make the thread cut at different sizes, then adjust with 2 screws that closes up the die. Hexagon dies use a plain spanner or socket.

Tapping T handles
Fixed and split die holder
TYPES OF TAPS
There are so many taps. If you’re an engineer or CNC machinist then you know all about it. It’s a mine field! With taps for this and taps for that and all the different versions for the steels used these days!
We’re only concerned with basic hand cutting taps, thats all you really need on a Lambretta – unless, like me you have to do some serious tap work in hardened broken studs.
Normally hand taps come in a set of 3……
1) Number 1 ‘taper’ tap with 7/10 threads tapered, these start a new hole
2) Number 2 ‘plug’ tap with 3/5 threads tapered, these increase the hole size and form a full thread but still has a taper so doesn’t form the thread all the way to the bottom of a blind hole, these are the ones we sell as these can do most jobs and fit our inserts and stepped studs.
3) Number 3 ‘bottom’ tap with 1 thread tapered, these will form a thread all the way down a blind hole like a hole in an end plate or crankcase side stud holes.
MB SCOOTERS STOCK THESE TOOLS, click on the link to go to the shop
TAPS
TAP HOLDERS
For 3, 3.5, 4, 5, 6, 7, 8mm taps
DIES
DIE HOLDER
USING TAPS AND DIES
BEWARE – drills, taps and dies are made of hardened steel to cut the softer steels used in most fasteners and threads. Hardened steel tools can be brittle and can shatter and snap IF you’re not using them right. The trick is the same as tightening screws, nuts and bolts – you need to have some feel in your hand to the work you are doing. It’s important to use cutting fluids or light oils when drilling and cutting threads. It’s important you don’t use them on fasteners that are hardened themselves especially the layshaft. Be careful with the drive bolt, flywheel nut and flywheel thread – some are hard, not only can you blunt a tool, you can chip the threads off the tool. Be careful to make sure if you’re drilling out broken studs to drill in the middle and square otherwise you will slip to one side and ruin a job. Also be careful to fully clean out threads to the bottom of the hole. The amount of times I’ve gone to do a job and found someone has done a repair but left a broken stud/screw or drill in the bottom of the threads! And you just don’t re drill out a broken drill or a tap they are harder than drills!
AND ALWAYS USE SAFETY GOOGLES/GLASSES!
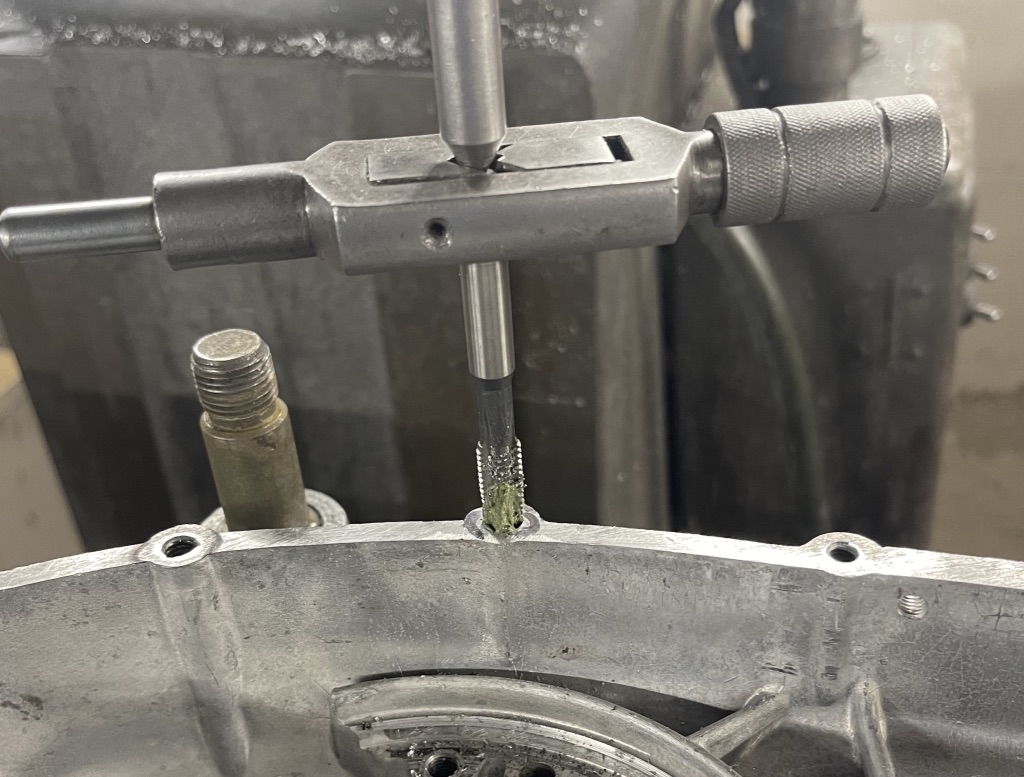
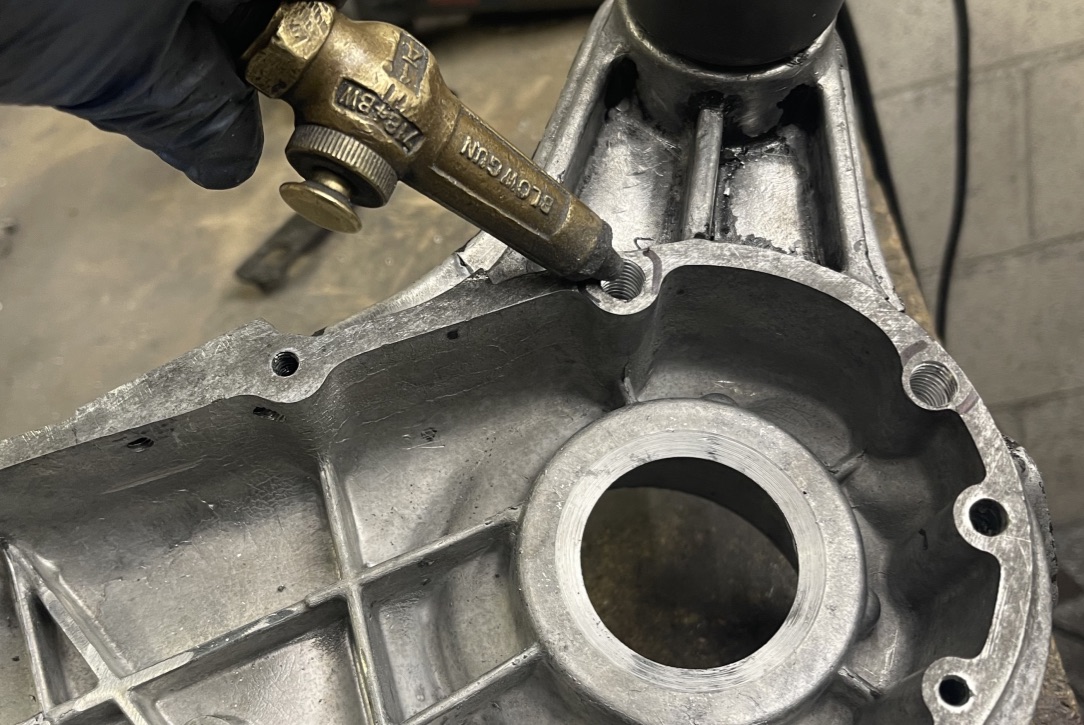
For restoration work these things are quite straight forward. Pick the correct tap for the job, use the correct holder, offer it to the part you want to clean out or repair. Then you need to hold the part been tapped either solid in a vice or if its small use a spanner, pliers or mole grips or hold the part in your hand. Fit the taper tap in the hole, spin the tap in the correct direction and slightly push until the tap finds the thread and starts to pull it’s self through. And just keep turning until the job is done. Try not to swirl the tap around in a wider ark, this will cut an oversized loose thread.
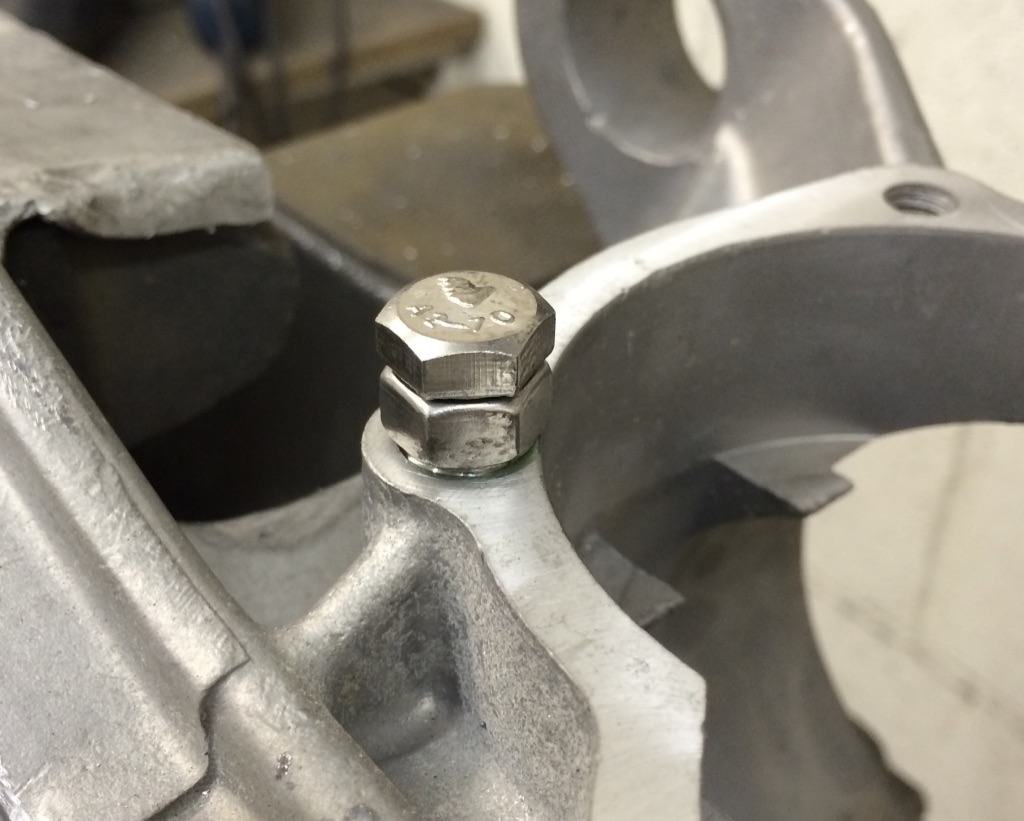
With dies and die nuts, offer it up to the part that needs recutting and spin in the correct direction until it grips and starts to pull its self down the thread. Always keep the tool running straight down and not at an offset angle it will ruin the threads. Some type of damage that needs cleaning up is a thread that’s been mushroomed over. This means the start of the thread is damaged and a nut won’t go on. This is usual with a layshaft thread. The amount of times a customer has complained a new rear hub nut doesn’t go on an old layshaft. We ask, ‘try the nut on the frame shocker mount which is the same thread’ and the answer is ‘oh it fits fine’. So the answer is the layshaft has been hammered to get the rear hub off and has been mushroomed over! Sometimes you can see this mushroom, sometimes you can’t. But theres an easy cure – you can use a hand or bench grinder and you spin the part around to put a starting taper on the item. This is the most common problem with a Lambretta but the problem is – the layshaft is as hard as dies! Die nuts will blunt and break very easily. Personally if you’re not good enough to repair the layshaft and baring in mind the age of the thing, bite the bullet and buy a new one. The rest of a Lambretta can be repaired at home.
LAMBRETTA WOWS
Some of these engines are now 70 years old. Some have been stripped numerous times and some haven’t. Some have been worked on with people who know what they are doing and others have been worked on by a gorilla with big hands that has no idea how to feel a nut, stud or screw been tightened up. Even the best of us can pull a thread out! You can look inside a thread and it looks perfect, fit a screw and tighten and the thread just comes out on the screw.
The Lambretta design was never made to last this long or even expect to do the normal power outputs that we ask these days! Sometimes increasing the ‘very damaging vibration levels’. Add to the fact sometimes batch castings are not as good as the one before or after. So you tend to find one casting that will need more repairs than another. More modern SIL casings – modern he says! These can be 50 years old anyway. Some casting batches can have decent casings and others – that literally – just falls apart as you’re working them. Or you build it and in a few miles its falling apart and threads pulling out! Try to weld these and some are un-weldable!
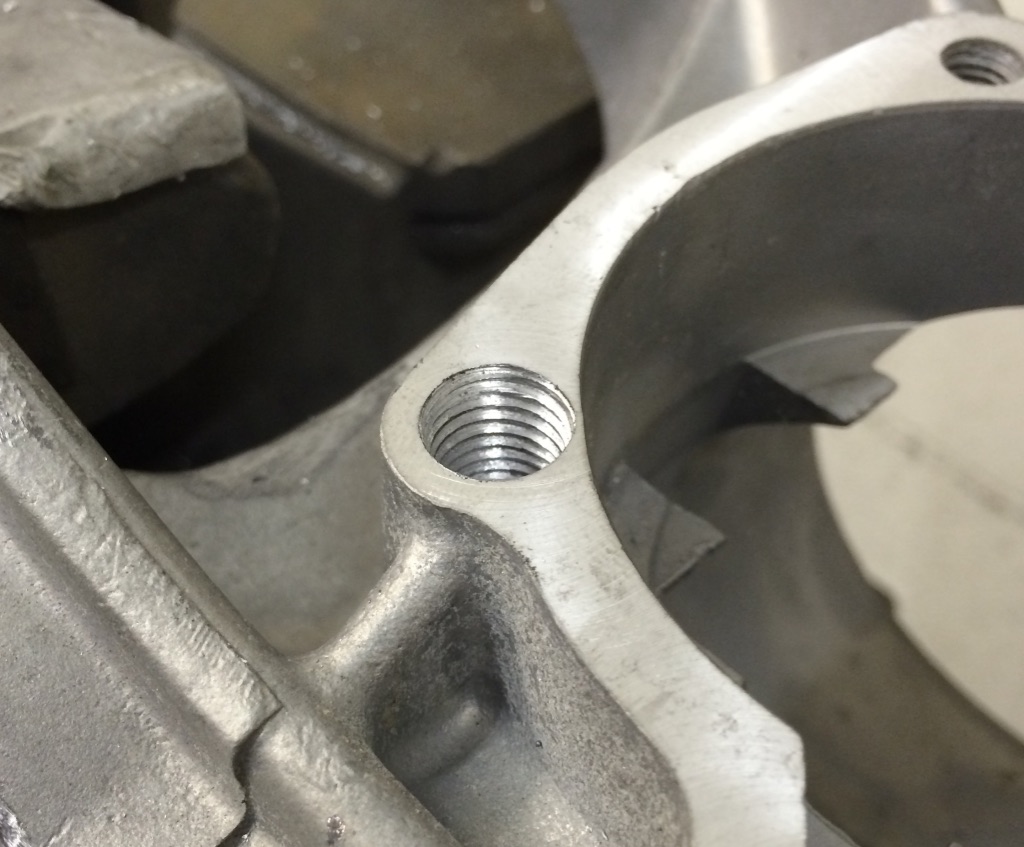
You can only work with what you have! Add the fact that the Lambretta casing has common weak spots. These can be the engine mount, cylinder stud holes, crankcase side holes, mag housing holes, end plate holes – it goes on. The casings are too thin in places and some casings from Italy, Spain or Indian can be better or worse – you just don’t know!
Take away casings cracking or breaking. The alloy threads and the design of the threads are not the best. For instance, the gear box end plate studs are normally 7mm – 8mm would have been perfect! The cylinder stud design is terrible any way, okay for standard 125/150 but try to do a 250 cylinder and there is no strength anywhere! You can only do what you can before welding and machining or scraping a casing!
6mm in an alloy casing is not very strong, move to 7mm or 8mm and it’s a massive improvement. This is why a stepped 6-7mm or 6-8mm is much better – IF the casing is thick enough!
If you take a crankcase side 6mm stud thats pulled out and left no thread. The first thing you could do is tap out to 7mm which could find fresh metal, it doesn’t always work, the chances are you need to go to 8mm or even 10mm. The larger you go with the thread outer diameter the stronger the insert or stud would be as the threads are more course in design giving more surface area for strength. Where as Timeserts use a fine thread pitch and can in time pull out as the surface area on the thread isn’t there.
The fact is – at some point if you own a Lambretta you will need to repair an engine casing or mag housing. It’s not just the engine, the headset and horn casings are really weak. Horn castings have 4 or 5mm threads but the depth and area around it can be only 3-7mm! There is nothing to tap out to and all you can do is weld an area. We make oversized inserts to cut away rotten alloy thats corroded with chemical reactions against steel and alloy. If only the factory had used some grease or anti seize compound when building the Scooters, this would have helped the poor Scooters from the terrible UK weather and salt on the roads!
TRADITIONAL INSERT THREAD REPAIRS
Most people will have heard of a Helicoil, Timesert or Tappex inserts. These can repair casings, but work and fit in different ways. These are all a universal size in lengths but most are not ideal in a Lambretta engine.
- Helicoils
Helicoils and the various other similar named ones are a hardened sprung steel wound insert. You drill a hole into the stripped thread, run a tap down the hole. Use a special inserting tool and twist the insert into position and it’s the spring in the insert that holds it in position. But if you use loctite on the screw/stud and next time the screw is removed the insert comes out!
These tend to have short threads, like Timeserts, Helicoils use the diameter for the length. So 6mm diameter has a 6mm length, you can also get diameter x 1/2 so 6mm x 9mm. Really you need at least twice the diameter on most of a Lambretta engine. But it’s not uncommon that you have to cut a Helicoil down with side cutters to fit the hole correctly. You have to do this in mag housings otherwise the Helicoil pops out and then they end up just not working and pulling or pushing out. You also have to be careful fitting a Helicoil as they can miss a thread and you fit a screw and it will lock up or damage threads. I always loctite these in place to stop them moving. Im not keen on Heliciols but they have their place at times.

Helicoil or similar set
- Timesert
These are made by a German company called Wurth. Some, class these as the best, but I disagree. I’ve seen so many fail, especially if you use a short screw that doesn’t go the full length of the insert and they snap in half and pull out. Also studs can lock into them and can pull out when the stud is removed.
As with Helicoils, you drill a hole to clean out the damaged threads. Timeserts then use a small counterbore tool which cuts into the casing a mm or so, if you cut too deep the insert is wrong and is a mess on the joint face. If you don’t cut far enough the insert sits proud of the casing. Timeserts are soft and can be easily filed flush. Next you tap out the tread with the special tap and wash out the threads. Another special tool is used with thin oil on it that screws into the Timsert, but this tool will only go part way down as the threads. With a tapping handle you screw the Timesert into the new threaded hole. Timesert inserts are not fully formed on the inside, as you turn the Timesert into position it starts to lock in place, the unformed threads at the bottom now gets re formed with the tool and as its forming, it opens out the insert like a mushroom to lock in the casting – or is supposed to. They do fail even if fitted correctly, personally I loctite them in place just in case. Same as Helicoils they come in ‘D’ and ‘D 1/2 – again not long enough at 9mm when a crankcase side stud thread is 10-12mm.

Timesert set
- Tappex
These are still around and plugged for Lambretta repairs from the 60’s workshop manual. I hate them, I’ve seen so many damage casings. Unlike the smaller outside diameter of a Timesert, these have a massive outside diameter and theres not many places on a Lambretta casing that’s got enough meat to fit them correctly without breaking through. Again a hole is drilled out, the insert is offered up and fitted with a special tool that cuts the insert into the casing as it goes. These are really hard, getting them out is sometimes impossible as a stud removing tool can’t cut into them to grip and remove them. All you can do is grind them out and do a weld repair. Ive also seen these fitted the wrong way round as you see two cut out areas where the fitting tool goes making a mess of the face area. And if you’re not careful these will cut off set and the stud will not be 90 degrees to a casing. These also are short on the thread length.
FITTING INSERTS AND STEPPED STUDS
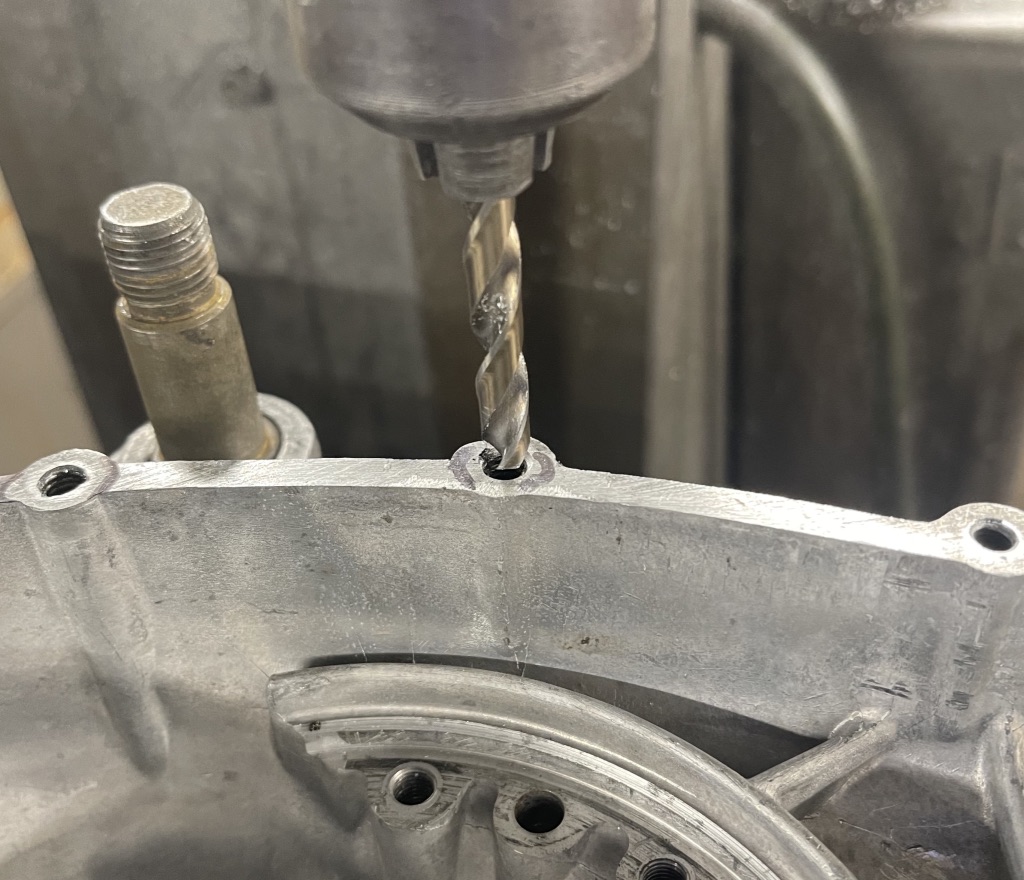
The basis of fitting an insert or stepped stud is – you’ve got to keep things true to the casing. Apart from horn castings and headsets – all threads on a Lambretta are drilled and tapped at 90 degrees to the casing face. The best way is to hold and clamp a casing in a universal milling machine and do the work on the machine. Of course not everyone has access to a milling machine. But of course you can do this by eye and feel by hand. It helps if there are two of you – ones doing the work the other is looking from all directions and helping out if you’re drilling or tapping to one side. It’s especially more difficult if you’re doing a repair with the engine still fitted in the frame, but it is all doable.
MB INSERTS AND STEPPED STUDS
We offer a variety of special inserts and stepped studs designed to repair Lambretta casings especially the badly repaired ones and if you’re lucky enough you can get away with no welding. Ours inserts, studs and stepped studs are aimed at finding more alloy meat in the casing – its there, but didn’t get used from the factory.
Take the gearbox end plate stud holes. A standard length thread is around 10mm and we know the end plate area is a weak spot because the studs come loose as there isn’t enough thread to hold tight. Where as there is lots of alloy meat under that 10mm thread. Even with a casing thats pulled out the 10mm threads you can tap deeper and fit a long threaded stud or even a bolt. You can even drill deeper and use an extra extra long stud! It’s the same for the crankcase side stud holes, some mag housing holes and the cylinder studs.
Whats on offer….
As I’ve been repairing Lambretta engine casings since the 80’s I’ve become very experienced in what breaks, snaps, cracks or pulls out. Knowing this I’ve designed our MB repairs products to cover all bases using alloy inserts, steel inserts and stepped studs and I’ve given you the choice – to either use an alloy insert to keep the casing all alloy, or fit a stronger steel insert or fit even stronger stepped studs.
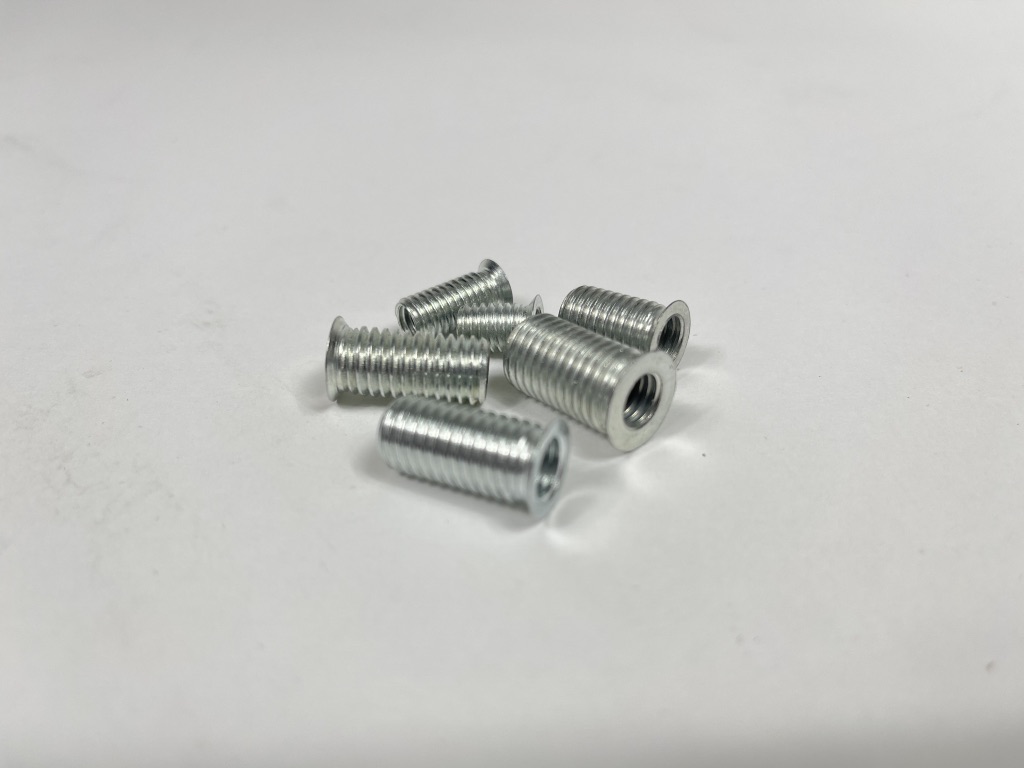
MB ALLOY INSERTS
We offer 6/10mm, 7/10mm or 8/12mm all 20mm long as this length suits most of the Lambretta casings when drilled out to clean damaged threads and cut new threads. You don’t have to cut that deep if you don’t need. You can fit them and leave some stuck out of the casing. You can then machine down to the face and lightly file flat, therefore hiding the thread insert so it looks like a near perfect casing.
MB SCOOTERS ALLOY INSERTS, click on the link to go to the shop
- Alloy inserts fitting tips
If your choice is to try and keep the casing looking as original as possible without welding then you want the alloy inserts. Alloy isn’t as strong as steel but they put fresh alloy into a casing. We’ve picked a larger outer diameter than some steel inserts. The advantage is it cuts away the rubbish old alloy, especially if someones tried to drill out a snapped stud and gone half into the stud and half into the casing or if it’s already had a failed insert repair.
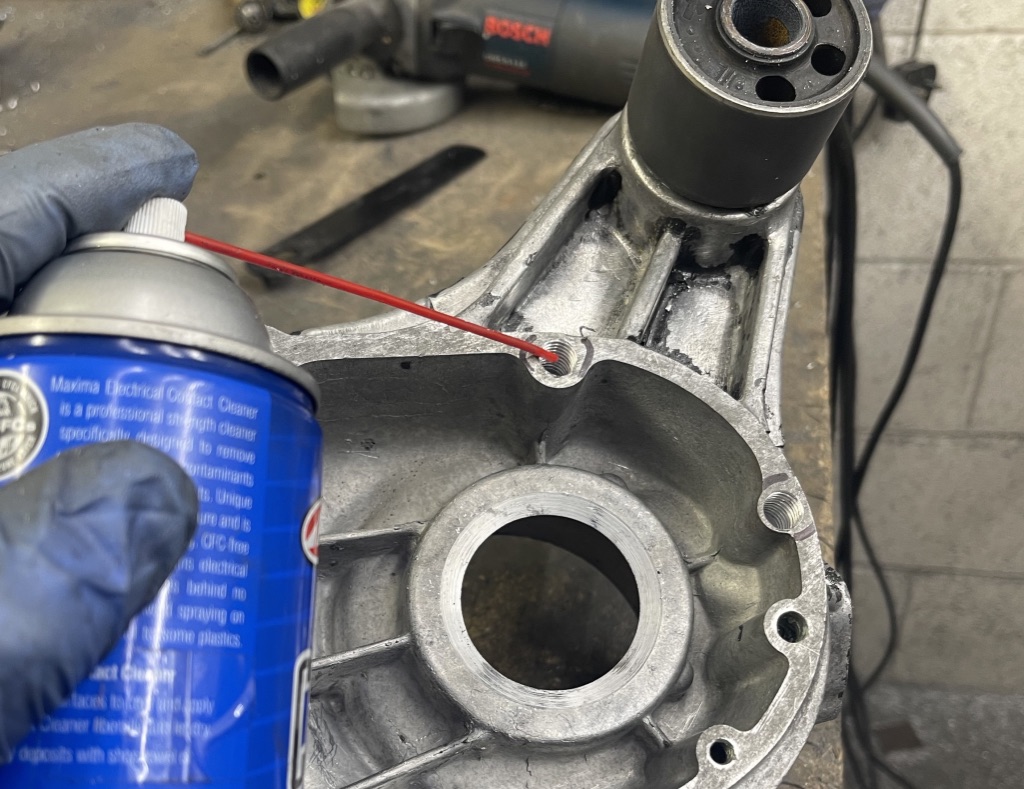
To fit them, you need to drill to size so the tapping tool cuts fresh clean threads into the alloy. You have to tap deep enough to make a good repair, deeper the better. But make sure you don’t drill too much so you break through the back of the casing, You can check the depth with a vernier depth gauge. You have to drill and tap to 90 degrees of the casing looking from all directions! Use a number 2 tap, which forms most of the thread, but importantly when you fit the insert as you get to the not fully formed threads you can keep tightening so the insert is locking up in the unformed threads.
Drill to size, tap to depth, wash out the threads – clean and dry. Use an Allen screw the size of the inner threads with the threads fully formed to the head, screw down a plain nut, wind the insert down the screw and make sure the end of the screw is near level with the end of the insert and lock the nut to the insert. Now you can fit the insert, put some strong loctite in the formed threads and on the insert. Now screw the insert in place, when it starts to lock keep tightening until the insert is stuck. Wind off the nut and remove the screw. Ideally with these leave 1-2mm proud, machine or file flush and it should leave a neat, strong repair. If you’ve not quite got the insert tight, leave the screw in place 10 minutes so the loctite works.

Alloy inserts
Drill to the correct size and then tap to the correct size, wash or blow out afterwards
Double nut a screw, run the insert down it and nip the nut to the insert

Use high strength loctite and screw into position

Let the loctite work and remove the screw/nut
- MB Steel inserts
For a stronger longer lasting repair the steel insert is that bit better. Some inserts come plain steel, chemically Blacked or Zinc plated Silver – the zinc plated ones look a bit like alloy so they look better.
It’s a similar idea when fitting these steel inserts to the alloy ones but these go one step further. Like a Timesert we use a counter bore on some of the early inserts, later inserts use a tapered counter bore or oversized drill so the insert locks flush on the face.
Drill to size, tap to depth – you may want to tap a bit deeper with these, counter bore the casing to suit the oversized tapered head on the insert. Cut this taper with a counter bore tool or use a drill to taper the face, don’t over counter bore, wash out the threads – clean and dry. Use the correct sized allen screw for the inner threads. Screw down a plain nut, wind the insert down the screw so its near level with the end of the insert, then lock the nut to the insert. Now you can fit the insert, put some strong loctite in the formed threads and on the insert. Now screw the insert in place, if you do it correctly when it starts to lock keep tightening until the insert is stuck in the casing and also locks the counter bored head solid in the casing leaving the head flush with the casing, if its slightly proud – file flush. Wind off the nut and remove the screw. If you’ve not quite got the insert tight, leave the screw in place 10 minutes so the loctite works.
MB SCOOTERS OFFER THESE STEEL INSERTS, click on the link to go to the shop
Various MB steel inserts
Drill to the correct size for the insert
Tap to the correct size for the insert
Counterbore with the correct tool or an oversized drill to the insert, so it sits flush to the casing
Use a allen screw or hex screw with nut fitted, screw the insert on and lock the nut to it
Use strong loctite to fit it so the insert stays in position
Fit the insert with the screw and lock down with the nut, hold the screw and unscrew the nut, then remove the screw
If the insert is proud, gently file off the head so its flush

Inserts can be cut down if too long

IF cut you need to clean the threads for an easy entry into the new cut threads
You need to cut the inserts in mag housings to make them work right
Correctly fitted insert into the mag housing
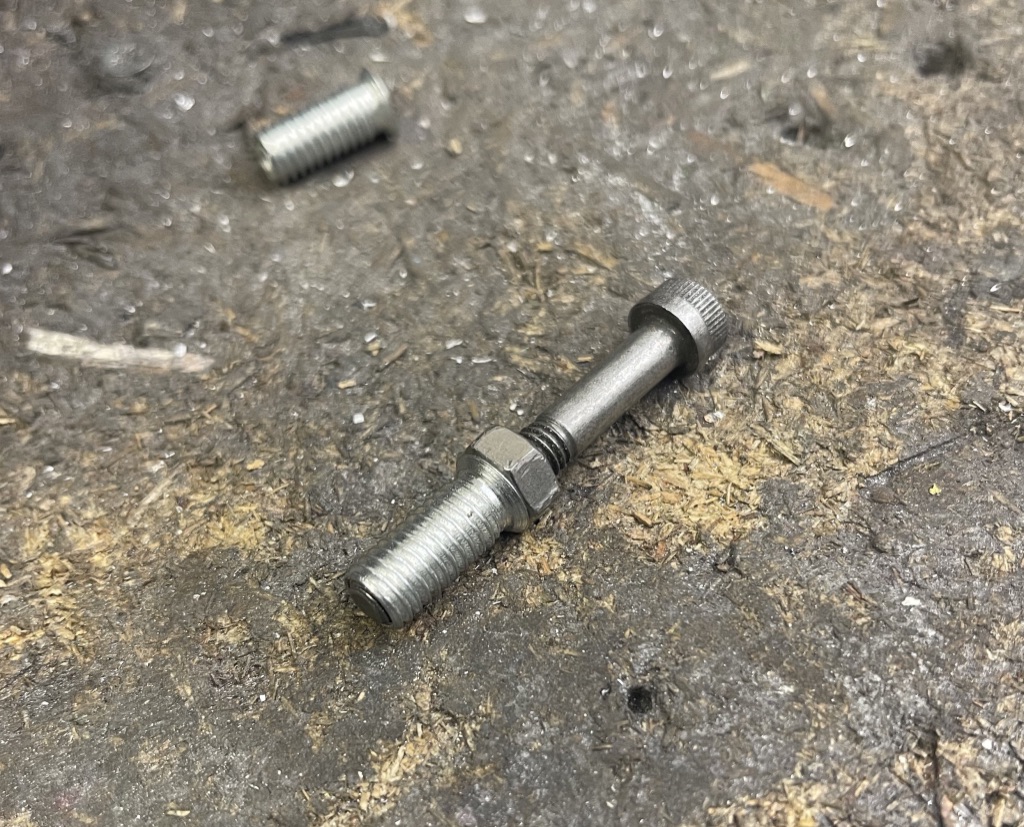
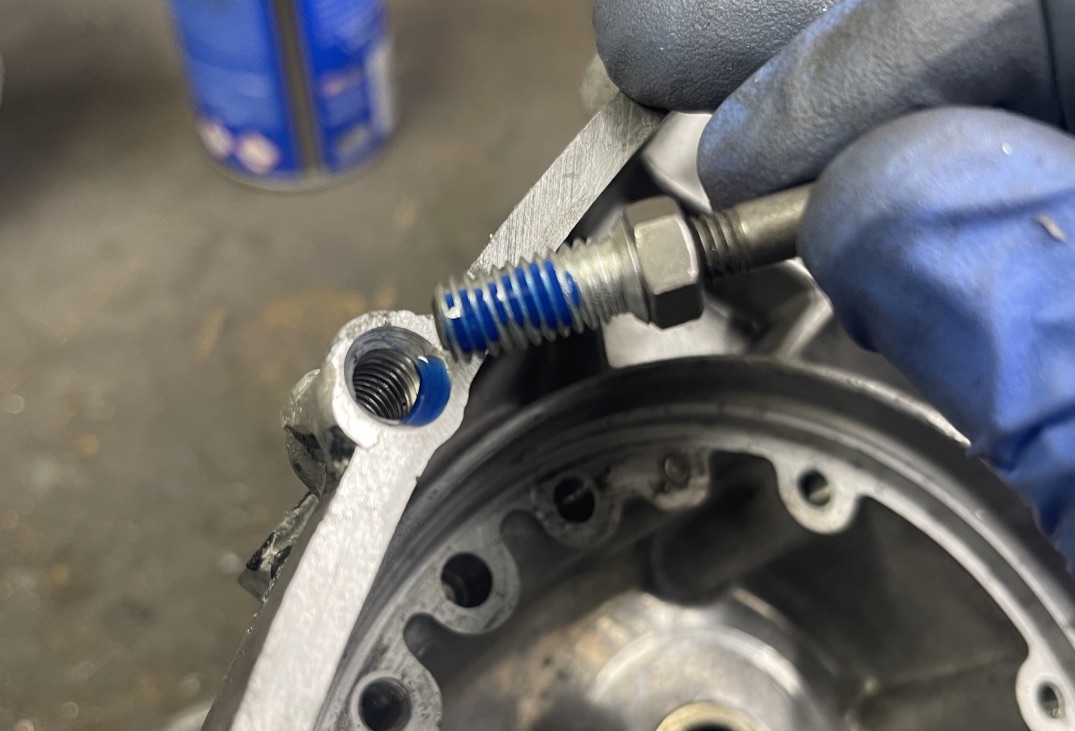
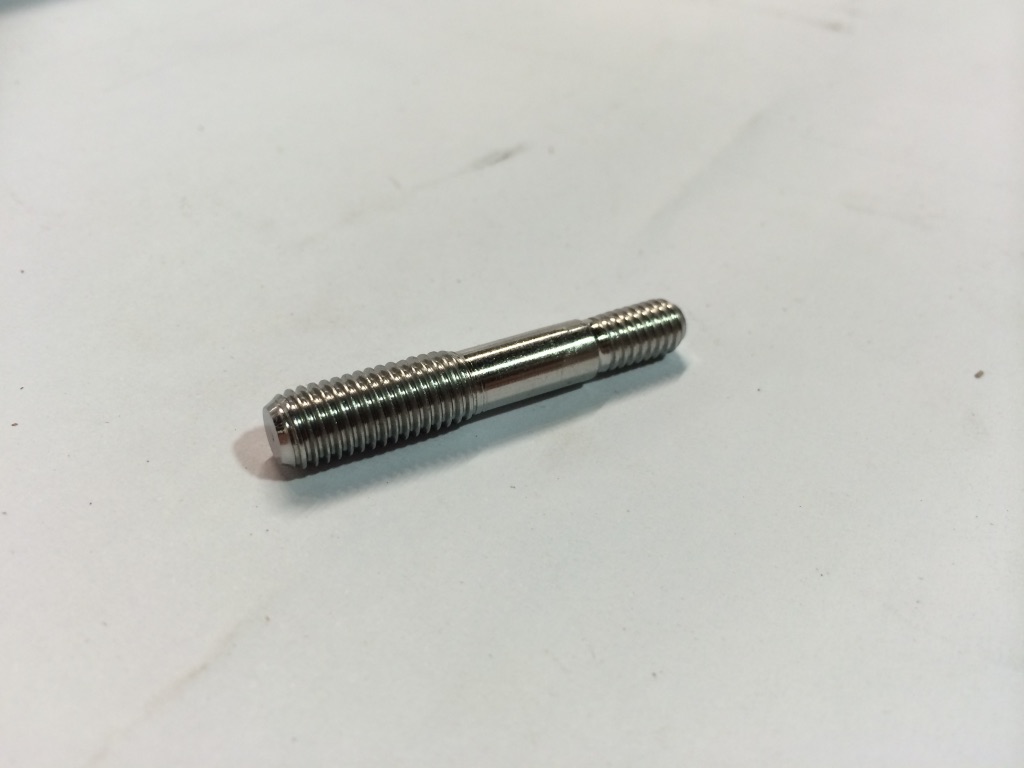
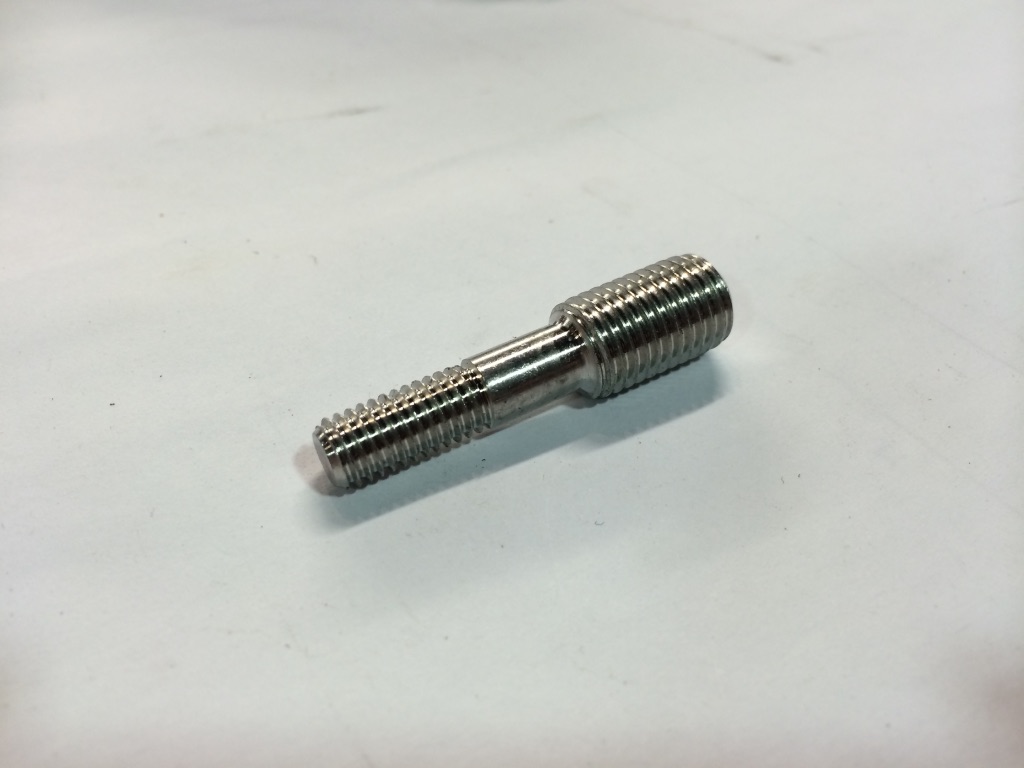
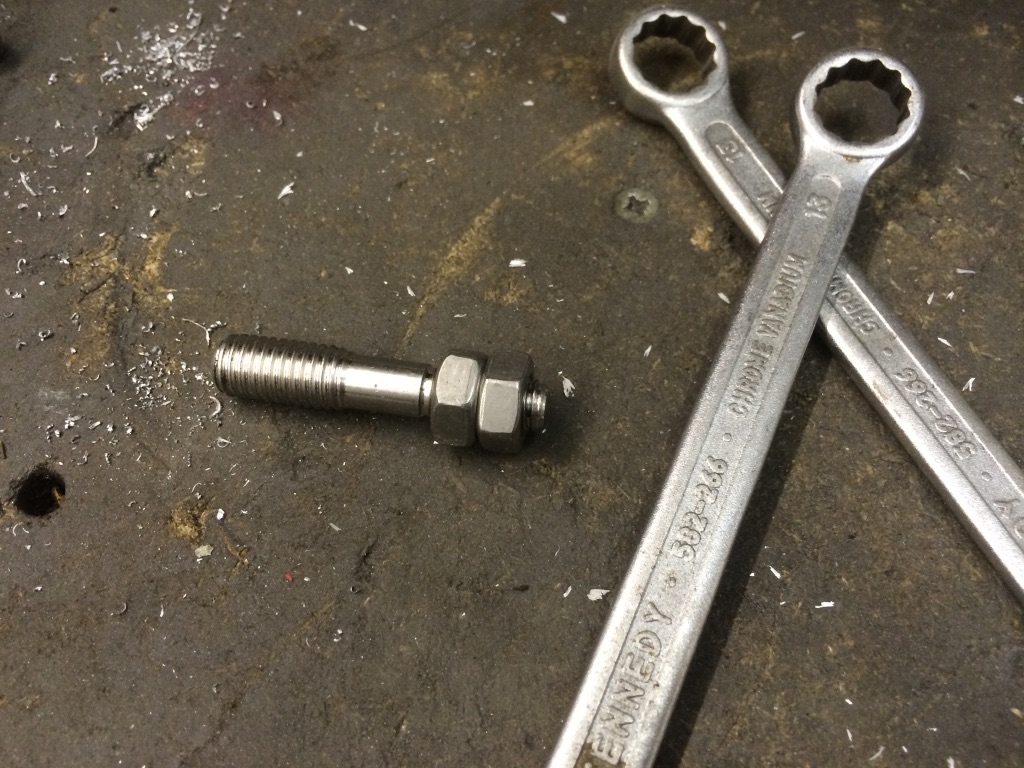
- MB Stepped studs
The advantage of stepped studs are they are easier to do and are stronger. The increased surface area of the larger outside coarse threads gives the strength yet you get the original size and length on the smaller threads keeping it more original. With inserts you have the inside and outside that can come loose at some point if not done correctly. If an oversized stud is fitted correctly it’s fixed in, the worst that can happen is you can over tighten it and snap the thinner part.
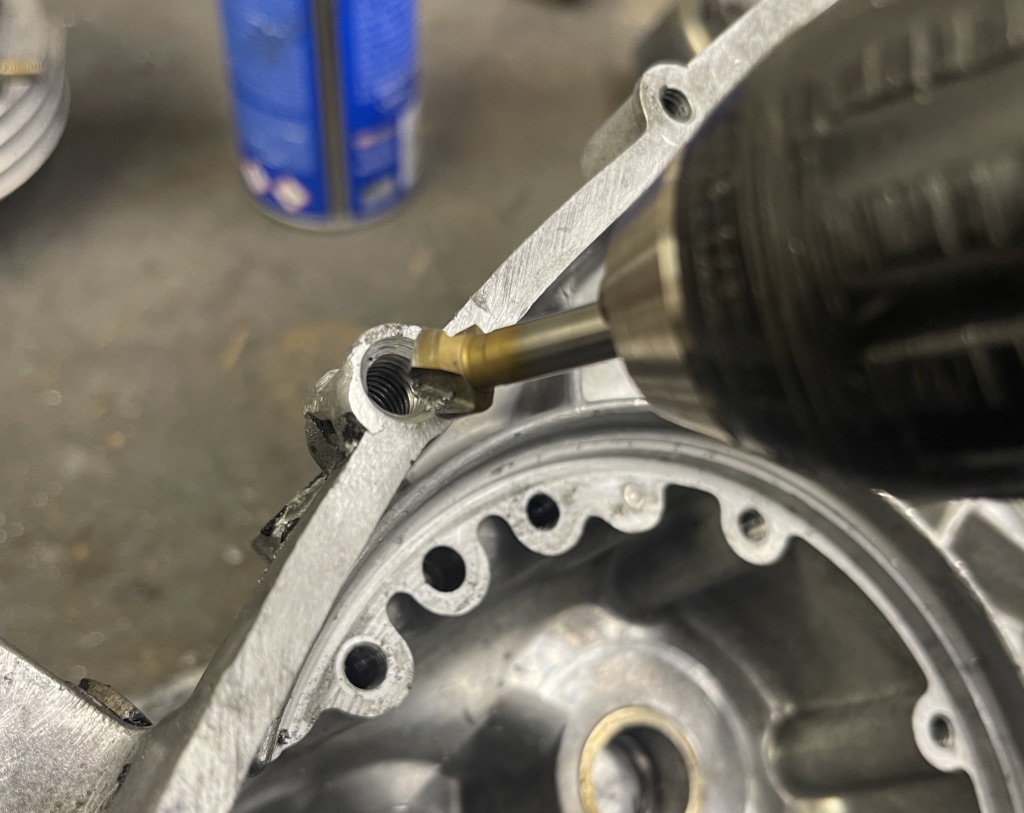
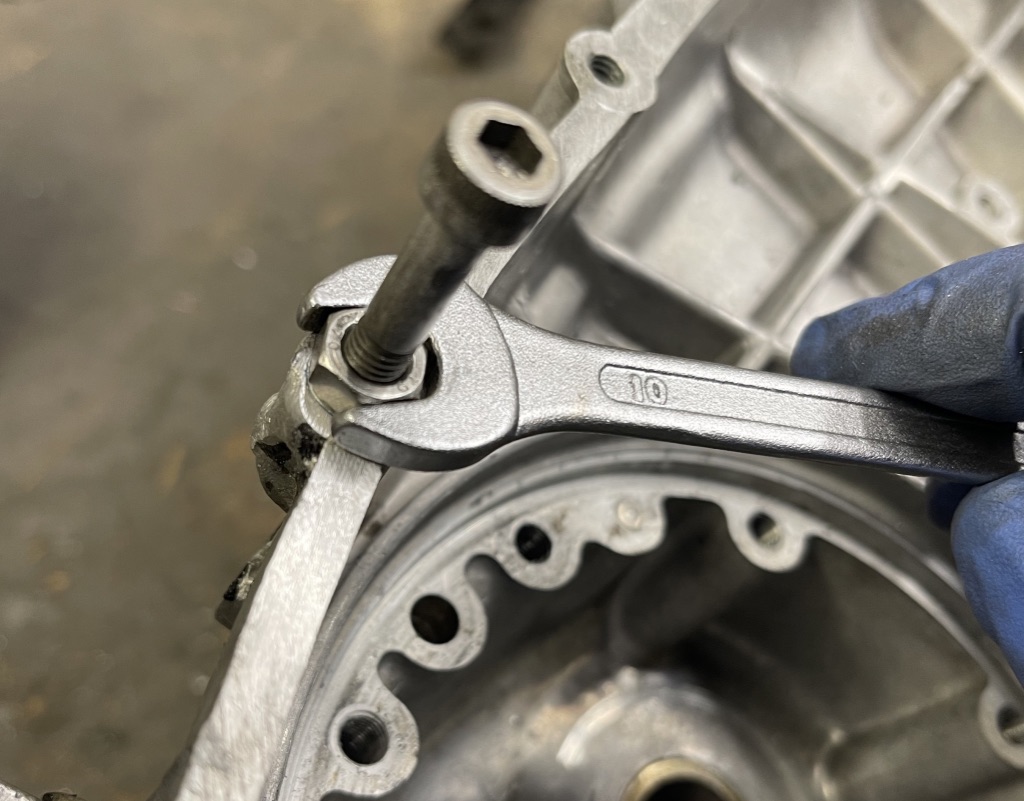
Drill to size, tap to depth, wash out the threads – clean and dry. These are easily fitted by running two plain nuts down the thin thread, tighten the two nuts together tight, this creates your tool. Ideally you tap perfectly deep enough so when the stud screws in tight the section between the largest part and the start of the thinest part sits flush with the face, so a gasket fits and say – a side cover fits without been lifted creating a leak. As you can use this double nut and stud as a tool, you can run the stud in place, if its higher then remove and tap a bit more, keep doing this until the stud is in a perfect position.
MB OFFER THESE STEPPED REPAIR STUDS, click on the link to go to the shop
8 – 6mm, crankcase side tail pipe
7 – 6mm, crankcase side tail pipe
8 – 7mm, gearbox end plate long
8 – 7mm, gearbox end plate extra long
10 – 8mm, crankcase side swan neck
12 – 8mm, crankcase side swan neck
Various styles of stepped stud, this is a first oversized for the casing
Various styles of stepped stud, this is a last oversized for the casing

First drill to the correct size then tap to the correct size
Wash out the threads
Or blow out the threads
Double nut the stud to fit
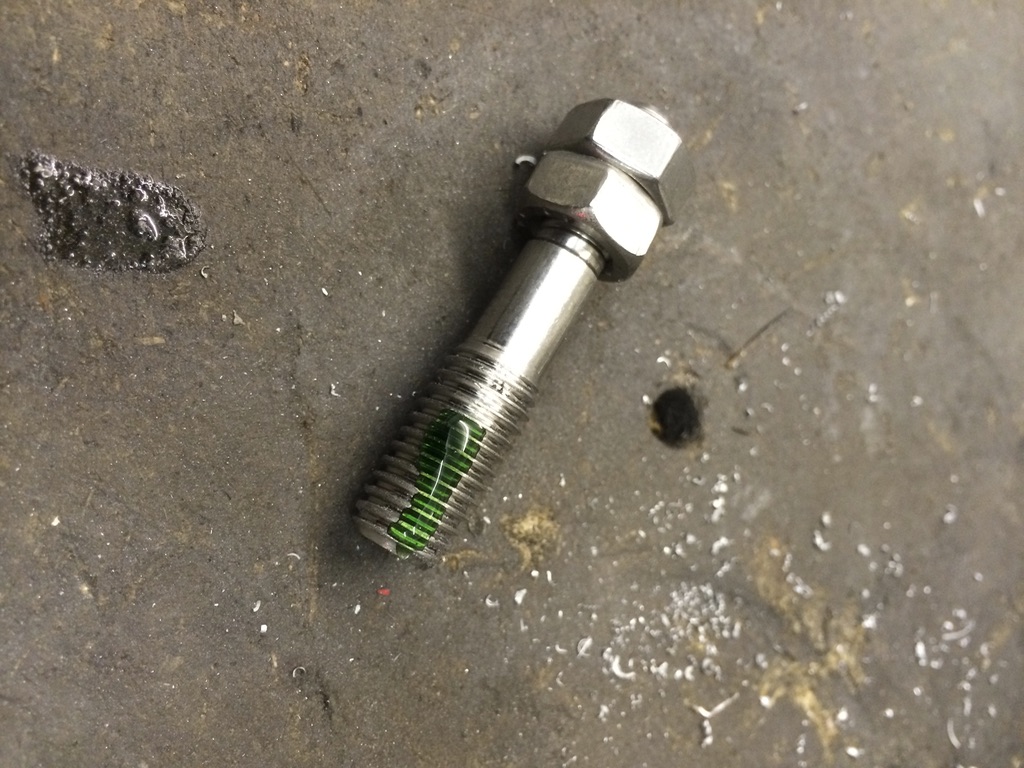
Use loctite on the threads

There are different grades of loctite, all will work, retainer or high strength is best
Using the double nut trick, screw into the correct depth
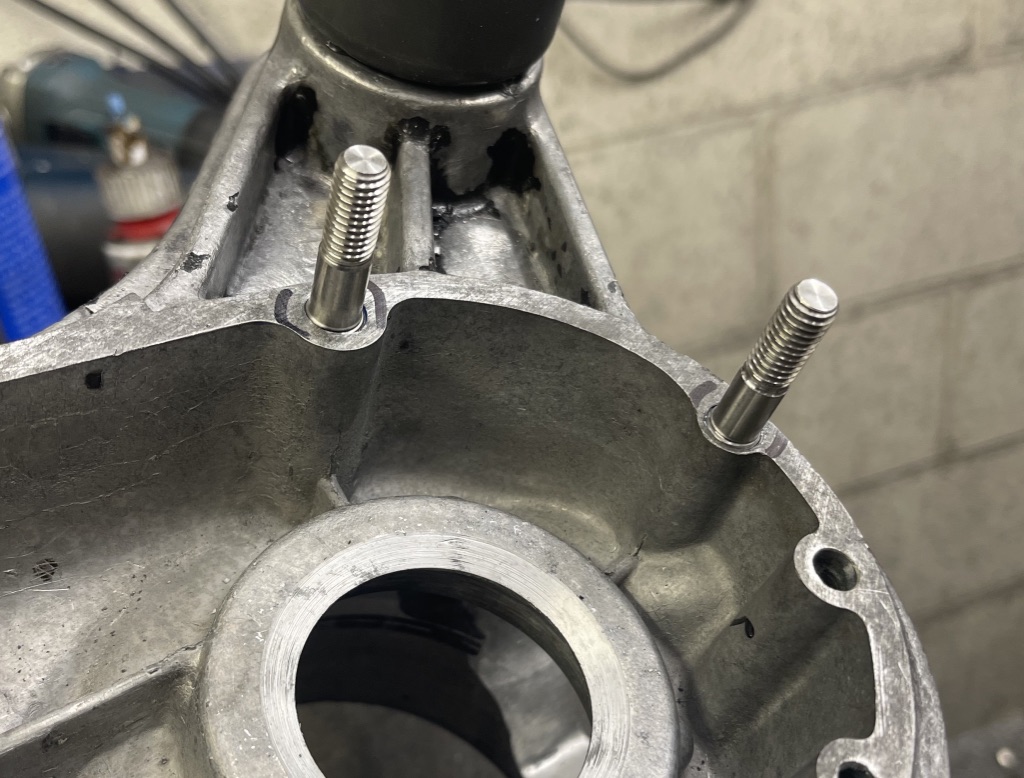
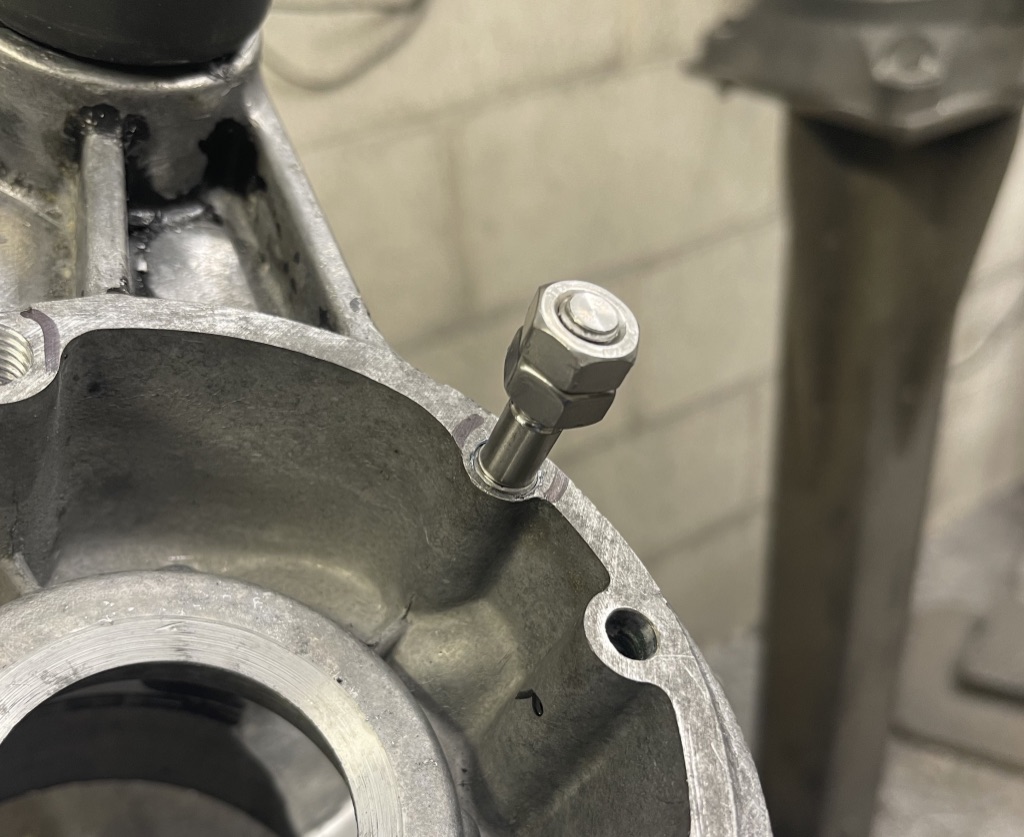
Once fitted they should look like this, so you can not tell its a stepped stud
TAPPING DRILL SIZE CHART, Give or take 0.1-0.2mm on the drill size these are correct drill sizes per thread.
- 3 x 0.5mm = 2.5mm
- 3.5 x .6mm = 2.9mm
- 4 x 0.7mm = 3.4mm
- 5 x 0.8mm = 4.3mm
- 6 x 1mm = 5.2mm
- 7 x 1mm = 6.1mm
- 8 x 1.25mm = 6.9mm
- 10 x 1.5mm = 8.7mm
- 12 x 1.5mm = 10.7mm
By now you should know how to drill and tap a hole in a part that needs repairing and be able to fit an insert or stepped stud. Okay you may have to buy some special drills, taps and holders but once you have them they are tools to keep just incase something else happens in the future.
If you are not confident in doing jobs like this, and you’re not sure if your mate is good enough. Then the only thing to do is entrust the jobs in the hands of engineers who do these kinds of jobs daily. Of course these are jobs MB Scooters Ltd can do for you.
If you have any questions email mark@mbscooters.co.uk


