


REED VALVES, REED BLOCKS, REED MANIFOLDS, REED PETALS ????????
Some of you will know what a Reed Valve is and others will not. Some may only know of reed valves from the TS1 cylinders. So what are they and what do they do?
Before I talk about Reed Valves and what they do, you need to understand a little about our beloved 2-stroke engine fitted in to a Lambretta.
Every Lambretta engine right back to the model A right through to the last GP were piston ported! Whats piston ported? Let me explain………
Without getting into the complexity of a 2-stroke engine you need to understand that fuel/air needs to enter the cylinder via the carb and leave through an exhaust, this is how a 2-stroke works and by tweaking various parts of it will produce more and more power, called tuning. For a 2-stroke to work it will need an inlet port, transfer ports and an exhaust port, basically we are only concerned with the inlet port side of things to do a reed conversion obviously other ports do come into it.
There are 3 basic ways for a 2-stroke inlet port to work. (there are more but lets use the common ones)
- Piston ported. This is how all Lambrettas work. The piston goes up and down and opens a port letting in the air fuel mixture. There are lots of names for it, basically an inlet port is controlled by a piston. ‘Piston ported’ explains it simply. You may have seen in older write ups the term cast (barrel) or cylinder, this was a way to differentiate between a TS1 Alloy cylinder and a standard cast cylinder. These days we have lots of alloy cast type piston ported cylinders. And now variations of the TS1 type reed cylinder. All piston ported cylinders have OVAL exhaust ports and all TS1 type cylinders have ROUND ports so this is now MB’s way of describing the different cylinders!
- Rotary Valve Induction. This is how all Vespas work apart from the earlier piston ported versions. ‘Rotary’ means the crankshaft controls when the air fuel enters the cylinder. There are various ways in which this is done, either from a disc opening or by a crankshaft that is reshaped as a Vespa is.
- Reed Induction. This is the modern way, most engines use this method including Motocross type engines.
So why are there three methods of induction?
There are theories that more power can be gained by either one. The piston ported engine is the easiest to manufacturer then the rotary and reed versions. These days there is not a lot in it but most manufacturers use the Reed design. Rotary is quite rare these days.
That’s the basics! So why move from a traditional run of the mill Lambretta engine which is piston ported. This is the simple method, it works and is easy to maintain. The big down side is a piston ported engine has problems at low revs! A designer or tuner picks a certain inlet duration, this is the time the inlet port is open to allow enough fuel in to make that engine work and it is part of what dictates it’s power output.
To explain this inlet opening period in simple terms. A low revving standard style Lambretta engine may use a very small inlet port timing of around 120 – 130 degrees. A more modern engine may use 130 – 140 degrees. These timings work very well on low powered and low revving standard type engines. Increase the inlet timing to suit higher powered tuned engines and it is quiet normal to see 150 – 170 degrees.
This is where the problems start, at low revs the fuel tries to enter the engine but the engine is not sucking fast enough to draw in the mixture and it reverses out of the carb, called spit back! This is the down side of over tuning a piston ported cylinder. These days for some reason people are using what I consider over porting, it’s not uncommon to see people on forums saying ‘I’ve got 160 – 180 degrees’ Dave Webster printed his book in the 80’s with massive inlet port durations! I found you can keep inlet port durations smaller and still get more usable low, mid and top end power!
Lets not go into this too much it will complicate things. What I will say is when Dave’s Group 4 bike was dynoed in the modern world it only did 23bhp with what I presume was an inlet opening period of around 175 – 180 degrees, transfers around 130 – 135 degrees and an exhaust of 185 degrees! We have what we consider a touring engine done in 1988 still running today with 155 degrees Inlet, 126 transfers and 175 degree exhaust port and it produces 25bhp! So back to the inlet timing BIG is definitely not best because even at 155 degrees there can be too much spit back.
The basis of this, is make an inlet port big and power goes up, but the spit back will get worse. So to gain power you need to shut off the inlet port and stop this spit back but still keep the air fuel it needs. This is where the ‘Reed Valve’ came from, it’s a method of controlling inlet port timings, gain power, stop spit back and usually gain a power spread and increase in fuel economy.
Reed valves can get complicated, over the last 30 years they have developed to be a reliable way to control a powerful engine.
The basics of a Reed Valve is – Have a big inlet port, make the port timings larger, control it with a reed valve mounted into the cylinders inlet port and mount a carb onto the Reed Valve by a stub adapter. Ideally this is done in the cylinders casting just like a modern 2-stroke or look at TS1 or RB cylinder specially designed around the Reed Valve system.
Today Lambrettas have some specially made Reed Valve cylinders like the TS1, Monza, Imola, GT, Super Monza and RB. With the exception of the GT all Reed Valve cylinders have the carb on the right hand side! (the GT offered a manifold for both sides)
Piston ported cylinders include all the Lambretta cylinders, Mugello, Rapido, Casa and our MB Race-Tour kit. ALL these kits have the carb on the standard left hand side, this is because of the frame design. It is these kits we are aiming at improving with our new MB Reed Assembly.
Before we go much further some of the wording may confuse people so I will try to help out some meanings.
Reed Valve, Reed petals, Reed block, Reed casting, Reed manifold, Reed assembly, Reed kit? What does it all mean?
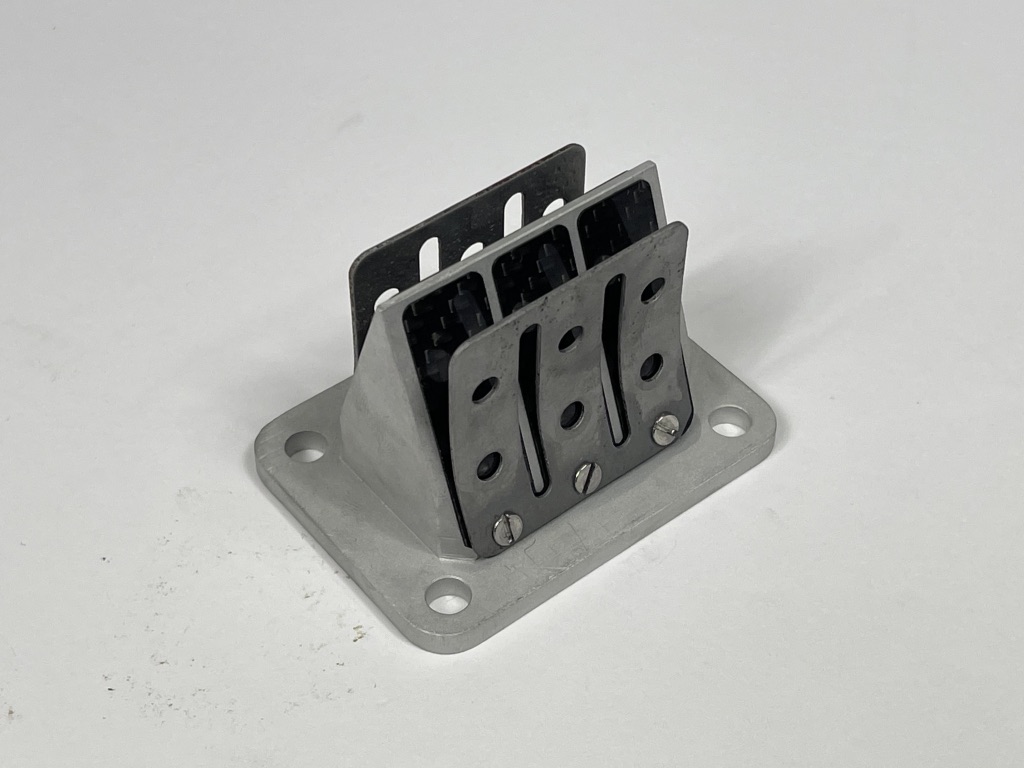
- Reed valve is the cage that the reed petals are assembled with. Some times it maybe called a Reed block or assembly
- Reed petals, these are the thin fibre or stainless plates that open and shut controlling the fuel flow in the Reed valve
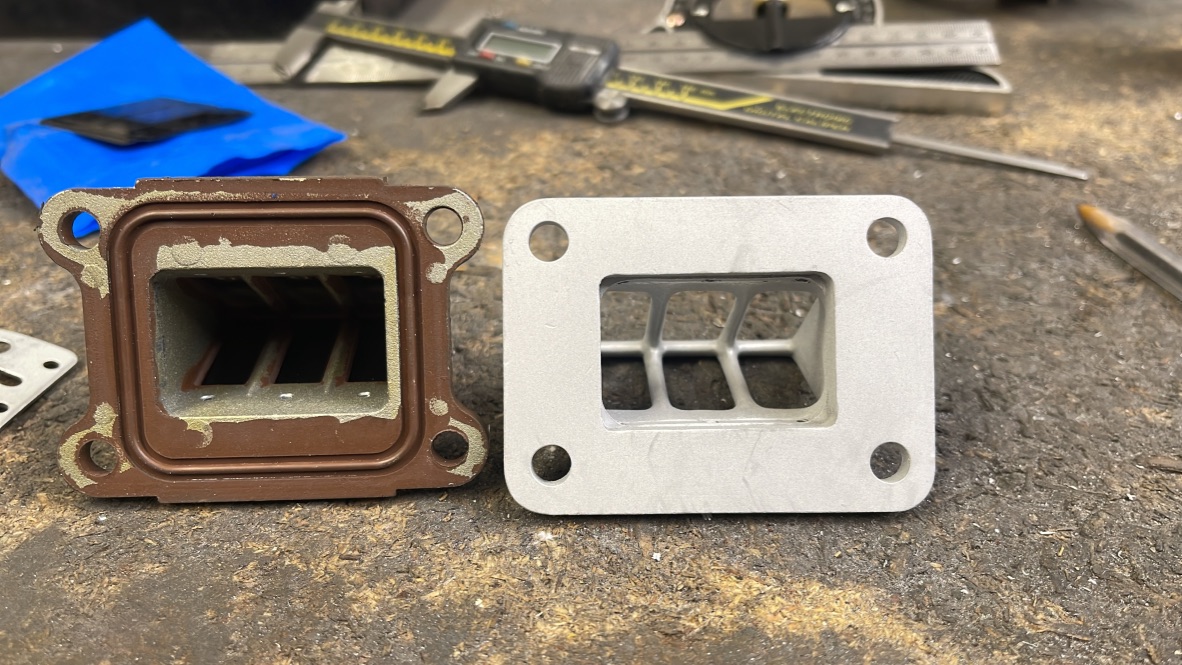
- Reed Casting also called the Reed manifold or just manifold
- Reed kit, this is the complete assembly which we should call the Reed Manifold assembly kit, but its too long, reed assembly should do.
I’ve been making one off Reed Valves since 1985 by cutting, shaping and welding bits of aluminum around a Reed Cage and welding it onto an inlet manifold. Then re-tuning the inlet port, adding a boost port (an extra port above the inlet port) and reworking the rest of the ports to gain more power. All this was very good but the design of the Lambretta frame, engine and panels doesn’t make this a good conversion these days. The problem in the 80’s was we used great big Reed Blocks which couldn’t fit in place of the simple inlet manifold, we used massive carbs which didn’t help! We got away with it then as there was no panels, or big holes in panels or cut downs were normal. It seemed the latest Reed engines used big is best! Reeds were new and the advantages were worth it. But they were all one offs using 4, 6 and 8 petal reed blocks and a pain in the arse to keep remaking. In the end I made a cast four petal manifold to suit. At around the same time Dave Webster DJ had a similar 4 petal version, Taffspeed brought out a 6 petal version and I brought out a similar version in the 90’s.
Whats best big or small? At the time the Japanese were using 6 and 8 petal versions in their Motocross engines, the road race engines used 4 petal versions. Petals, whats a petal? The petal is a small thin valve that can open and shut depending on what the inlet port says it needs in terms of air fuel! These petals are housed in a Reed Block or Cage with holes and bridges to support the reeds as they shut to let air fuel through. These come in various sizes from tiny to massive! I learn’t an early lesson when out riding and testing I came along side another Reed engine which had a very small RD Reed block on it compared to a big 8 petal one I was sat on. We accelerated away at the same time and the little one worked it pulled away and flew! Proving a small block could work well, I never forgot this lesson and brings us to now.
Times have changed, they have over the 30 years of tuning Scooters, styles of engines go up and down. I’ve known people start on a standard engine, gradually increasing the tune to the max, swapping to a TS1 and then back to a standard! And start the cycle all over again and twice over to what ever is the fashion as they see it now.
So why build a new Reed Assembly again now? There are various reasons! Popular demand is one, others where bringing out Reeds blocks in different designs. People were complaining about over tuned inlet ports from poorly designed cylinders and over tuned cylinders. By making a new block you can gain some very handy improvements.
The main advantage is fuel economy and lack of spit back. You can double the amount an engine does per gallon. We have one RT kit fitted with a Reed Valve which is 21bhp with a Clubman that will get 80mpg at a constant 60mph sat up on a Series 2 on the motorway and that same engine can do a genuine 80mph as well.
ITS ALL ABOUT FUEL ECONOMY
If you work this out, a gallon of petrol costs £6 and oil per top up at £1.50…….. £7.50 and increasing! Now some engines I know can only get 8-15mpg! Ok that’s a full race spec engine, a mellow piston ported engine can do 30 – 50mpg, add a Reed Valve and you can nearly double it and still get good power, so you can see a Reed Valve fitted to a piston ported cylinder would soon pay for its self in a short time. This to me is the main advantage, why throw good money at the governments and taxes! It makes no sense! It’s my modern way of giving something back to my customers.
I’ve looked at redoing a new Reed Assembly for a long time, our old 4 petal worked but we had a crap wooden pattern. Our 6 petal version was lovely, big yes but worked and worked well. The problem was it stuck out too far and the panels needed cutting. Demand went away from this sort of tuning, people wanted standard looking frames and bodywork, we adapted our tuning to suit people. Every now and then we would get a request for our old 6 petal reed block, unfortunately when our old casting company went bust it was the only pattern we lost! These were the early days of the Rapido cylinder, which in our opinion had a big inlet port at 155 degrees and spat back loads of fuel, our RT pistons lowered the port timings and increased power! Demand and feed back started telling us a Reed valve was needed.
There is only so much time in the day and it was one we missed. LTH designed theirs based on a very small Auto reed block, Jimmers and John Maddison reproduced the old Taffspeed version both with their down sides. We have used the LTH one and wasn’t too impressed, they worked, but needed a lot of work to get them to how we wanted them.
The Mark one LTH reed block, which we felt needed welding to get what we wanted from it. These are a block made by CNC machining, expensive and not really flowed because of it, these are now available in cast form. There are various reed blocks and petals that fit, we have dynoed all permutations of blocks and petals with our involvement in the auto game through our old company Scootermatix. With demand for our Race-Tour and other cylinders needing Reed valves we looked at what was available that could fit and work, it saved buying other peoples designs what we were not happy with.
The perfect design is nearly impossible because of the frame, panel work and design of the cylinder! Whatever you do it will only be a compromise as with lots of ideas put into a Lambretta engine.
Having found numerous different Reed blocks from the now very popular Automatics, remember these are quite new, they were not around in the 80’s or 90’s! There seems to be hundreds! By searching our suppliers and working on Josh Browns 2009 championship winning ZIP we started to learn what blocks fitted what. It would be the Reed blocks and mounting spacings that would dictate where we were to go with our design.
The simple spec was….. make a Reed manifold fit in the frame so the carb cleared the panels! Easier said than done! I wanted to use the Yamaha YPVS reed block, I knew it worked, it was reliable and and I’ve seen 36bhp in a Lambretta engine and have been using these since 1985 and were very reliable. This was the basis of our 1980’s manifold, it would not fit as much as I tried you can not get it to fit with keeping the standard inlet port and get the carb inside the panel.
Originally I wanted the RT kits to use this reed block but costs meant I did the RT as a piston port to start with. I have made a one one off cylinder shown else where that’s another story. So the hard part was the research into reed blocks which had to be easy to locate, replace and use good reed petals and have a rubber or two that would work with lots of carb set ups. Once these were found the only way to get the Reed as close to the piston was to cut some fins above the inlet port! Not good I know but done right, its works no problem, the trick is to get the reed block as close to the piston as possible.
And this is where we are today, we have our new MB shorty reed assembly (shorty as opposed to the longer out side panel versions)
In the end we had a series of Reed Valves, unbelievably the main one came from Malossi’s PX reed block, nice and cheap, it fitted and it works and is easily available! These came in two types, cheap (plastic) and not so cheap (rubber backed). Using the same stud mounting holes were a number of other easy to get reed blocks. All these came from a very common auto and geared engines which uses the same interchangeable cylinders from lots of manufacturers who all made different reed blocks to suit.
Getting my Lambretta ready for the Euro in Spain was a total nightmare, then the event totally capped it off how pissed off I had become! It’s no secret I went on the big bike which allowed me to make it a business trip and call on customers and dealers on the longer way round touring Europe. One of these meetings had us stay at Casa France, in talks over beers, Sam said Conti (Conti is a small GP style starter entry race bike for kids and Automatic tuning company) was in his town! He made a phone call to ask if MrBee could visit and look around the stores. As we were looking around the stores we came to one isle where the owner said ‘you don’t want to go down there is all the old stuff we don’t use it any more’ I said ‘lets look, there may be something we could use and as luck would have it there was a tea chest full of reed blocks and this is where we found our ultimate reed block which I had found impossible to get anywhere in the UK. This was to become the main block in our new manifold! Luck or what and that little find was the best part of a 2 week tour to the Euro Lambretta!
So now you should know a little more about Reed Valves and what they do, but what can we offer the customer?
Do we have a perfect after market bolt on Reed Manifold assembly for oval ported type cylinders? The answer is possibly maybe, as I have said it’s always a compromise and depends on how you look at it. Panels and engine mounts vary in position, so one carb may fit another maybe tight! One may fit with a filter the other may not. The smallest best carbs for the job if you want a filter is the PWK, the Dellortos are much bigger and these facts dictate to how perfect the system will be.
Part of the options with our Reed Assembly is a twisty rubber, both Polini and Malossi do these to suit 18 – 21mm carbs and 26 – 30mm. These are a nice little touch to our blocks, the rubber twists through 360 degrees which should help out with bikes with large after market tanks, or funny fuel tap levers, we do our own adjustable fuel tap lever which also helps! And we also have 4 other rubbers freely available through the Scooter world giving us 8 rubbers in total, up to now. LTH also offer various reed blocks, petals and rubbers making that very versatile, but with limitations, we tested every rubber and reed combination. Now Vietnam make their version using the Yamaha reed block. Our Conti six petal reed block has ran out of stock, which is a shame as it gave the best power of all the other reed blocks, there is another bike block that fits but is more expensive.
We have developed a new MB shorty reed block to suit the Yamaha reed block which is going into production for 2014.
For now these MB Shorty Reed assembly come as only 200 stud spacing, which means it fits these kits.
- Tv200, Sx200, Gp200 Italian
- Gp200 SIL
- Rapido 200/225
- What we call the KA Indian kit, sometimes called the SR200 kit
- Some Mugellos …….. they keep changing some use 150 studding
- Casa ……… Can’t remember what they did, some one tell me and I’ll add it
- ALL MB Race-Tour kits including the 190-195 kit
There hasn’t been much demand for a small block version, so for now we can weld and modify a casting into a small block fitting, at the moment for around £20 extra.
MB Shorty Reed assembly’s come complete with these parts
- Manifold assembly
- Reed valve (reed block)
- Mounting Rubber
- Screws, washers
- Set screw, 7mm washers
- 200 inlet gasket and reed gasket
MB Shorty Reed assemblies complete
- 6 petal version, when available
- 4 petal version plastic reed block
We carry these spares
- Rubber mounting
- Reed rubber twisty type 21mm carb
- Reed block plastic type
- Reed block rubber backed
- Reed manifold
- Reed block gasket
TIPS
- Carb rubber mounts have a hard life, Reed rubbers are no exception so I suggest you find some rubber to push and glue under the carbs float bowl to support the carb
- As with some of the after market inlet manifolds the head cowling will need cutting to suit the reed manifold, cut it so it will not rub on the casting. Li type cowls will need modifying or swapping for a GP type.
TUNING FOR A REED VALVE THE MB WAY OR DIY
You have really 2 choices
- Fit the Reed assembly and get the added benefit of little or no spit back, but no real gains in power, unless the cylinder you used was totally butchered and wouldn’t work well as a piston port type
- Fit the Reed assembly using MB’s long history in doing one off and production Reed conversions, or do it your self the way you think is best or what your mate says down the pub or off a forum or as we are going to tell you now
WORK REQUIRED TO MAKE A REED CONVERSION WORK
You have to look at the mods by doing it in steps and be capable of using a die, angle grinder or drill and at least know a little about porting work, if not don’t do it, give it a man who can.
- Make the Reed casting (manifold fit)
- Open up the inlet port to suit
- Add a boost port or a number of boost ports
- Alter or swap the piston
- Re-tune the cylinder to gain power advantages
- Look at the cylinder head
MAKE THE MANIFOLD FIT
This is the down side of the MB Shorty design but something which can’t be helped and needs doing. Fins need removing above the inlet port for the manifold to fit. Using two long studs fitted to the inlet port stud holes, slide the manifold down. Where the manifold touches the fins, mark them with a scribe, remove manifold and studs and grind the fin area, marked. You will need to do this a number of times until the manifold sits in place and has around 1mm of free space between manifold and fins and make sure the gasket face is seating perfect.
OPEN THE INLET PORT
Match the manifold to the inlet port and or match the inlet port to the manifold. Fit the long studs, slide down the manifold and scribe the inlet port face where any metal needs grinding out. Some cylinders need the reed altering by scribing from inside the inlet port. Remove the manifold and grind the inlet port face area to the line and if the reed manifold needs grinding grind to the marks. When done clean any burrs, fit the manifold to the cylinder tight and you can easily grind the manifold and inlet face from the outside making the transition from manifold to inlet a smooth one.
Open up the inlet port. This will depend on what cylinder you have and what has been done before! Ideally raise the port as high as possible (be aware of rings dropping into the port at BDC, this is the limit) Lower the inlet port to the maximum without breaking into the cylinder base face (sometimes tuners do this on purpose as we also cut into the casing but this is advanced work) As for widening the port, don’t go too far this area is where the piston takes a hammering (look at an old TS1 cylinder, below the port always shows signs of bad wear) And it is this area where the piston flicks on it’s upward stroke. Ideally make the port shape….. roundish or oval or squared off with a good radius in each corner
Add a boost port. If we are talking modifying a Lambretta piston then you are limited to how many or how wide a boost port can be, the same goes if you are using a Jap piston as these can have ring pegs close to each other and is not unknown to only get a 10mm wide boost port. Mark the top of the dome of the piston where the pegs are, then. Either fit the piston onto the con rod and slide down the cylinder or place the piston in the bore if it’s showing signs where the piston has been running. At BDC mark the bore finely with a scriber or marker pen where the pegs run. Then ideally mark inside where the pegs run 4-6mm away. This should leave a mark where a slot or boost port needs cutting. How wide? We see TS1’s widened to 30mm with no problems and we have seen and used 10mm slots, so anywhere between. Cut this slot up to level with the transfer ports or 1mm below, you can alter angles by raising the port higher I don’t like this way on road bikes.
Re-tune To Suit. You can re-tune the cylinder to suit you, where you want a power increase if any. If you are happy with your cylinders power in piston port format as it is, but don’t like spit back, leave the transfers and exhaust port as they are. If you want more power which can be gained from fitting a reed valve then play with ports. Raising the exhaust port is the easy way and because of a reed valve you can really increase the port durations.
Take a decent piston ported cylinder with an exhaust port timing of 170 – 175 degrees above that the bike has no pull, its has to be thrashed and geared correctly. Then look at say a TS1 engine with 185 degrees with a Reed valve. The basics says, add 5 – 10 degrees and it should work no problems and lift power and torque output! It’s doubtful you are going to get to TS1 power outputs without lots of specialist work.
We are aiming at TOURING and FUEL economy here on existing cylinder kits. Done right these engines will still show a TS1 a thing or two because of the drive-ability you should gain. When it comes to transfers, these are very important. Big is not best….. We have tested a RB up to 145 degrees transfer timings, it gained no power no where near a TS1 with 130 degrees. An RB has 138 degrees as standard, ever looked at a dyno graph of one, flat as a fart till 6000rpm then off like mad.
We did a GT200 Reed conversion in 1986 where, because of the GT inlet port it had 140 degrees transfers! It had loads of pulling power but would not rev, the transfers flooded the cylinder, it would have needed at least 200 degrees exhaust port to get it to work, but the power would have been after 7000rpm. Pick between 120 and 130 degree transfer timings depending on the cylinder. There are loads of theories, our MB shorty Reed Assembly is aimed at Touring engines, not racing, so keep things small and you will love the engines reliability, ride-ability and drive-ability.
CYLINDER HEADS
What a misunderstood area in Scooter engineering! All dealers have their preferred way to machine a head! Some good, some bad, some work and others don’t. Nearly every engine that come in for a jetting, seizing or holed piston problem come down to the heads! Every piston has a different dome. Lambrettas have high domes and Jap type motors have a flatter dome. Innocenti got the heads machined wrong in the first place! The basic as we see it are: The squish of the head should follow the dome of the piston and be as near as perfect from the outer edge to the inner edge……… Then get the compression ratio correct to suit unleaded fuel!
Simple! Get that right and the engine will lift power across the rev range and become reliable. So many people take an average of the dome in a straight line, this is easy as a lathe works in this way, but leaves an outer edge to fire when you don’t want it to. Others cut the head with a dome shape much greater than a piston domes, same as Lambretta did! This does nothing for an engine. We have dynoed an AF head and comparing our head on the same engine and gained 4 bhp across the rev range! In the old days it was said with Reed engines increase the combustion area to burn the extra fuel that would come from the boost ports! This does not work………. just get the compression ratio correct to suit that style of engine to run on the crap fuel we are using which is the main reason 2-strokes are getting more unreliable!
In days of old we could get away with 14 – 16:1 compression ratios, but we had 4 and 5 star fuels. Today we have shit and shitter fuel, compressions need to be around 9 – 10:1 uncorrected (read a book, or if you ask I may write a story on heads, heads are a mine field). Get the basics right and it will work! But be careful lower the head compression too much and you will get a gutless motor, lots of Italian heads and kits come with these, throw them in the bin! And lastly get the squish clearance correct 1.00mm to 1.5mm on road engines.
And that’s it, simple! If you know what you are doing! If not give it someone who does………. who I mean really does know, you could be wasting your money if not! Explained elsewhere we have thousands of pounds of tuning equipment, we have more than 30 years experience and have probably tuned more Scooter engines than anyone else. For this we do charge, these things take time! If its your first time trying tuning you will value the time, effort and money to do the job, this is why we have to charge if you want an expert to do the job…..
PART OR ALL OF THESE TUNING LABOUR MODIFICATIONS WILL BE REQUIRED TO IMPROVE A PISTON PORTED ENGINE TO A REED TYPE CYLINDER
- Full tune to Mugello/Rapido type cylinders
- Full tune to Race-Tour cylinders
- Full tune to Cast iron type cylinders Or individually
- Tune boost port above the inlet port
- Tuning to inlet port for reed valve, match and flow, bolted on
- Grind fins to suit oval reed block
- Reed valve tuning to exhaust and transfers, extra work to inlet port
- Modify and machine piston for reed valving
Plus, pistons, rebores and head mods if required. The only way to know is send it in or give it an expert to look at. Call the shop if this looks confusing and we can talk you through it 01709 869756.
These kits have proved popular, the feedback is excellent and everyone one has said they are well worth the money and effort I’ve put in to the modifications.

MB Shorty Reed manifold

Bolted and flowed to the inlet port

Cast iron reed tune to inlet port

Rapido Reed tune
.jpg)
Special one off inlet rubber to suit larger carbs

Complete reed assembly for larger 35mm carbs
.jpg)
Modified piston converted to Reed valving
.jpg)
Reed piston modified for Racing

Wiseco piston modified for Reed valving

Various ways to alter a piston to get 360 degrees inlet timing

Rubber mounting to suit 26, 28 or 30mm Dellorto, PWK type carbs

Rubber backed Malossi reed block

Various MB Reed blocks with different rubbers and reed blocks

Shorty fitted to a RT cylinder
.jpg)
Rapido 250 cylinder modified

Inside the Rapido tuned cylinder, dots for extra lubrication
.jpg)
Ceramic plated reed tuned cylinder

A modern Race-Tour Reed tuned cylinder kit

Various types of reed rubbers
.jpg)
LTH CNC reed block, needed welding to suit our requirements

The latest LTH cast reed assembly, again needed welding to work

Our first MB 4 petal reed casing from the 80’s

A sectioned 4 petal reed assembly cut away

80’s race tuning, a genuine 100mp road bike

90’s version 6 petal MB reed manifold

Sometimes its a single boost port some times its a twin or one with 3 boost ports
On the left is our MB shorty 6 petal reed block
When I needed a reed block that I could find I made one to do one dyno test!
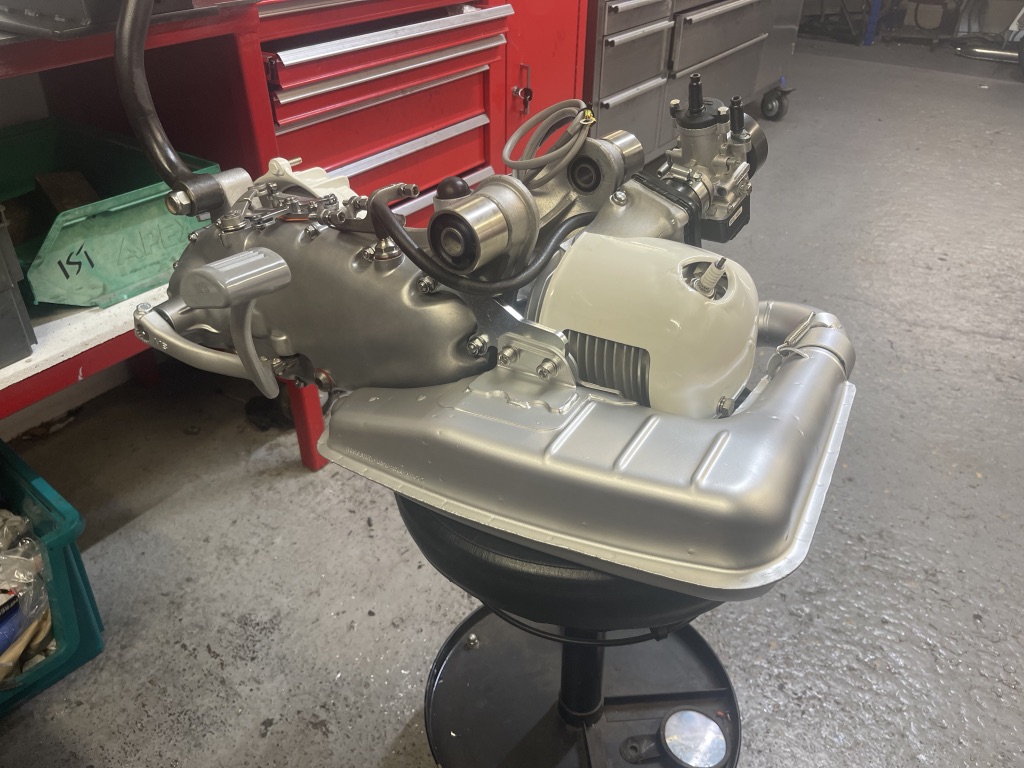
MB RT230 full package reed engine
Mark Broadhurst. If you have any questions please email Mark on mark@scooters.co.uk


