


TECH ENGINE MB OIL SEALS
I’ve been dealing with seals of all sorts of descriptions since the late 70’s. I’ve used and fitted hundreds and hundreds and sold thousands more, so you could say I know a little bit about seals.
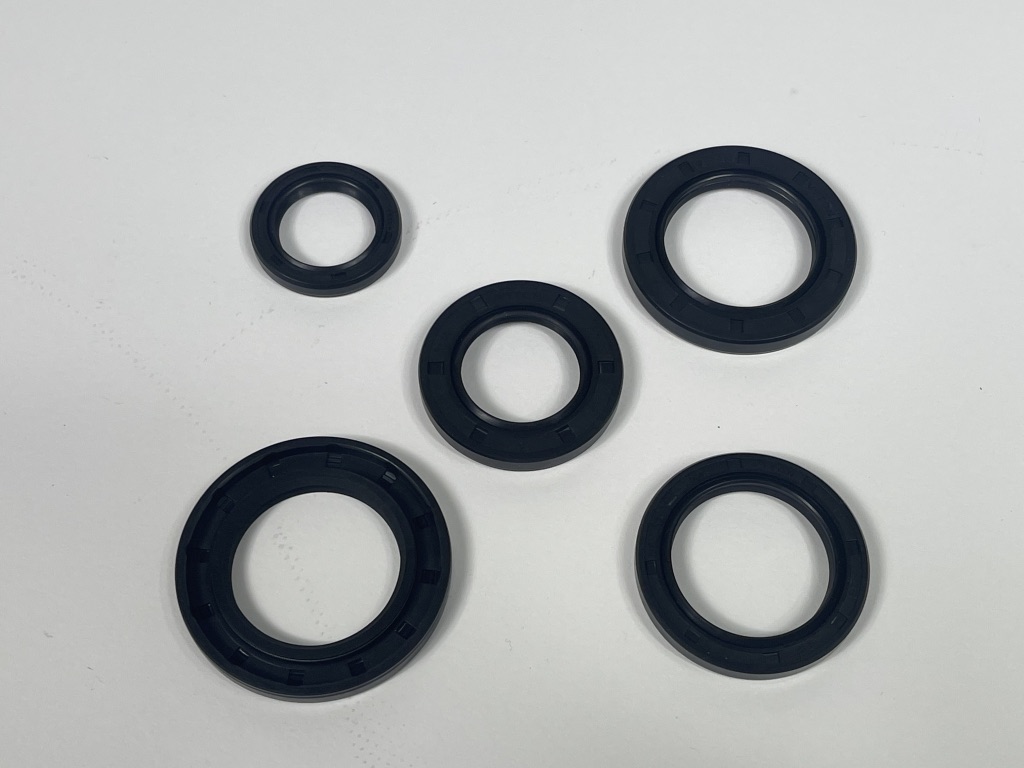
We all know a seal is a small round rubber object that fits between a casing and works with a shaft. Ok some Vespas use a metal seal, but presume we are talking a Lambretta here. A seal is designed to stop oil/petrol/dust from entering or escaping where we don’t want to! There are lots of different types and styles of seals, a Lambretta only uses a couple of types so I won’t complicate it by telling of seals you or I may never see or use.
Most of us will have learn’t the hard way about seals and how we should never take them for granted. I did, when I ran my first Lambretta a Li150 which was so slow I looked at improving the speed for two reasons.
- A bus over took me driving home from work up the long drag into Consibrough.
- A Honda C90 over took me going down Hill Top road in Conisbrough, which actually runs on one side of the new shop.
These are memorable times of the Li150, I then looked at tuning it by using the old 60’s tuning book! I tried it all and never really found any power, from the tunes to the 175 conversion! There was one thing for it, I bought an old second hand 200 casing and an old Tv200 cylinder. I tuned and rebored the cylinder, then I stripped my daily workhorse after work on Friday night and swapped all the bits out of the Li150 engine and fitted them all into the 200 casing. Ok I was young and eager!
This is where I learn’t one big lesson! Always change the bloody seal, don’t fit an old one! You’ve got it this super tuned 200 with Amal Mk1 and home made reverse cone exhaust, burnt gearbox oil and smoked the whole town out as I was thrashing around all night and kept people wake! The speed was well impressive at 60mph in 2nd! Silly me, over tuned and over geared at 4.4:1 and in the next few weeks the second hand clutch burnt out, snapped a Li crank, had points bounce and dropped a ring or two etc etc etc! On about been unreliable!
It was days of fitting second hand cranks, a crank would snap or a big end would go, we didn’t overhaul them just fitted another second hand crank! Li at that or even worse lots of Jet type cranks!
It’s how I learnt! The hard way! I had no money or anyone to help me……… this is the lesson of how Mark wanted to know more, build fast reliable engines and improve the way I went about it, get to work and back and do Scooter Rallies with little or no problems.
One year later I was building Liquid Cooled Lambretta engines, at 18! That is history as they say, but lets get back to seals.
I was a apprentice mechanic and started to learn how and why you need to fit a bearing and seal correctly.
Working for the main Yorkshire bus services it was drummed into you that every job you did meant there was up to 60 lives in your hands when a bus was out on the road, do a job wrong and the ministry of transport would pick it up. By the time I had finished my 5 years training I was never knocked back by one job I did, unlike nearly all the other mechanics that I worked with.
So I learnt very young about respect for the job, at 17 maybe I over looked fitting a new seal, maybe I didn’t have the time to buy a seal or was so young I thought stuff it. The lesson then was I had to strip the engine again the next weekend, It was the joke that my engine was like a zip it would come apart so often. It’s how I learnt!
By the time I had set up in business in the late 80’s I had done a deal with a national bearing and seal supplier who trusted me to sell seals for them. We were selling around 15’000 seals a year back then, it was amazing neither me or the supplier couldn’t believe it. Perhaps I was good at my job, perhaps it was because wrongly I plugged away that they were double lipped seals and would stop the age old problem of the drive seal going and letting gear oil into the cylinder!
Yes these were double lipped, I was young I didn’t know the 2nd lip was a dust seal only, today there are dealers selling double lipped seals saying they are the bees knees. The only time on a Lambretta when these actually work are on the front hub, where the grease seal works and there is some benefit from stopping dust wearing the grease lip.
Anyway these seals were made in Taiwan! When Taiwan had a bad reputation…….Jap crap and Chinese shit. But I think I can safely say the seals never went wrong, from memory I think they were TTO seals before anyone else was selling them or using them! It was times when dealers sold the latest Indian seals, or eastern block or Italian seals where there seemed to be very little quality control, perhaps this is why my seals sold so well. They fitted and worked as they should.
DOUBLE OR SINGLE LIPPED SEALS
The standard seal for all aspects of a Lambretta is a single lipped seal, this has one lip which seals from one side only. A double lipped seal commonly has the same seal but an extra bit on the opposite side which is just a dust seal, it is not an oil seal!. There is no harm to fit a double lipped seal in a Lambretta, there could be slightly more friction but it makes no difference.
We have looked at designing a drive seal with a REAL double lipped seal to work both ways at the same time. Normally these seals can only be made if the seal is wide enough, normally a drive seal is not wide enough but we did design one but they were four times more money than standard and we didn’t think it was worth the investment.
SO WHAT IS A SEAL AND WHAT DO THEY DO
Funnily enough a seal needs to seal, in a Lambretta engine it needs to seal crankcase pressure and oil mixture, it needs to stop gearbox oil leaking and it needs to stop grease from coming out of places you don’t want it to.
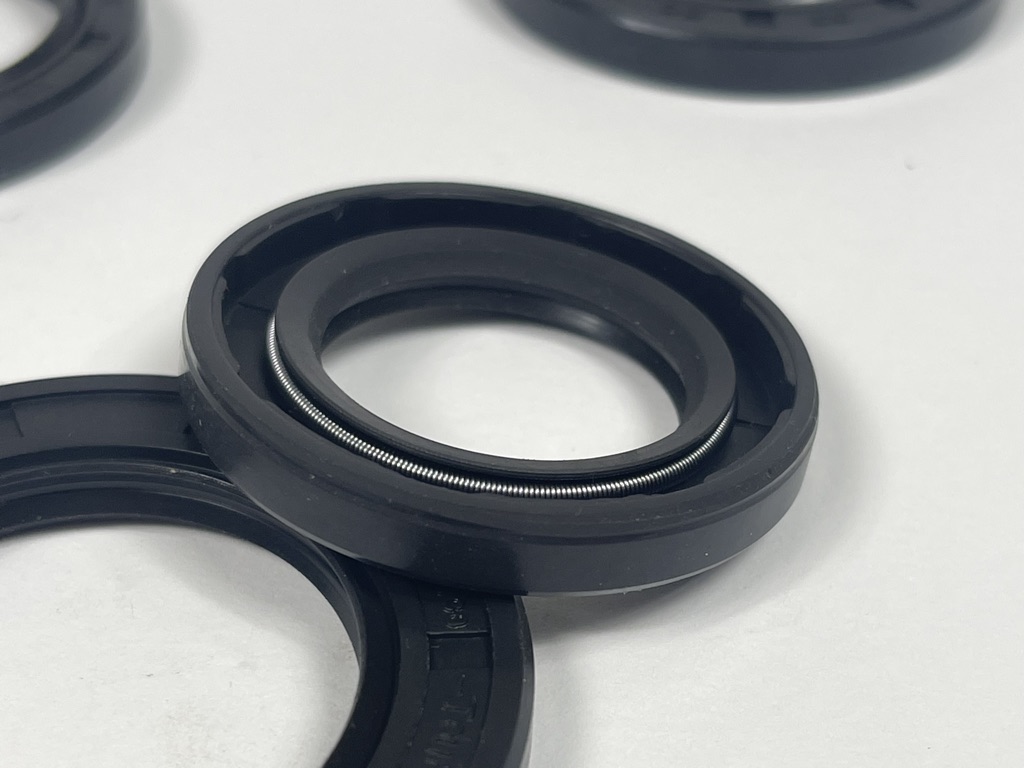
A seal is a round object usually made from pressed metal usually covered in rubber. It is designed to fit tight into a casing and stay in place and be tight enough to seal on the outside surface, rubber is perfect for this. Then it has a concave shape with a sharp lipped inner area that has a coiled spring around it. This sharp lipped inner area runs on a shaft or bush in the case of a Lambretta.
Seals are usually black, but black is not the natural colour of rubber, black has a dye in it, the same as tyres, tyres are coloured also. Sometimes you may see blue or brown seals. Again these are only coloured it doesn’t necessarily mean they are a better seal, Viton seals which are considered best in certain circumstances are usually brown.
Contrary to popular believe the inner edge of the lip of the seal does not touch the shaft but a very small bead of oil or grease runs between the shaft and the lip. Without the oil or grease as a lubrication the lip would just burn out. This is why we SHOULD oil or grease a seal and shaft before we run a motor from new or when overhauled.
Then we have different rubber compounds and hardness’s. The basis of a Lambretta seal only needs to be made from Nitrile rubber which is standard, these work perfectly fine with a Lambretta and with the heat generated by the engine which isn’t high enough to damage a Nitrile seal. APART from the crank shaft seals where un-leaded fuel mix may touch the seal and possibly destroy it. Today with only unleaded fuels around it is thought that these crankcase seals need to be made from VITON which is a different rubber but withstands the corrosive factors that we now get from un-leaded fuels. There is no need to use a Viton seal on a outer mag seal, kick start, rear hub or front hub it would be a waste of money.
HOW DOES A SEAL WORK?
The inner lip spring keeps the inner lip tight against the part where it needs to seal. But its not just the spring that makes it seal, there is also pressure to think about. The spring comes in different grades or tightness, have a spring that is too tight and the inner lip will be tight making fitting anything into it without a big chamfer HARD to do. Once fitted the pressure pushing against the inner lip (spring side) and the seal will be forced onto the shaft therefore causing a seal.
We should look at the each seal and what it is there for!
DRIVE SIDE SEAL
This performs two functions, to stop oil entering from the gearbox into the cylinder side of the engine and stop petrol/oil mixture entering the gearbox! Seems simple? So why does the seal fit with the spring pointing towards the crankshaft and not the gearbox? Well as the piston goes up and down it creates a pressure, crankcase pressure! It doesn’t matter if you want to talk about high or low crankcase compressions its all the same where a seal is concerned. This pressure is higher than the pressure from the gear box (the gear box is open to atmospheric pressure via the crankcase breather, crankcase pressure is higher, try putting your hand over the carbs bell-mouth when kicking the engine over you will feel it suck hard).
LARGE MAG SEAL
This works in exactly the same way as the drive seal except there is grease at the rear of it. The same applies to which way the spring fits, towards the crankshaft as the crankcase is greater and it needs to stop petrol/oil mixture entering the grease in the mag bearing.
SMALL MAG SEAL
This has one function to stop grease leaving to the outside of the Mag housing. The grease, once warmed up becomes like oil so this seal is considered an oil seal, there is a greater pressure from warm oil than the out side atmospheric pressure.
KICK START SEAL
This has one duty but you could also consider a 2nd duty. 1st is to stop gearbox oil from leaking out of the crankcase side. 2nd which is not very important, if this seal was a doubled lipped seal it could in theory stop dust effecting the seal lip. In reality dust doesn’t effect this seal here. This seal works occasionally, apart from when the kick start is engaged it just sits there and its main job is statically to stop oil.
REAR HUB SEAL
Again this is exactly the same as the kick start seal except as the engine moves the seal needs to constantly seal on a moving shaft (the inner bearing race of the rear hub seal) Dust does accumulate on the outside of the bearing but again it’s not important and a double lipped seal isn’t really needed.
FRONT HUB SEAL
These have one main function, both inner and outer seal has to stop grease leaking outwards onto the brake linings and also to stop the bearings drying out. As the outer seal is close to a lot of dust and perhaps water, a double lipped seal could be an advantage but it is not important.
SPEEDO SEAL
This is not a traditional engineering seal, its basically just a soft rubber seal without an inner spring. Surprising it works by stopping the grease from the speedo drives entering the brake shoe/pad area.
HOW DO YOU FIT A SEAL?
Well if we are talking about a Lambretta engine lets do it this way; they are all very easy to do. BUT always be careful, never damaged the inner sharp lip or the seal will not work correctly. I always fit the seal with the outer edge dry this aids the seal for long life once fitted but always oil or grease the inner lip and what ever it is fitting on.
SMALL MAG SEAL
This is so simple. For a start if you are fitting a new small mag seal then we are presuming the mag housing is empty and stripped so the mag housing needs warming, I’ve used oxyacetylene, a gas stove, a camping stove, gas torch and an electric heat gun. If you could fit it in boiling water that would work also. Providing the mag housing is warmed enough, with the mag housing inner face facing you and rested firmly on a flat surface all I use is a wide bladed flat screw driver which I push in on the lower gap between the outer seal and inner seal. The spring faces inwards towards the crank. Push it lightly one side and then opposite and it just pushes in! Easy! Dealers asked for years for me to make a special fitting tool, in the end we did.
LARGE MAG SEAL
Out of all of the seals this is the hardest to fit. Presuming you are overhauling the bearing and everything is at hand whilst it’s warm the second to last thing to fit is the seal. The inner spring should face the crankshaft. We make a plastic tool which fits in the lower edge between the outer part of the seal and inner lip. This lower edge is usually metal under the rubber and is strong enough to either hand push in if warm enough or tap in with a hammer. I’m not one for bodging, our plastic drift is the best way to go, I’m not one for using big sockets and tubes and wacking in the seal with a hammer, but if your careful this would also work.
DRIVE SEAL
Again very easy, this one can be either pushed in or tapped in. There are different types of drive plates, the original steel Li/Sx type and alloy Gp types, the steel ones are ok but usually rusty, the alloy ones are usually warped and should be swapped. Both don’t have a large chamfer to aid the seal when fitting. I prefer our remade steel one which I added a larger chamfer to make the seal fit easier. Remember the spring fits facing the crankshaft.
REAR HUB
Easy if done right, the hard bit is making sure the inner lip is not caught and damaged. There are some bearings where the inner bearing race does not have a chamfer or big enough chamfer to lead the inner lip onto the inner race and the inner lip can cut. So start by fitting the seal from one side and gently tap the outer edge of the seal into the bearing to get it started, then with your finger nail make sure the inner lip is pushed over the inner race. Once this starts to fit it’s easy to slowly tap around the outer edge of the seal but watch that inner lip, make sure it deforms correctly over the bearings inner race. I grease the inner lip and fit the out dry so it grips the bearing and wont spin. We designed our MB rear hub bearings with a large inside and outside taper to aid fitting the seal.
KICKSTART SEAL
Easy to fit into the casing, just keep it square, I have a special drift but a little hammer does the job, gently. The spring should face the gearbox.
FRONT HUB SEAL
I use a special MB drift, this is an easy one to fit, fit them with the spring facing towards the bearings, you could use a socket or tube if you want.
SPEEDO SEAL
Easy no hammers or drifts it just pushes in by hand, the spring side if there was one faces away from the bearings.
That’s fitting the seals into position, the next step is not so easy and is make or break especially with the drive, large mag and kick start seal.
DRIVE SEAL
Once the seal is fitted into the drive plate and fitted into the casing the hard part is fitting the crankshaft. There has been criticism of our Viton seals. We have used Nitrile seals for years BUT with un-leaded fuels as with other manufacturers we are now using Viton on crank seals. We had our own made with Race-Tour printed on them, these are also distinguished by been a brown colour.
There is nothing wrong with our Viton seals, although we did have a small batch supplied some time ago and are now well out of circulation, The spring was only one coil too tight, which made the inner diameter too small and made them hard to fit, especially if you don’t know what you are doing or the crankshaft inner seal shoulder had no or a very small chamfer. We had sold many hundreds of these seals with no problem, it takes time for faulty parts to feed back to us especially when we have sold hundreds previously with no problems. When it was pointed out it was too late for some people. It was only a small remade batch that we supplied faulty. When we found out we swapped the spring for a new one and everything was back to normal. We have only ever had a problem with a small batch of drive seals and never with a Large mag seal. People just like to make a mountain out of a mole hill.
There is only one real way to fit a crankshaft, like it or not it’s Marks way. If you really don’t want to have a problem lipping over the drive seal then do it Marks way. First never hit the crank in with a hammer! It will damage or knock the crank out of alignment. ALWAYS use a drive side puller, which acts on the drive bearing and use the drive bolt to pull in the crankshaft, tighten the drive bolt with a socket and ratchet. First gentle fit the crankshaft into the drive bearing, if it slots straight into the bearing by hand you will need to use a SMALL amount of loctite or bearing fit only on the shaft that fits in the bearing. Loose cranks are quite rare but always check it, if you don’t, oil can pass through the crank and bearing just another problem to avoid. I grease the seals lip and then oil the crankshaft seals shoulder, be careful not to catch the drive splines of the crankshaft on the inner lip, they can be sharp. Once in position, fit the drive puller and bolt. I’m right handed so I hold the cranks flywheel taper shaft with my left hand and tighten with my right hand. If your left handed…….. err I don’t know what you do sorry!
The real trick is………. constantly turn the crank with your left hand whilst tightening with the right, this spins the crank, as the cranks seal shoulder hits the drive seal which remember is rubber it will deform, as it spins the seal will want to deform over the crank shoulder. If you don’t spin the crank the seal will want to double over onto it’s self. This is the most common fault which will occur when fitting a seal and this is where the Viton seals get the blame for been unreliable, it’s the person fitting them. This will not allow the seal to work, it will rip or double back or both and the spring will pop off and usually the tell tale sign for this is the crank will be hard to turn by hand. If fitted correctly the crank will turn by hand with no resistance. If your not sure remove the crank and check the seal. If damaged just change it for a new one, they are so cheap even the Viton versions compared to another rebuild at a later date. Trust me! Do this method and even the small amount of tight Viton seals that we sold will fit with no problem.
There are 3 types of drive bearing, the Lambretta drive bearing is what is called a popular metric roller bearing, quite easy to get, it’s not a special. But these bearings come in different fits, that is to say tolerances between inner and outer races and ball bearings. I always have used a standard C3 fit and have never had a problem. Some people say they are too tight for a high revving Lambrettas, this is rubbish! A C4 bearing is much looser and I find they cause more trouble than they are worth. Check the bearing books and a standard bearing is well within our rev range. These bearings come as a standard but they also come with one grease seal fitted and some come with two seals fitted, these are steel shields, the oil seal version has one or two rubber seals fitted. I have always used the single rubber seal version or the twin sealed version which is cheaper and you can flick one seal out no problem. These bearings with seals do lower the theoretical rev range but again don’t worry I’ve NEVER had a problem from them road or race. Fit this bearing with the seal facing the crankshaft and you get a double seal. Many years ago I fitted a crank with a sealed bearing, I lipped the seal without knowing and over 10’000 miles later I stripped the engine with no problems or burning oil to find the damaged seal the bearing seal had done its job! Proof in the pudding.
MAG HOUSING SEAL
The trick with the Mag housing seals is to get the Mag housing into the casing and onto the crankshaft without damaging the seals. To do this is, make sure the Mag housing is a very easy or sloppy fit into the engine casing. This is something I do before I rebuild an engine, all I do is clean out the casing with a flap wheel, it doesn’t take long and I do it so the mag slides in and out with no effort, definitely make sure a mag housing doesn’t need hammering in as most do! By making the Mag housing really loose it allows you to push it down the crank and wobble it into place. Make sure you grease the Mag bearing and leave enough on the seal edges. The outer or small Mag seal is never a problem when fitting onto the crank so don’t worry, this is because the seal has a very long and smooth entry onto the crankshaft.
The Large or inner Mag seal can be a problem especially if the Mag is tight in the casing as you have no feel right at the end of fitting when the seal starts to sit over the shoulder. The Large seal doesn’t have an easy long chamfer, by having this loose Mag housing and wobbling or rocking the Mag into place it will naturally feed the seal over the seals shoulder. Again like fitting the crank into the drive bearing, once fitted there should be little effort by hand to turn the crank. It is very rare that a Large Mag seal lips over but it can be do. If you can turn the crank whilst fitting the mag housing then it would make sure the seal doesn’t lip. The other advantage of a really loose Mag housing is the crank, and bearings will centralise the Mag housing inline. If the Mag is tight and the machining work from the factory is not so good it could pull the Mag to one side taking the crank with it therefore pulling the crank out of centre! When I say a loose fit on a dry rebuild the Mag should fit inwards easy and have a slight wobble and will rotate side to side even with the Mag studs fitted.
KICKSTART SEAL
The kickstart is a law unto it’s self even without worrying about the seal. I personally fit the seal into the side casing before fitting the shaft. Others fit the seal after the shaft has been fitted. Either way there are so many different shafts some good and some bad. What you need to look out for is that the shaft has a big chamfer from the outer edge where it will feed into the seal. Some shafts come with no chamfer, it’s easy to file one or grind one and polish it yourself. This trick will save the kickstart seal when fitting, however you do it, I always fill the side casing with grease between the inner and outer kickstart bush, this obviously aids fitting into the seal but the kickstart seal is prone to leak, by packing the side casing it keeps the kickstart shaft lubricated but prevents gear oil pushing passed the seal. Always be careful and watch the inner lip of the seal doesn’t lip over which it can, if it does start to lip, twist the shaft or gently push around the lip until it is correct then finish by pushing the shaft fully home.
So what problems indicate a damaged seal?
The worst one to go is always the drive seal. This is quite easy to suss out, with the engine running you will get thick white smoke coming out of the exhaust, this is because the gear oil can enter into the crankcase and not burn correctly. This can be mistaken for bad petrol and oil mix, running engines by stopping and starting them or just leaving them on tick over and not getting the engine hot enough to burn off the unburnt fuel mix left in the crankcase or what may build up in the exhaust. If you are not sure take the bike for a good ride, get it warm and give it some revs. Sometimes the seal may be leaking very slowly it may not smoke a lot, you may think it’s a normal 2-stroke, but check your oil level if the gear oil is disappearing.
It’s rare Mag seals go, if the small Mag seal goes you can usually tell as it will leak grease into the stator area. If the Large seal goes it will eventually fill the Mag bearing area with fuel so the leak will become wetter and may run out of the Mag housing. Do not get confused with petrol leaking form the tank cap and constantly running down the engine casing.
The kick start seal is obvious, it will leave an oil drip or the area will become damp.
Now the rear hub seal always comes in for bad press! It always gets the blame, providing the seal was fitted correctly in the first place it’s doubtful it’s the seal. The rear hub bearing hardly ever goes, it may become a little wobbly but the seal can usually cope, unless it has done a lot of miles. What usually leaks is the O ring on the layshaft or the oil comes around the back of the casing, the easy sign is you loose your rear brake. Tip; when fitting the bearing in a casing make sure both the casing and outside of the bearing are clean, smear silicone sealer around the casings before the bearing is fitted, when fitted wipe around the bearing and leave enough so when the rear hub plates are fitted it will create a seal. Wipe the excess off inside the casing and don’t let it enter the bearing.
Front hub seals are quiet obvious, they either leak and show on the outside or on the inside and eventually will stop the brakes working, this is usually common if you have grease nipples and grease according to the old manual.
O RINGS
These are seals of some description, as mentioned the layshaft O ring is the worst culprit. I always fit a layshaft by making sure the inner bearing face and layshaft are totally clean. I then put a small amount of loctite in the layshaft groove, fit a new O ring and smear the loctite around the O ring before fitting into the bearing.
The next culprit is the gear arm O ring, these can leak and gives the symptoms of a leaking shocker. All casings vary in size and the gear selector arm bush can wear, the standard O ring is a 2.5mm thick sometimes I fit a 3mm O ring to tighten up the selector arm and make sure it does not leak.
There is also an O ring fitted to the top of the clutch arm shaft, fit a standard O ring these never leak.
I use an O ring on the rear brake cam between the casing and brake arm, this stops water entering the brake cam area which should stay lubricated, the Lambretta brake cam is not the best design in the world.
There are also O rings used in the front brake arm, again corrosion and lack of grease is the only problem here.
Before I finish off, seals come in for a bad wrap, mainly the crank seals! If the crankshaft spins out of line, that is; the crank is shocked loose from been tight and in line to center it will knock seals out quite quickly along with the bearings. But before this happens the bike will vibrate, damage the ignition system till the bike stops working or a really bad out of line crank will lock up. Certain cranks are common for this even after many years on the market. We have developed our Race-Tour cranks over many years to try and avoid our cranks spinning. We think we have cured this without welding the crank-pin which we think is a no no! Of course it’s possible a crank could be out of line and you don’t know the only way to find out is to have it checked on a special jig.
A main problem is the chamfer that come on the drive and large mag seal shoulder on some cranks, they are just not big or long enough! The Lambretta crank design is very limited to improve too much. Chamfer too much to help seal fitment and there may be no area good enough for the seal to work. We now do a double chamfer to get round it on our Race-Tour cranks to make fitting them as idiot proof as much as we can.
MB Offer seal kits to help engine rebuilds
- Engine oil seal kit
- Crankshaft upgrade kit
- Engine O ring kit

MB Viton seals, we made thousands in brown to identify them if there was any comes backs, there was very little so now we do them in black
Full Viton engine seals set for Lambrettas
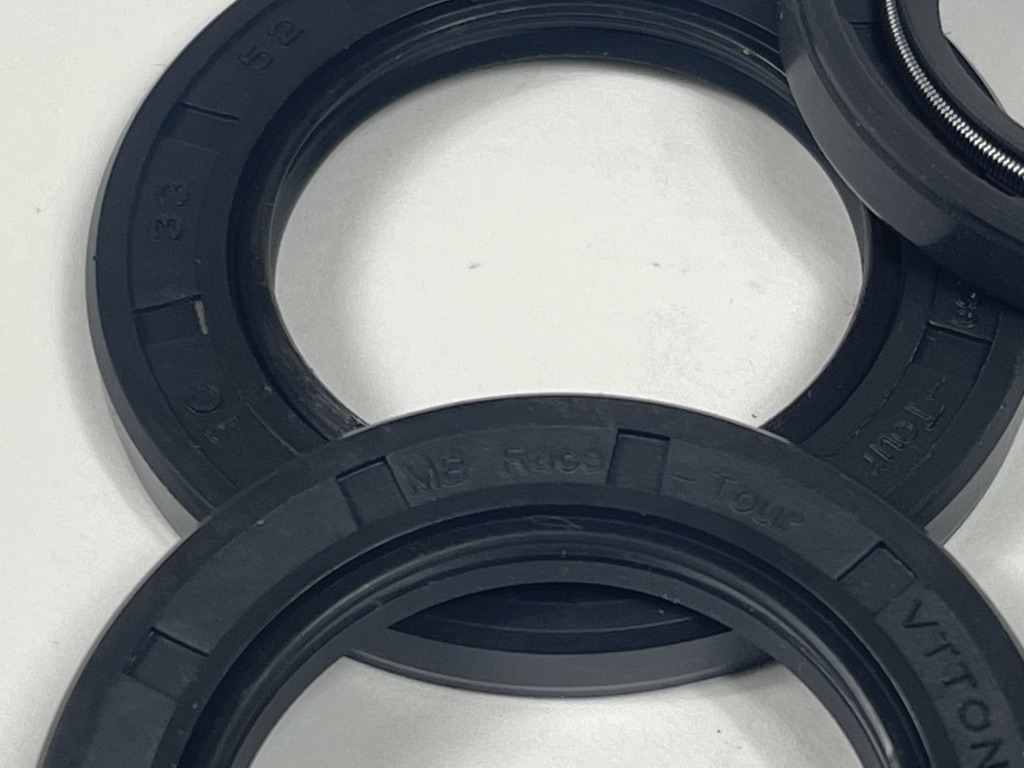
Our genuine Viton seals are marked ‘MB Race – Tour’
MB Viton seals have a large chamfer to help when fitting
Mark Broadhurst. If you have a question please email Mark mark@mbscooters.co.uk


