


TECH ENGINE MB IGNITION SYSTEMS
This article is not a fault-finding article on how to repair faulty ignitions. It is to try and identify your ignition system, point out their faults and help your tuned engine become more reliable.
The ignition system would control how a tune, carb and exhaust would work as a package. A poorly set up ignition would mean the tune doesn’t work correctly and would become unreliable. All Lambretta engines need a good ignition system as much as it needs a piston, crankshaft or exhaust system. This is a fact and it is a very important part of the engine especially a tuned engine!
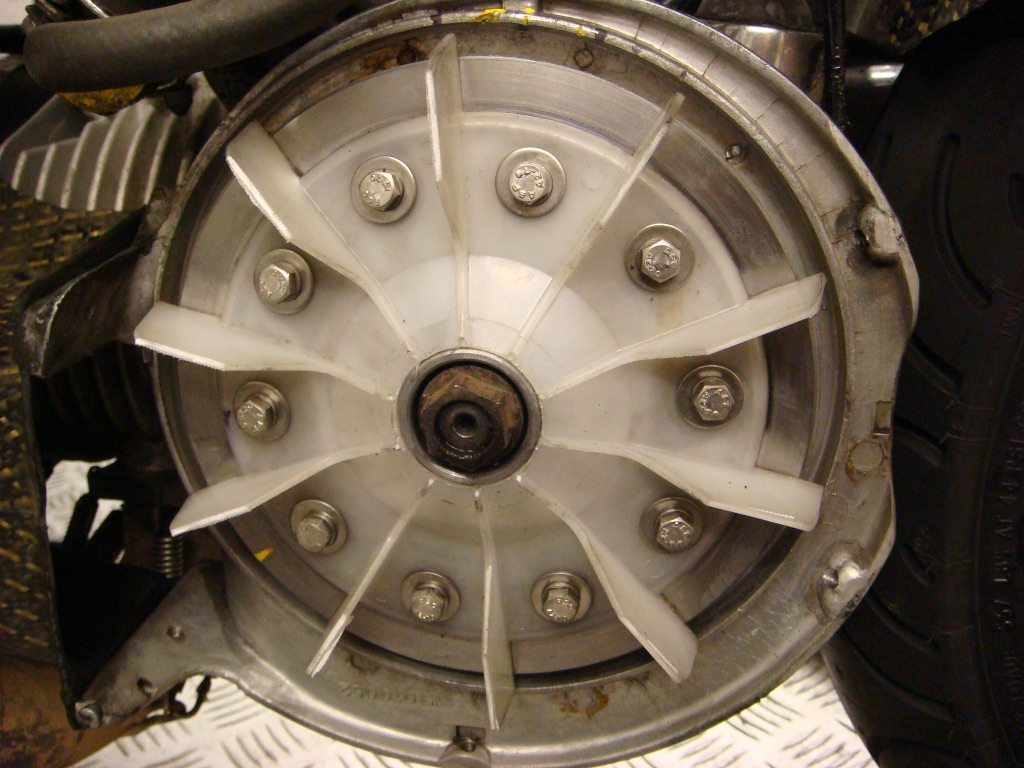
From the beginning of the Lambretta engine the ignition system has always used the magneto points system. As an easy explanation the flywheel has magnets embedded in it, as the flywheel turns it creates a magnetic field around coils located on the stator plate, this generates power for the lights and ignition. This type of system on Lambrettas has always used contact points control when the ignition / spark plug fires. Some systems used batteries and some did not. The basic system has been modified from the model ‘A’ right through to Grand Prix 200. There have been variations on each system over the years but for tuning purposes they were all basically the same. The early engines have four-pole flywheels and stator plates, this means they had four magnets within the flywheel creating four pulses, hence the four pole system. The later versions were modified to six pole ignitions, i.e. six magnets in the flywheel.
SERIES 1, 2 AND EARLY SERIES 3 (four pole generators)
We haven’t covered much of the early models in the tuning sections. Most of the tuning is relevant and still works the same. There have been four early systems used, these systems used brass flywheels and if still running could work fine on very mild tuned engines, especially engines that have kept their original carbs and exhausts as these limit the amount of power and revs that that engine will do! Any ignition system would have to be in tiptop condition to stay working on a tuned motor. These systems when working could be fine on a standard engine, but lack power in the lighting department, this can effect the ignition system and cause problems with firing of the plug when the lights are on! These systems were quite inferior especially when used with high revving tuned engines and would be best at least converted to the Series 3 points type. Changing any of these systems can be done by upgrading to the later series 3 type systems. This would require changing the relevant parts needed for the system to work.
SERIES 3 (6 pole generators)
These systems were fitted to all of the later type Lambretta models. There have been variations to these models.
There were two types:
1. The AC system (alternating current) i.e. non-battery. These had 4 different coloured wires, purple, green, brown and pink.
2. The DC system (direct current) i.e. battery system. These had 4 wires, 2 yellow, green and brown.
And there were two variations:
- The Li, SX, TV type using the thin crankshaft taper
- The GP type using the fat crankshaft taper
Flywheels were not interchangeable between crankshafts but all other parts were basically interchangeable.
Early systems used single spring points. This was one of the main tuning failures as the single spring was not strong enough to take the extra revs of a tuned engine, this caused points bounce and misfires at high revs. This misfiring may have taken place at revs as low as 5000rpm. The later systems used double spring points this, within reason, cured the problem of point’s bounce.
Other factors also affected the ignition system with regards to tuning.
Flywheel magnetism. If the magnetism became low this could mean bad starting. Or when turning on the lights the engine could cut out. Dim lights were also an indication to low magnetism. If the points gap became too big then this effected firing and lighting. If the flywheel bearing had a lot of play then this effected firing.
For most Lambrettas UK models or imports the 6-volt, 6-pole system is the most common. Parts are freely available new or second hand.
INNOCENTI’S ELECTRONIC IGNITION
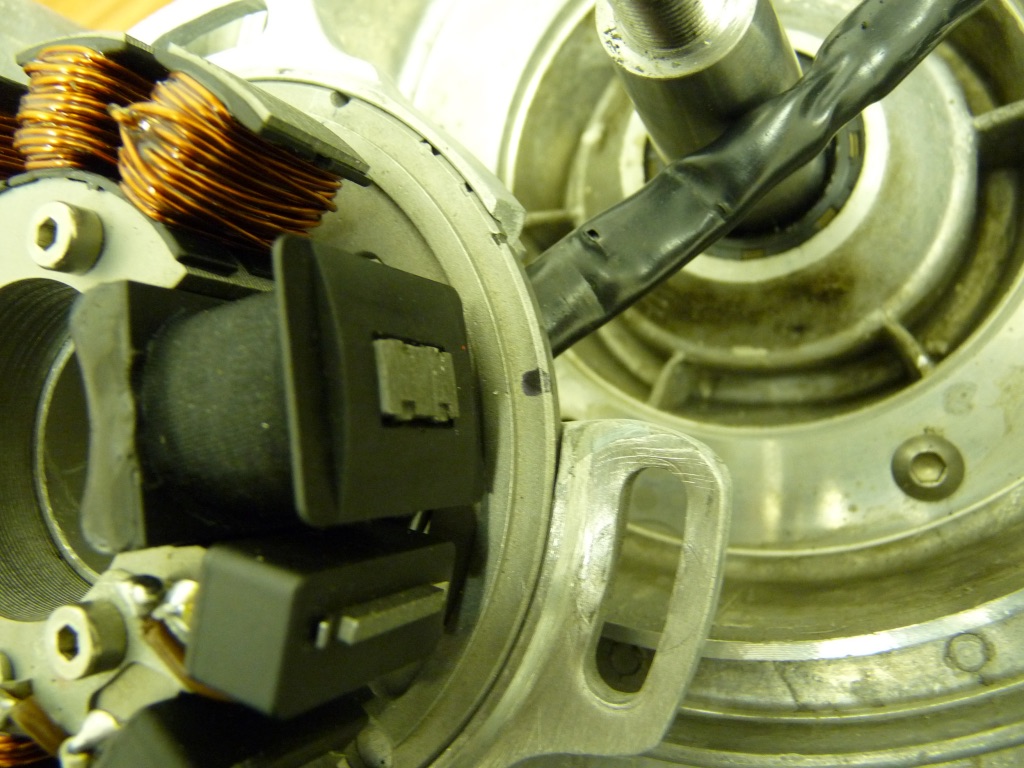
Towards the end of the Lambretta production range, the Grand Prix 200 Electronic scooter appeared with a totally new ignition system. The flywheel and stator plate looked very similar to the original points system but instead of points and condenser it had an electronic black pick box (chopper/pickup pulse coil) a different low tension coil and now had a different ignition coil which was square shape and Red in appearance. The system had 6-volt lights, and to my knowledge the ignition was still 6 volt. From the outside the flywheel looked identical to a GP flywheel. The only difference were that two magnets had prongs that over lapped each other, this was the magnetic chopper controlling when the spark fired. Some flywheel bosses had no cam to open the points but I have seen flywheels with the cam type boss.
In my youthful days I seemed to be surrounded by old electronic Lambrettas, they were all unreliable for some reason. The main fault seemed to be the Red ignition box, twenty years ago they fetched and held their money, even more so today. It was possible to change to the later Vespa electronic coil if wired up different. Other faults which effected the system from working was the stator plate, these seemed brittle and fell to pieces. As with all GP type flywheels used on fast tuned engines the die cast flywheel would crack around the boss and break! The GP system came out in the late 1960’s, Vespa didn’t bring out an Electronic ignition until the-mid 1970’s with the introduction of the Rally 200, and this system was totally different! But in the late 1970’s Vespa brought out the PE200 Scooter with electronic ignition nearly 10 years after Innocenti! Ducati Electronica who made the GP system again made the Vespa system. Basically the system resembled the GP one, the lighting was now 12 volt and had a Black ignition box instead of Red. By using the Vespa parts the Lambretta system could be repaired to work very well. With the end of Innocenti, ignition system development ended for a while. Both Scooters Indian limited and Servetta Spain took over production from the Italians. Early scooters used Innocenti left overs, as these ran out India and Spain produced their own versions of the later Italian points systems.
AFTER MARKET 12-VOLT BATTERY CONVERSION
In the 60’s someone clever came up with a conversion where the Series 3 stator could be rewired and used with a 12-volt DC rectifier to give better more power full lights. The new system added an extra 6-volt battery fitted into the toolbox, this was a strange one as it used a positive earth system, totally different to any other system before or after apart from later SIL systems used the same Lucas positive earth system with a zener diode as a heat sink. Today this DC system is still used but now it’s based on the easily available 12-volt electronic systems. More on this to follow.
SPANISH LAMBRETTAS
As stated the Spanish factory used up old supplies of Innocenti Sx / LI ignitions. They then had their own systems made by the Spanish firm Motoplat. These systems looked similar to the Li systems but flywheels and stator plates were different and parts were not interchangeable.
Spanish points only had a single spring and again tuning a Spanish engine had the problem of point’s bounce at relatively low revs! The main downfall of the Motoplat systems was reliability, if they worked they worked well, but most were unreliable only working when they wanted, especially in the rain! The early AC system could blow bulbs very easily and it has been known to fit 24 volt bulbs all round to cure bulbs blowing!
Motoplat had variations of their systems, they introduced 6-volt and 12-volt lighting and used different regulators and wiring set ups, again very little was interchangeable with the Italian or later the Indian systems. All these systems had no interest from the tuning point of view.
The Motoplat points system used different points and condensers and were not interchangeable with either the Italian or Indian systems. The point’s system flywheel weighed approximately 3kg; similar to the Italian item. Using this weight on tuned Lambrettas, especially Spanish engines with Spanish crankshafts, problems could occur as the flywheel’s weight could cause the crank taper or crank pin to snap!
In the-mid 1980’s Motoplat introduced an electronic ignition system that fitted the Li type crankshaft. This system worked well, both lighting and ignition were excellent and was much improved over the points system! Unfortunately its downfall for tuned engines was again the flywheel weight. These flywheels weighed 3.2kg, by far the heaviest flywheel produced for Lambrettas. Although very well made it was far too heavy, even heavier than a standard Ducati flywheel. The problem with heavy flywheels on Sx / Li crankshafts is that the crank tapers are not fat or strong enough. The flywheel weight can snap crankshaft tapers and crank pins. This seemed more so with Spanish crankshafts as the crank webs and crank pin didn’t seem as strong as the Italian versions. The flywheel had enough meat to be machined down safely without affecting the cooling fins or without the need for a plastic fan, but the crankshaft was still prone to failure. To identify a flywheel was easy, look at the cut out inspection holes around the flywheel nut, this was the only flywheel with triangular holes for a flywheel holding tool to fit. The coil was different to other systems, still Red and similar to the MSC item but not interchangeable. The regulator looked similar to the Vespa regulator and again was not interchangeable.
INDIAN LAMBRETTAS
As stated the Indian factory used up left over ignitions from the Italian Grand Prix range. As parts ran out SIL introduced their version of the Italian systems. The main difference was the flywheel. This was changed from a two piece die cast item to a steel and alloy type using nine separate pieces riveted together (not including the rivets!). It has been known for rivets to shear and fins explode! The stator plates were altered to either 6-volt or 12-volt and could be AC or DC lighting with their various versions of electrical accessories. Some systems used batteries some didn’t. The Indian systems had such a bad reputation for unreliability. The points and condenser were unreliable but could be changed to the Italian type, as these were interchangeable. Basically because very little was understood about the Indian systems people tried to set up as per Italian ignitions. But the Indian Ignition needed different points and plug gap, and also used a different coil! If setting up as per Innocenti then problems occurred! If they were set up as SIL recommended they worked quiet well. It was and is with out doubt that Indian electrics are not as well made as the Italian versions and this is still true to day!
MIDLAND SCOOTER CENTRE. DJ MOTOPLAT GP ELECTRONIC IGNITIONS
In the early 1980’s MSC found a supply of Motoplat electronic ignitions originally fitted to a micro light aircraft. These systems used a full 12-volt lighting system with lots of DC power, you could run fog lights from the system! The system was a battery type and used a standard 12-volt Lambretta battery.
With use you would find the battery burnt out regularly! Ideally a larger battery or two batteries needed fitting to cure this. The ignition had no advance feature and used a fixed firing point. It used a coil similar to the Spanish Motoplat systems but was different and not interchangeable and could be identified by an extra pin for a rev counter. These systems looked like no Lambretta system used before or after (apart from the later Servettas) there was a limited amount available, to date they are so rare I haven’t come across any of these systems on working Lambrettas for years. The last one I had was used on my sprint engine to good effect as the flywheel had some weight but not too much. The flywheel weight was approximately 1.4kg. It had no cast fins on it so a plastic fin was needed, this was no problem as the flywheel was nice and large and had a flat area to locate a plastic fin and had loads of places for bolts. The stator plate looked like no other before, as it was sealed in a Red epoxy (similar to the later Jet item) a special alloy plate was made to suit to mount inside the Lambrettas mag housing. Also the flywheels taper was machined to fit only the GP type crankshaft. Fitting a peg through a small hole in the flywheel set up the ignition timing, this then located into the stator plate, the same as the later Servettas. A special stepped woodruff key was required for this system from new or the flywheel could be modified to take a standard woodruff key which is what we did to engines. The main down fall for the system was that the battery would lose charge over a few nights and a special ignition switch was required to cut the earth out, stopping this discharge. Or alternatively a cut out switch could be fitted to the earth strap of the battery. When these turn up and they were really well made, shame the supply dried up.
VESPA PX AND PE IGNITION CONVERSIONS
In 1985 I worked at Beedspeed scooters and was introduced to the delights of Vespas! One thing I saw straight away was the Vespas ignition. As I looked at the PX and PE stators I realised they would go straight into a Lambretta engine. To do this it required the Vespa stator parts swapping on to a Lambretta stator.
This could be done in 2 ways.
- Unsolder all wires, bend over the coil tabs and remove each coil and part individually, do the same to each stator then rewire the Vespa parts onto the Lambretta alloy part of the stator
- Another way was to leave all the coils intact, drill out the rivets securing it to the alloy back plate then swap that onto a Lambretta stata, then rewire it
You could do this to a PX points stator very easily. By swapping the PX coils and leaving the Lambrettas ignition coil, points and condenser, this gave your Lambretta 12-volt lights (the PX regulator needed using) and you could use either the Lambretta or Vespa coil systems depending on how you did it. The total Vespa conversion was best, as the ignition coil was more reliable that the Lambretta item. Doing this conversion would use existing points and Lambretta 6 pole flywheels. This system was very good and cheap but still used points with their problems on tuned Lambrettas. The other way was to convert all the PE electronic system over on to the Lambretta stator plate and use a GP electronic flywheel, this again was very easy but the flywheel was getting hard to find. In those days we were still locating genuine GP Electronic flywheels, obviously these ran out quickly, as did second hand ones. So I looked at the PE flywheel, I swapped the cam to a GP type, I machined the flywheel down and fitted plastic fins, after a lot of timing and strobing, the system worked. The main big problem was the Vespas flywheels firing point. The Vespa system is out of line with a Lambretta so they fire in the wrong place! You then need to re-drill and tap 3 more holes in your mag flange to get the stator in line with the firing marks. Both PX and PE conversions worked but took a lot of time to do!
Given the hassle factor and difficulty in obtaining spare parts plus the factor of ignitions being totally out of time I pulled out of using this system in 1987! Anyway what was the point in doing a difficult labour intensive system when the AF electronic system had just come out!
AF RAYSPEED, ELECTRONIC IGNITIONS
In 1987 AF Rayspeed introduced a new revolutionary ignition system. This system we found to be the best for many years, it fitted with minor modifications, and it worked and gave some of our engines the best horsepower. Sadly these early Ducati flywheels and stator plates dried up and will never be replaced as a Ducati item.
There were two systems used, the AC (non-battery) and DC (battery) types. We found that the DC system lost charge in the batteries very quickly and soon we converted to the AC system, this got rid of the battery, which at the time we believed to be very impractical as we only had lead acid batteries we didn’t have the new dry cell batteries. Today it’s the must have thing a 12-volt DC system.
The AF system was a cross between the Ducati system introduced for the GP electronic, Vespa PE system and the J range. The basic difference between the other systems seen at the time was the flywheel. The flywheel was alloy and much smaller and lighter. It resembles a J range flywheel except the cam was now GP and had the two cross over magnets with-in the flywheel for the pick up points the same as the Innocenti design. The flywheel had three cut out windows compared to other systems and required a new flywheel holding tool. The flywheel used a dust cover from the J range also. Many people used to jam bits into the fins to tighten the flywheel up, this always resulted in broken fins. These early type flywheels are now getting quite rare and when we see them some fins are usually missing.
In some circles this flywheel was considered too light at approximately 1.4kg, most engines required a faster tick over speed and if you didn’t get it right stalling the engine was easy. The light flywheel caused more vibration low down but the advantage was better throttle response. The two types of stators (AC and DC) looked very similar, the low tension coil and pick up were the same but charging coils were different and were wired up differently. The easy way to identify them was, the AC system had 4 wires coming off it and DC system had 6. The AC system used a regulator the same as Vespas with 3 spade connectors, the DC system used a rectifier with 5 spade connectors. They where the same to look at but were not interchangeable. Both systems used a black electronic coil as per Vespas and were all-interchangeable. Ignition timing was done by the original method set by Innocenti of the raised lines on the pickup box and notches on the flywheel if done correctly ignition timing was perfect but was always best to strobe one to check timings! The lighting system was now 12-volts and required the bulbs and horn changing over.
Some modifications were required or problems would occur.
The system came with 3 machined down 6 x 25mm hexagon bolts if these were not used then standard headed bolts locked up onto the flywheel. Even with machined down bolts they sometimes still locked up! We supply these MBFDAC6x25 for the job which we use on all stators. With differences in the machining of the system, the pick up box on the stator some times locked up on the flywheel. If the system was used with a MB crankshaft conversion then the flywheel ended up 0.5mm away from the stator and no damage was done. But if the system was fitted with a standard crankshaft then 1mm needed machining off the mag housing face. Another way would be to machine the inner face of the flywheel but we found in very high horsepower engines the casting between the three inspection holes would crack! The main failure point after these modifications were done, was the very thin earth wire on the low-tension coil this would break with vibration. MB used to modify the stator by tapping over two stator laminates which tightened it up and the failure did not occur, for good measure we Araldited the earth points. Occasionally systems would misfire and not work. We found on a number of occasions that after checking out the full electrical system that the low tension coil would be at fault even when giving perfect Ohms readings as per book, changing the stator or coil was the only cure. The wires from the factory were not long enough to mount the coil and regulator high up out of the way of road dirt. AF suggested mounting them on the floorboard arms. This was too close to the back wheel, rain got in them and usually they looked a mess! Our way was to mount them in the original coil position with our MB mounting castings and we extended the wires.
The original loom required modifying to work in a DC style junction box, this was supplied with the kit. We found these would corrode and faults would occur. MB introduced a new simple electronic wiring loom, this got rid of the junction box and any more problems. By introducing this loom we set a standard that ALL other loom manufacturers copied, we now do 2 types of remade MB looms Black and Grey! The original flywheel dust cover was alloy, these eventually ran out and a plastic one was made as a replacement, these used to break regularly. MB used to sell Vespa flywheel bungs as a later replacements, these need bonding into position. Today the original Ducati flywheel and stators are very rare especially in perfect condition.
In recent years AF have remade the flywheel which are different but look the same. Look inside where the magnets are and you will see the the magnets are held in position by brass rivets, it has been known that these rivets cause a miss fire and the rivets can come loose, we do not sell these flywheels. Always check the pick up height firing points to the flywheels t make sure they fire correctly.
INDIAN SIL ELECTRONIC IGNITIONS
SIL introduced their own electronic ignition system for the GP models (and in later years for the Sx/Li models). This system is a across between the Innocenti GP, the PE Vespa and AF system and has been without doubt the most common ignition on the market apart for old Innocenti ignitions and all we had to work with for 20 years. Now with new bgm parts on the market we’ve stopped using SIL ignitions.
The major difference with the system is the flywheel. This was changed from a die cast item to a steel and alloy type riveted together. The fins are alloy, the flywheel is steel and the magnets are bolt in loose types. This flywheel is riveted, bolted and glued together. The flywheel is very heavy at approximately 2.6kg, more so than a GP electronic type. This can cause problems especially if crankshafts are not tight enough. We find the flywheel is too heavy for Sx and Li type crankshafts as the taper is thin and tends to shear or spin. The GP flywheel has been under cut on the cam and these can shear off. MB used to weld around this area and this cures the problem, but can crack at a later date with them been two tyoes of steel, even when welded with disimilar rods. It has also come to our attention that the rivets holding the cam to the steel flywheel comes loose also, so MB welded these together with the kits we sold.
Later on the Indians in their wisdom made the flywheel fins longer to aid cooling, this we have been told from the designer does nothing for cooling as no extra air can get between the fins. A whole new longer flywheel cowling was made which were fitted to the 3 wheeler engines. The UK way is to machine down the fins to original size and use a standard flywheel cowling. This then made a gap between the flywheel and the later head cowl designed for the long fins. If the flywheel was machined down and used with the long fin cowling, cooling was reduced as there was so much air circulating in the cowling. We have known the alloy fins to explode away from the rivets. If this happens expect our cowling and mag housing to go with it.
One of the best cooling conversions we worked out – was to machine away every other long fin or half fin and keep the long cowling – this really cooled an engine!
The stator plate comes from the factory wired up differently to before as they use a different regulator and electronic coil. The stator should be rewired correctly and supplied with an Italian type regulator and coil. We had stators made which were wired correctly to the Italian wiring as did others but quality varied from different manufacturers. The quality of the Indian stator is very poor, in standard form they are not too reliable! The main fault is the earth straps are not tight! The pick up coil fails regularly in standard form.
Indian stators came wired
- Yellow from pick up – should be Red
- Green from low tension – correct
- Brown from lighting – should be Yellow
- White from earth – correct
All electronic systems sold at the time by MB where the GP type and had these modifications done before sale.
- Flywheel cam welded to strengthen it
- Flywheel cam welded to keep rivets tight
- Flywheel fins machined to suit standard cowlings
- Stator plate rewired
- Earth points tightened and bonded
All MB ignition kits included;
- Electronic flywheel, Including shortened fins and flywheel cams welded for strength. Electronic AC stator plate. Strengthened earth points and rewired
- Electronic ignition coil
- Electronic regulator
- Electronic loom
- Wiring diagram and fitting instructions.
To reduce flywheel weight MB where the first to offer a flywheel lightening service. This reduced weight down to approximately 2.0kg helping throttle response. Later the Indian manufacturers copied exactly what we did and is now commonly called the mid weight flywheel.
MB offered these spare parts separately for the Indian electronic systems. Highlighted we still offer these parts for sale.
- Electronic coil, BGM Red Blue
- Electronic bgm Regulator/Rectifier
- Electronic 12 volt DC rectifier
- Electronic auto advance and retard coil kits, now the KyTronik Smart Booster
- Electronic MBgm Black or Grey simple wiring loom
- Electronic MB regulator coil mounting brackets
- Electronic MB coil rubber cover
- Electronic MB 3 and 5 pin type rubber regulator cover
- Electronic bgm Reg/Rec rubber cover
- Electronic bgm pick up box
- Electronic bgm low tension coil
- Flywheel dust cover
- Flywheel dust cover circlip
- HT lead per 1 foot
- HT cap NGK Std
- HT cap NGK Rubber
- Spark plugs Running in/Town Motorway/all round
- GP flywheel nut and washer
- Woodruff key
- MB Stator plate clamp
- MB Stainless steel mag housing sealing plate kit mag sealing plate kit with screws
- Dual ended flywheel-holding tool
- Flywheel extractor double ended
- 12 volt bulbs
- 12 volt AC horn
BGM ELECTRONIC IGNITIONS
In recent years the BGM product brand has become a very popular brand. MB have been at the forefront of design, manufacturing and development for these products which have superseded any of the previous Electronic parts from Innocenti, AF and SIL and are considered to be better quality, so today we don’t sell any other products.
BGM STATORS
The BGM brand stated life with the rear shocker then the stator plate, there has been to date 4 versions all basically the same. The first stators were offered as 80 or 120 watt outputs, to be honest there was not much difference between the two so we looked into it and phased out the 80 watt and rewired the 120 watt and developed this. Each time power output has been increased to the maximum that a flywheel could generate, stator wiring and windings have improved and they have just got better. Today bgm offer two types of stator plates the uprated improved 12 volt AC version and in 2013 we introduced a new 12 Volt full DC version. DC staotors can be used as DC or wired with one Yellow to earth which becomes a AC stator. An AC stator needs rewiring to become a DC stator.
- 12-volt AC Stator
- 12-volt DC Stator
BGM FLYWHEEL
New for 2013 was the long awaited bgm flywheel, two years in development and designed to work with bgm, AF, Vespa and SIL stators. The flywheel comes in Li Sx, Tv and Gp versions. These flywheels come as a one piece, by that I mean no more rivets, the flywheel is all alloy, with a one piece bonded magnet and the cam is cast into the alloy flywheel. These are extremely strong, they do not use a flywheel dust cover and come pre marked with Top Dead Center (TDC) and timing marks of 30, 25, 20 and 15 degrees. These marks are set to allow for fitting an advance retard box later on if required. You have to set new timing marks by finding TDC and mark it on the mag housing, from then on the timing marks can be used to set up the stator plate by strobing the ignition. These flywheels come with similar flywheel fins as per Innocenti GP so use a standard flywheel cowling. A new small flywheel holding tool is required as an extra or you can use a 32mm spanner to hold the flywheel.
Always check pic up heights as casings/stator can vary.
- Gp Flywheel
- Li, Sx, Tv Flywheel
BGM REGULATOR/RECTIFIER
BGM introduced a new super powerful small regulator/rectifier, this was found when we were developing the power output of the stators. By using the reg/rec you can have AC lighting for the main lights and have a small DC trickle charge to suit various items like a Sat Nav, phone charger, Rev counter and rear brake, you can use it as a direct feed or via a battery.
You can use this DC feed for a really bright brake light and a DC loud horn. It can be improved to use with a small battery or capacitor to stablise power so you don’t blow or have erratic power supplies to certain toys. All in all it’s a neat little add-on to improve either the bgm system or any Vespa/Lambretta electronic system.
Or you can just use it as an improvement over the SIL or Vespa 3 or 5 pin regulator.
- BGM 12 volt AC/DC Regulator/Rectifier
- MB Regulator/Rectifier rubber cover
- MB Regulator/Rectifier set of wires
DC RECTIFIER
Again these are new for 2013, these are the same as the well known Wassell, Podtronic or any motorcycle single phase 12 volt DC rectifiers. These are to use with a bgm DC stator plate or any electronic stator plate rewired to work on a full DC supply.
- DC Battery type Rectifier
LED REAR LIGHTS
To improve lighting bgm introduced the LED rear light, this takes less drain from the lighting system and pushes power where it is needed to the main lights making them brighter. These are a direct fit into the rear light on the Series 3 others can simply be silicone sealed into position and work from AC or DC supplied ignitions.
We offer these LED rear lights
- AC and DC 12 volt Series 3 and Gp
- AC and DC 6 volt Series 3 and Gp
- AC and DC 12 volt Series 1 early Series 2
ELECTRONIC COILS
These come in Blue and Red, there is nothing different in the way they work, they work on any Electronic system, bgm, Vespa, AF or SIL system.
INTERCHANGEABILITY OF bgm, AF, VESPA AND INDIAN SYSTEMS
All bgm Electronic products are interchangeable with any part from a AF, SIL or Vespa Electronic conversion.
Given the Electronic ignitions usually fitted to a Lambretta, all parts are interchangeable. The main failure of electronic systems is the pick up box and low-tension coils. Indian pick ups are available but are not as good as the Vespa or bgm item. Low tension coild vary in height we only stock the 11mm version low tension coil. Vespa do not offer this as a spare part, they only offer a complete stator plate. Stators vary on how many laminates are put together on assembly, some stators may need some laminates removing and some may need a packer adding to make them work. Always bend the laminate tags over tight, make sure the earth is done correctly, and Araldite the soldered wires.
The Vespa style regulator is usually used on all systems, these look different to the Indian ones, but both work if wired up correctly. The Vespa style regulator comes in different wattage ratings, they vary slightly in size and can be made in Italy or the Far East. All types are interchangeable, even the higher out put bgm stator works with all known regulators. Vespa 5 pin regulators can be used to add a trickle charge for a battery or just swap to the newer bgm Reg/Rec.
The ignition coils (or CDI box what ever you want to call it) usually come in Black but there has been some available in different colours, usually Blue and now Red there are no differences in their workings and ignition coils are interchangeable between all systems.
Indian, AF, bgm, Innocenti and modified Vespa flywheels are interchangeable with the same stator plates but care should be taken timing them up and they all should be set with new timing marks and strobed up. Any system can be repaired with the parts available today, but maybe there could be some slight modification.
bgm ELECTRONIC IGNITION KITS
We offer full kits plus all the add on’s already listed separately for both Gp and Li, Sx, Tv type crankshafts
- Gp Electronic AC kit, includes Flywheel, Stator plate, Reg/Rec and Red coil
- Gp Electronic AC kit, includes Flywheel, Stator plate, Reg/Rec and Blue coil
- Gp Electronic DC kit, includes Flywheel, Stator plate, Rectifier and Red coil
- Gp Electronic DC kit, includes Flywheel, Stator plate, Rectifier and Blue coil
ODDBALL IGNITIONS
Over the years Motoplat has produced a number of race ignitions suitable for Lambretta engines. Looking at a Lambretta flywheel it spins clockwise, most modern race style engines spin anticlockwise. Some Kart engines spin the same way as a Lambrettas making them ideal to convert, the only problem was they were race systems and had no lights.
Two types were common
Internal rotor (flywheel inside of the stator plate)
External rotor (flywheel on the outside of the stator)
One required the flywheels taper to be machined.
The other required the crankshafts taper to be machined.
Major advantages of this system allowed an auto advance box to be fitted, these came in different degrees of linear advance per thousand rpm to suit different engines, not perfect but worked and in recent years Agusto and MTech used a similar method which worked on the Lambretta electronic systems. Or they could be used as standard fixed ignition. As these were race ignitions and came from small capacity racing Karts the flywheel were small and only weighed between 1.2 and1.5kg. Plastic fins were also required on air-cooled engines.
In the 1990’s Motoplat went bust and ignitions became hard to find for race use. Towards the end of the 90’s a company called Ital systems remade the clockwise race Motoplat system and it is now freely available for race engines but not for road engines unfortunately.
In 1987 I developed a Japanese ignition system using Suzuki parts, this system was absolutely brilliant. It had a built in advance retard feature and gave the scooter a pulling power rarely ever seen today. It was this system that made me a fan of any ignition system with an advance retard feature (also called auto advance) this system used 12-volt lights and a battery, the down fall was availability of second hand parts and new parts were unbelievably expensive so we only ever did a few systems!
In the 1990’s I developed a Japanese race ignition for our race team, again this worked well but second hand parts were hard to get and new they were very expensive. Other dealers have used other race systems the most common was from Honda race bikes. One very common one from the 80/90’s was the total loss system, this used an electronic chopper for igniting a cars coil energised through a battery. Once the battery went dead so did the spark, not good on a road bike.
Today others are developing complete electronic ignitions using second hand motorbike parts, but I’ve been there and done it, the prices are silly new and the conversions are complicated even to justify second hand parts and at the end of the day, what is the point when there are simpler systems like the complete bgm Electronic package which is interchangeable with parts freely available second hand or new from any where.
ELECTREX IGNITION
Oh where do I start with this, it’s embarrassing! I asked/begged and had many meetings and phone calls about this ignition with the manufacturers. In the end it was made exactly to our spec as I had given advice on over a couple of years. The deal we had worked as distributors was offered direct to other dealers, when we complained it fell on def ears so we pulled out of selling it especially after testing many faulty ignition systems and been guinea pigs for testing. Shame, really we can only work with honest people.
VARITRONIC IGNITION
From Italy comes the Varitronic ignition, why Varitronic? Well it has a built in advance curve as standard so requires a different set up procedure. Usually you set the ignition timing at around 2000rpm to 24 – 20 degrees and it needs to be strobbed, then the ignition follows a pre designed curve which will hold on then drop as the motors power comes on song. These fire twice per revolution! Different to anything else on the market. This supposedly is to clear the cylinder gases at bottom dead center, that or it came from a twin in the first place! Who knows. The flywheel is a multi piece affair with bolted on fins. The stator only uses 4 coils comparing to all the other ignitions we’re used to. It uses a small regulator/rectifier with a trickle DC feed like the bgm but the stator windings are less so there is less power supplied. You can run these all AC or AC with this little 12 volt DC trickle feed. The basis of the kit looks very nice. I’ve personally had two, one would not jet in at all, one minute perfect, the next weak, the next rich then the plug would over heat, after a week of playing I junked it. The other I was desperate for an ignition to race at the IOM, it managed 600 miles of abuse even puling 12’000rpm, the day after I returned the rivets exploded on the dyno and took out everything! I had similar problems with customers bikes on the dyno so I’ve never used them after that. Others say theyve had no problems at all, others have similar complaints. Since then the flywheel has been increased in rivet size and are also welded in position. When they work the flywheel weight is light and make a nice little race system for the road but not for me, I would prefer the bgm system with all the extra up grades which can be fitted.
Today Scootopia, Casa and othe rItalians supply their own system copied from the Varitronic.
VAPE IGNITIONS
Again another embarrassing waste of time, the systems where brilliant, we modified and made working samples and tested them over a 4 year period. We had many meetings in Germany and sent a full working engine to the Czech republic. We even drove over there on a motorbike and had a meeting. In the end you just have to give up wasting your time if these people just do not want to work with you! Again a great shame! Especially as they could offer an advance box with 80 settings!
UPDATE to Vape ignitions 2019
Well out of the Blue Vape did make a Lambretta Electronic ignition but not for me the designer! No SIP got them! Looking at our instructions and designs to Vape, the manufacturerd system is near the same as ours, even down to the wire lengths. They offer a AC system and a DC system. As we requested, all you need to do is use an AC or DC regulator or rectifier. The flywheels and stators are the same. The main complaint is the instructions are not very good as its wired for a Vespa and coloured wrong for what we know Lambretta systems.
The instructions say no need to strobe the system after fitting – no they are not perfect always strobe them and set you own timing marks. Wiring can be altered to correct colours if you know what your doing. The fan is bolted on by 6x6mm counter sunk screws which are normal right handed, these should have been a left hand thread to stop the screws unscrewing – it wouldn’t surprise me if screws come out on the road in the future. If you use super strength loctite it will cure the problem, but then you wont be able to remove the screws as the heads will round off and you will have to remove the fan and flywheel to alter timings. You can bond the flywheel together to make it a better one piece but you need to do your own timing marks and you have to remove the flywheel as normal to alter the timing.
You get 2 choices with CDI – fixed (has a little movement, so always strobe it) and Advance Retard – but theyve used a map used for really high revving race engines 10’000+ so is useless on a road system. I recommend the fixed CDI.
No flywheel holding tool comes with the kit so you need one as its special. The flywheel extractor is a normal Italian type.
Vape road system fixed ignition AC
Vape road system fixed ignition DC
Vape DC rectifier
Vape AC regulator
Vape flywheel holding tool
MODERN IGNTION SYSTEMS
There are a number of ignition systems new to the market
Casatronic – copy similar to the Varitronic
Scootopia – copy similar to the Varitronic
Casa Ducati – todate no used it but good reports apart from expense
UPGRADES TO IGNITION SYSTEMS
There are lots of upgrades and lots of ignitions these days – the choice is yours. The Vespa/AF/SIL/bgm common electronic system is the most used. Its not the best but can work for a long time and if it fails parts are everywhere. The down side of that designed ignition is the internal Black pick up box pulse coil and its Low tension coil. The lighting side is near faultless.
To get around the failure of the pick up box, I got Scootronics to work an external pick up pulse coil. This can be bolted to your mag housing with the flywheel machined to take a steel trigger. The spark is then improved, as is reliablility and you can adjust timing with the engine running – a perfect upgrade. You can still time your internal Black box but leave the wire free, if the external one fails, plug the internal one in. The down side is the Low Tension coil is still required and tend to fail as the wound wires are so thin they can break.
To get around this again I asked Scootronics to come up with a system which we developed so no Black box or Low tension coil is needed. This used a DC CDI unit. You remove your Vespa style CDI coil which can break down anyway! In its place you used a new box which can be powered from AC or DC 6 or 12 volt what ever your sytem uses. The external trigger creates the spark to a separate CDI coil. This sounds complicated – it isn’t – it’s a fantastic system that I use my self.
External pickup kit
Electronic ignition pack kit
SOME IGNITION THOUGHTS
A flywheel nut on a Lambretta is a left handed thread, the reason for this is, as the flywheel spins clockwise it is tightening the nut, if it was a standard right handed nut then as the flywheel rotates it undoes the nut! It is very important that crankshaft and flywheel tapers are perfect along with the woodruff key. The woodruff key does NOT stop the flywheel from spinning it only locates the flywheel so the ignition timing stays correct. I use a fine smear of loctite on the tapers upon assembly as I do with the nut.
Standard Lambretta flywheels are quite heavy, the advantage of this is a smoother running engine especially at lower revs and tick over. The disadvantages of heavy flywheels are a lack of response to the throttle and they will limit the amount of revs. Over heavy flywheels cause crankshafts to spin out of line or in some cases as with the Sx, Li, Tv crankshaft flywheel tapers and crank pins will shear! This is the reason why MB don’t recommend Sx, Li, Tv crankshaft and ignition systems in anything other than standard engines and even then they break. The worse case for a heavy flywheel set up was the Spanish Motoplat electronic system, which was used on Sx cranks. It was possible with this flywheel to machine a large amount of weight from it to make it more useable.
Lightened flywheels have been around many years, there is a reason for this, a lightened flywheel gains power! A lightened flywheel gives the advantage of throttle response, acceleration, higher revs because it improve horse power. The disadvantage of a lightened flywheel is the lack of inertia which at some parts of the rev range can be a disadvantage. The worse case was possibly my 40hp sprinter fitted with a very light flywheel weight of .70kg, if there wasn’t enough revs on when setting off the engine would stall. But when setting off fast the engine would just spin the back wheel giving nothing in-between! Fitting flywheel weights helped to cure the problem, showing that too small a flywheel was no good. The Indian flywheel is quite heavy at 2.6kg compared to an AF item at 1.4kg, which was a little too light on a everyday road going engine. An in between weight is the Indian flywheel machined down too approximately 2.0kg which is an ideal all round weight for any tuned Lambretta engine, we worked this out and India copied us with the mid weight flywheel.
Early machined flywheels used a plastic fan to reduce weight but still keep the cooling side. The only real way to secure a plastic fan would be to use small bolts or screws and wide washers to spread the load over the plastic. Using the same flywheels turning theory normal bolts would undo them selves and they did! Loctite always helped this to stop happening. Most flywheels don’t leave enough metal area behind the fan to seat the fan correctly making life even worse. The worst case of this would be the Vespa electronic conversions that I invented many years ago. I personally dropped this conversion for a number of reasons.
- Flywheel cams on Lambrettas don’t line up to Vespa flywheel holes making the system hard to time up correctly. This conversion was OK if fitted in the workshop and strobed up, but it was a lot of hassle and to do in kit form wasn’t practical!
- Because of the design of the Vespa flywheel no decent flat area was left to seat the plastic fan. To make matters still worse there wasn’t many places where you could drill into the flywheel to secure the fan.
The most popular system using plastic fans was the MSC GP Motoplat system as used in the mid 1980’s. The fan for this system was quite large and needed cutting down but usually lasted as it had a large flat area and plenty of metal to tap screws into it. Today we have light flywheels or can machine them and still keep the alloy fins without the need to put plastic electric motor fins of which mainly were unreliable.
IGNITIONS HEY………..
There’s no such thing as a perfect ignition, especially on a vibrating high revving Lambretta engine. Some are better than others, some are ok with some miss matched parts or strengthened. Whatever, they all need looking after, even down to the spark plug gap, get this wrong and most won’t work right and it’s surprising how many people blow pistons because they put a running in plug in a race type engine. All parts have to be perfect with no damage, all wires need to be secure and every engine needs the ignition timing setting to suit the motor. Lower revving and smoother engines seem to last longer than others trashed at high speed. I personally thrash my motors to the extreme, I find every weak link going. If I can’t break one then the part is good, I use this idea with all my parts, If I can break it…………. a customer can’t. The ignition is a very important part of a tuned engine, it’s worth the extra money and the time to set one up.
The first Lambretta Vape system, Vape and SIP ripped me off, copied it and put into production
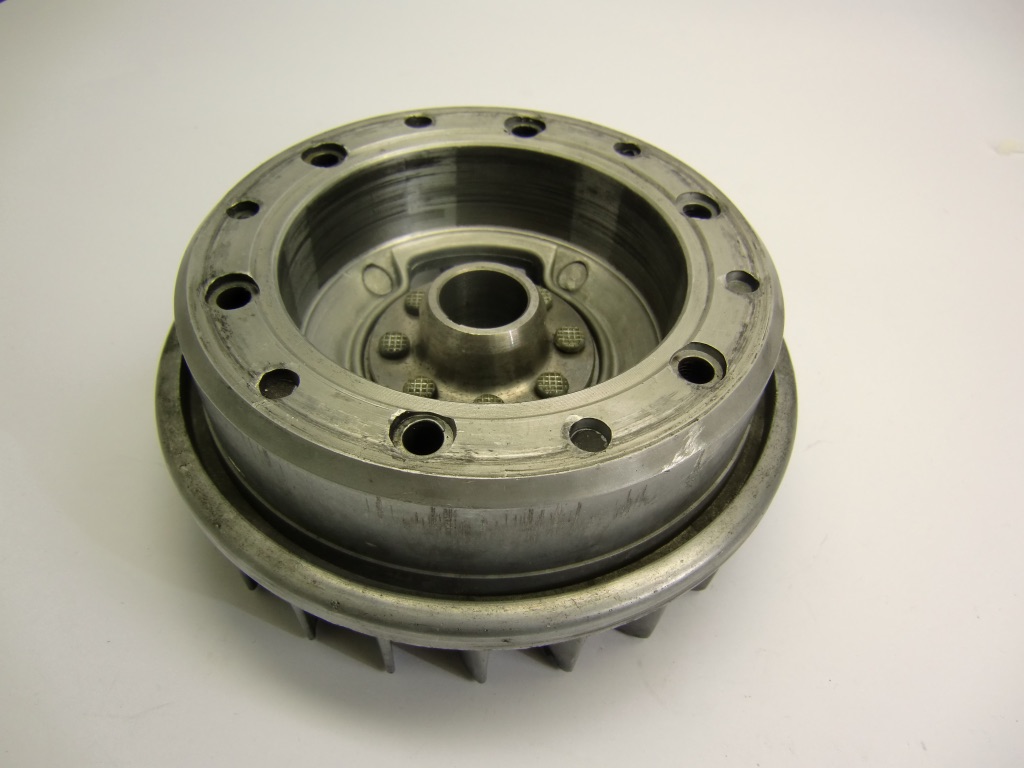
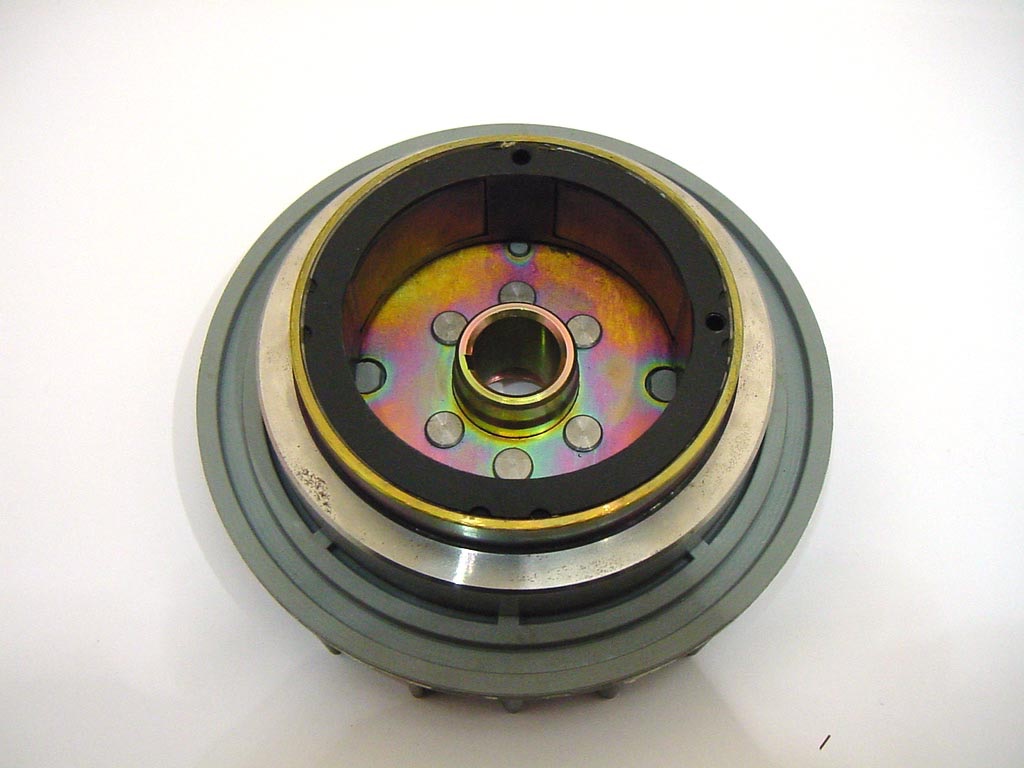
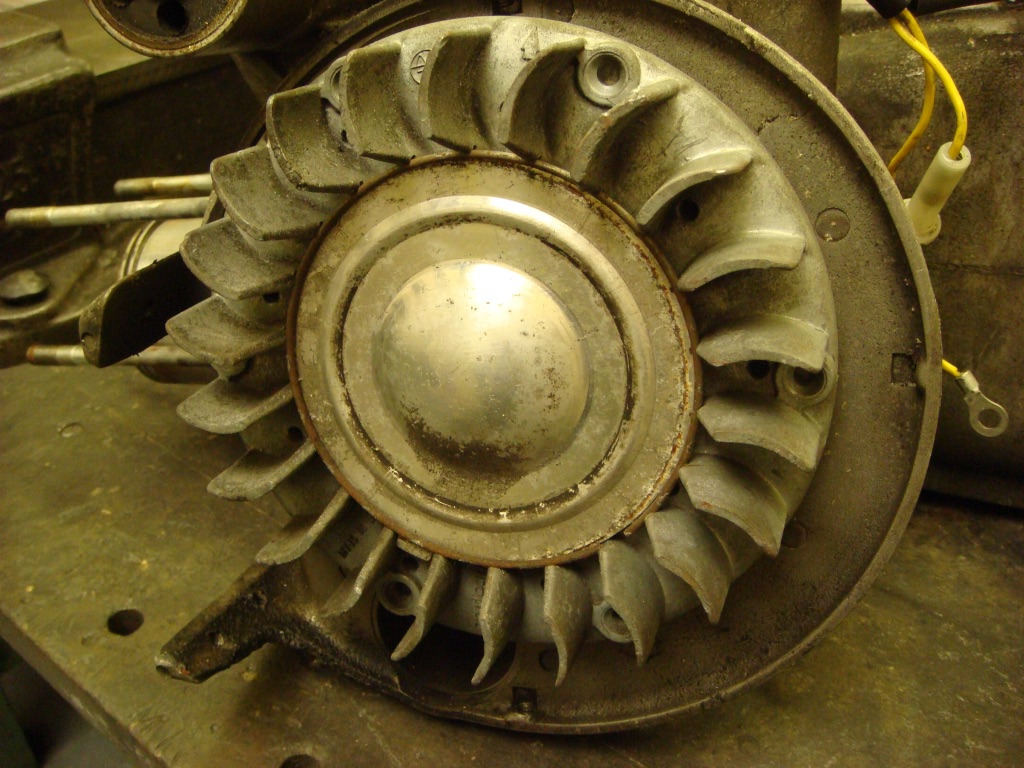
Late 60’s GP Electronic flywheel

Ducati Innocenti flywheel
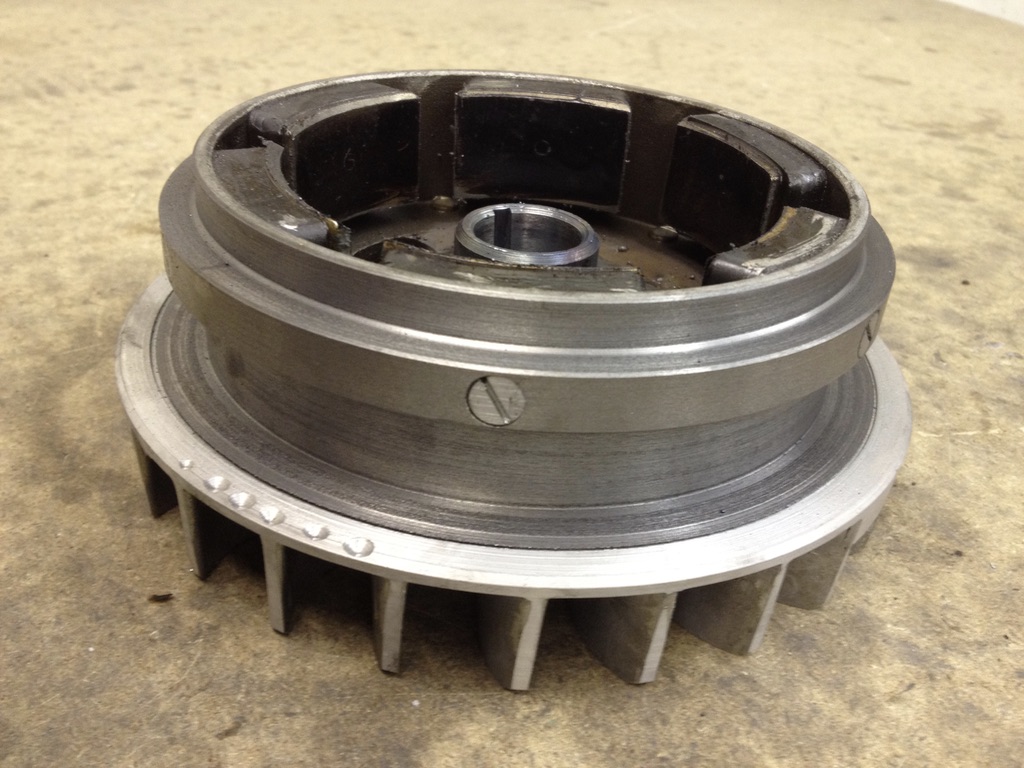
SIL flywheel, lightened by MB before Elemec brought out the mid flywheel
Varitronic 4 pole IDM flywheel
Varitronic flywheel Gp type insert the magnets
Varitronic outside showing plastic fins, this is an early type
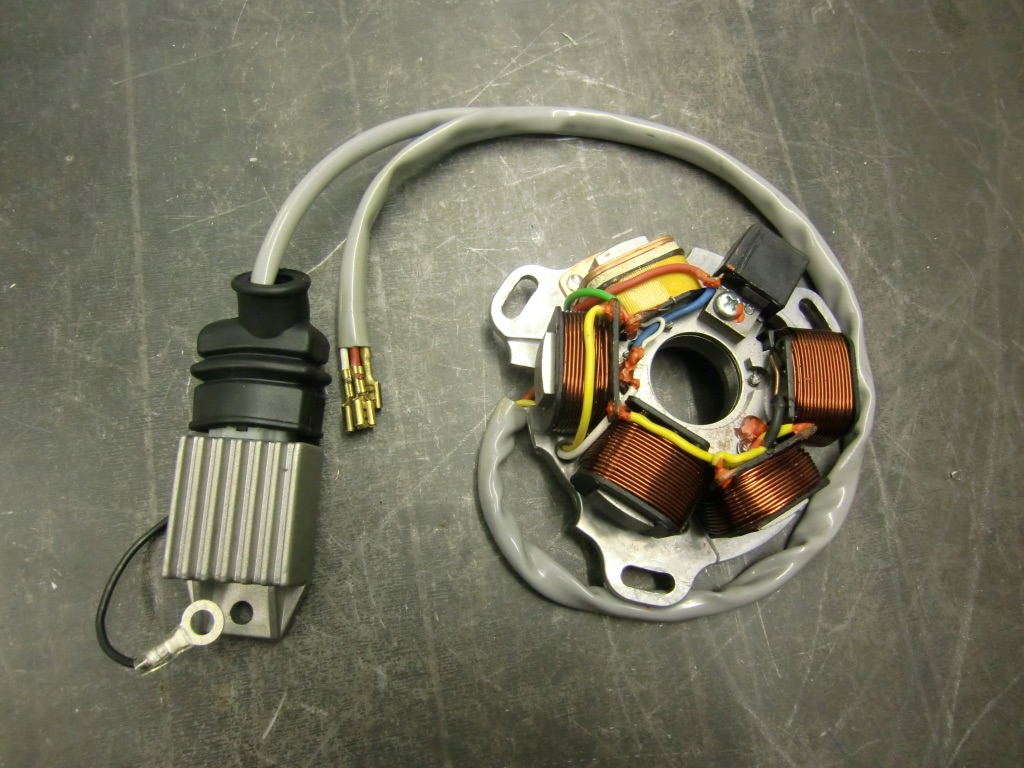
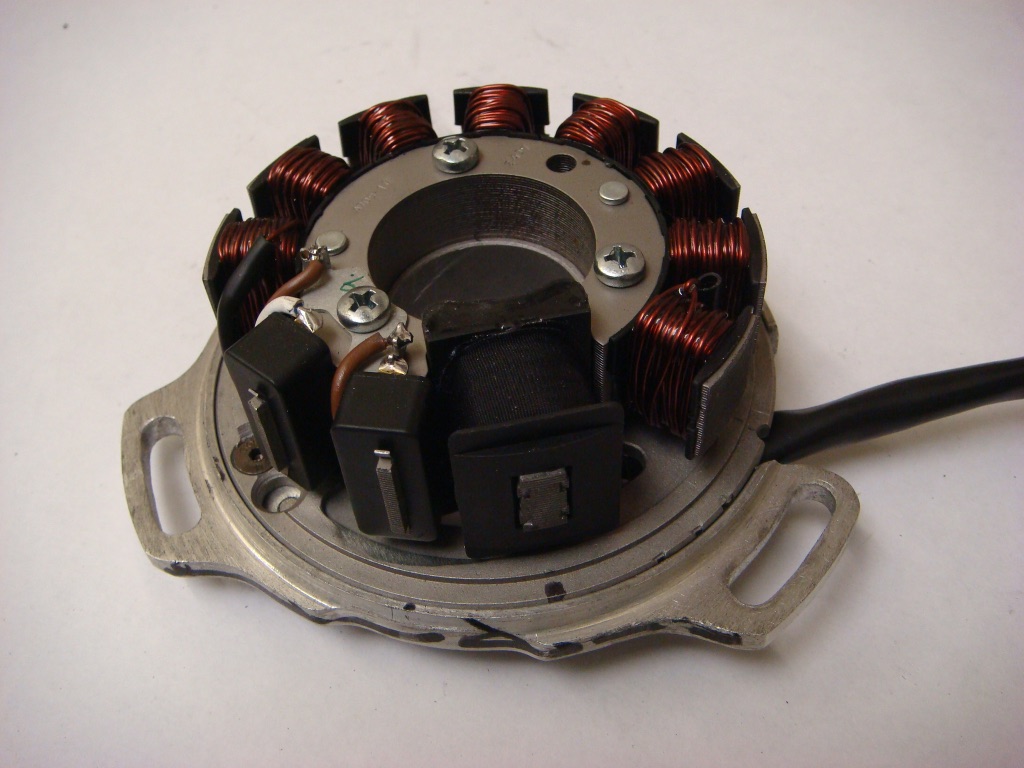
Bgm type stator plate with bgm type regulator rectifier
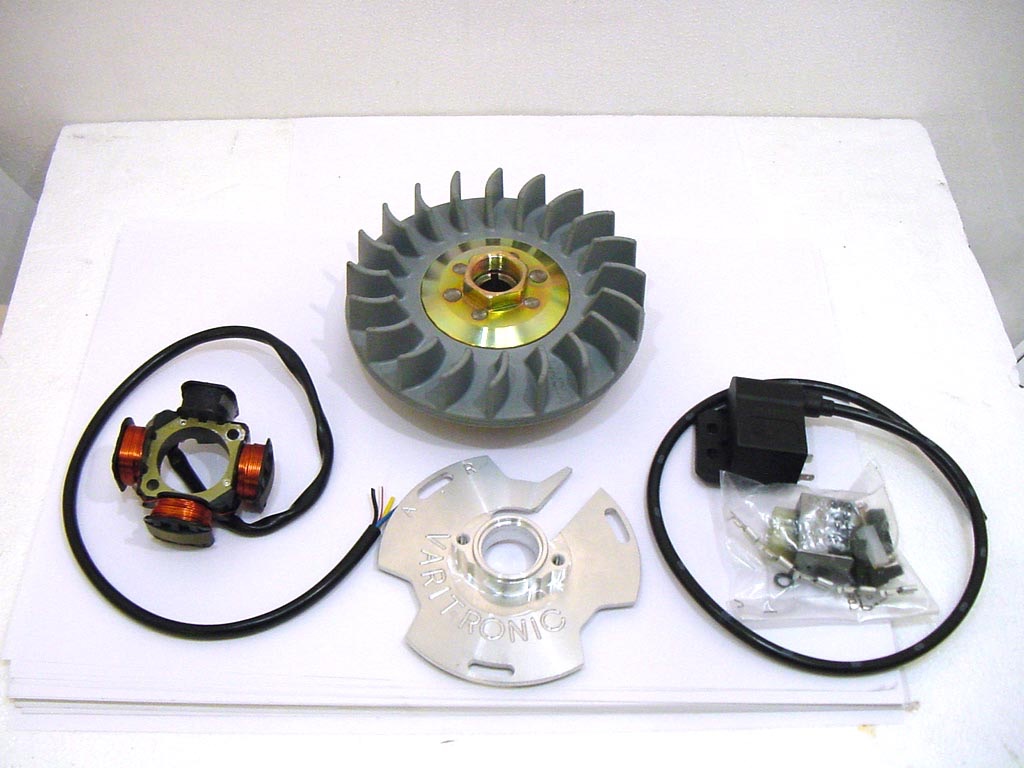
Varitronic kit

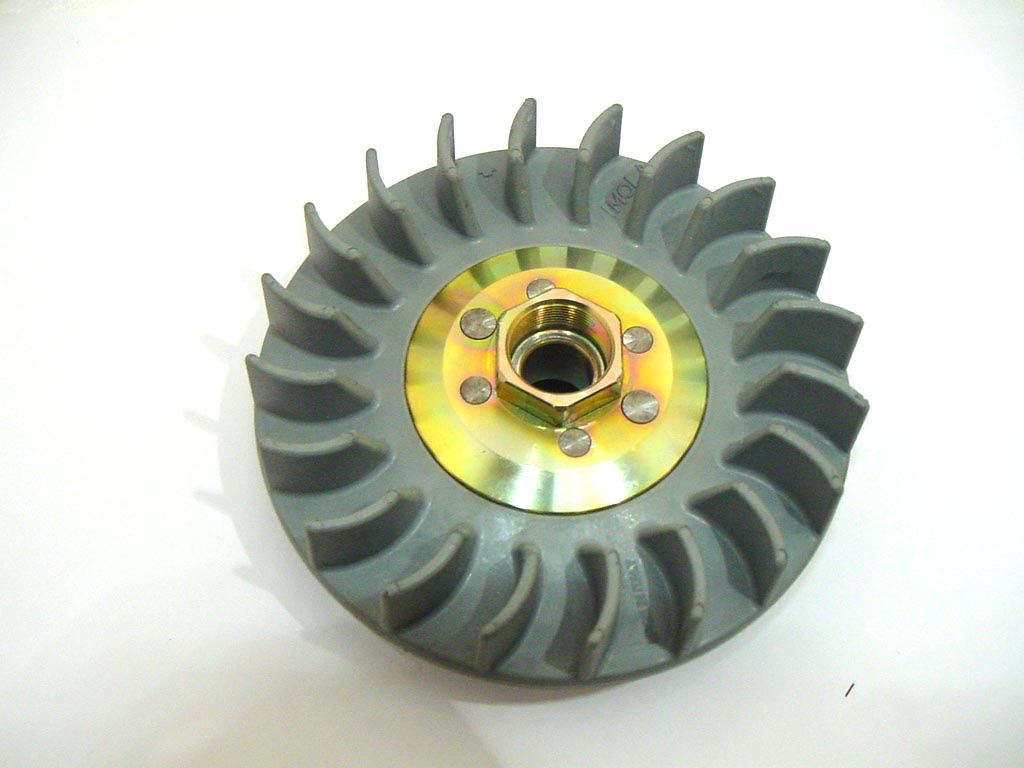
Bgm one piece flywheel
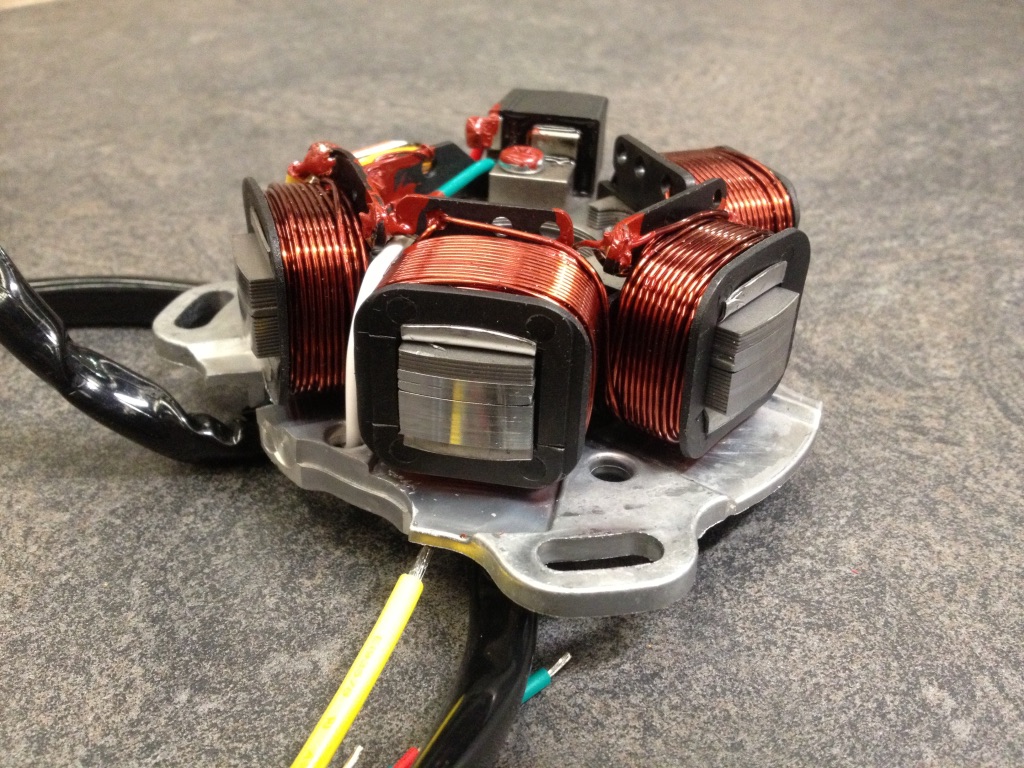
Bgm stator
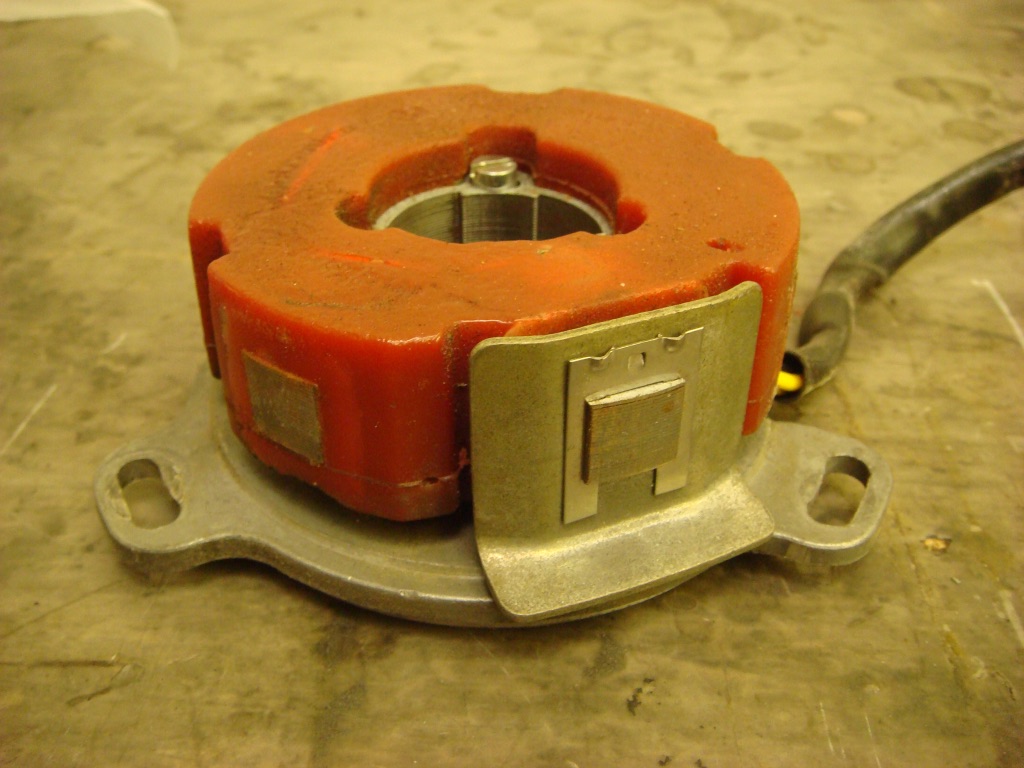
Spanish Motoplat stator

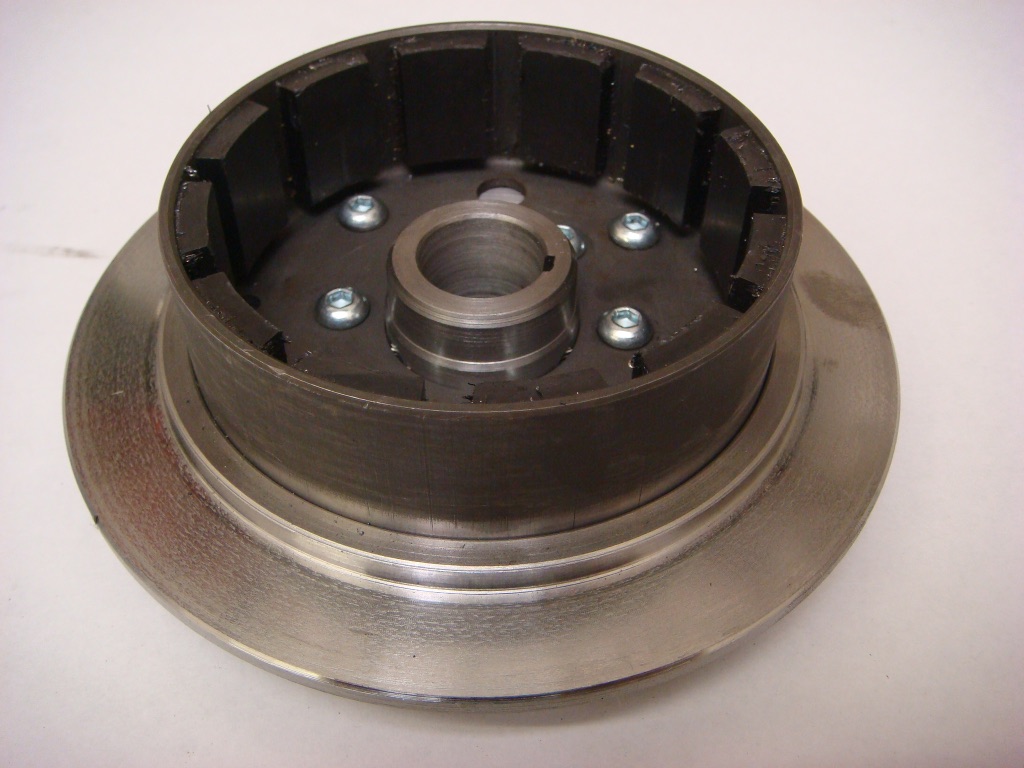
Motoplat Li flywheel
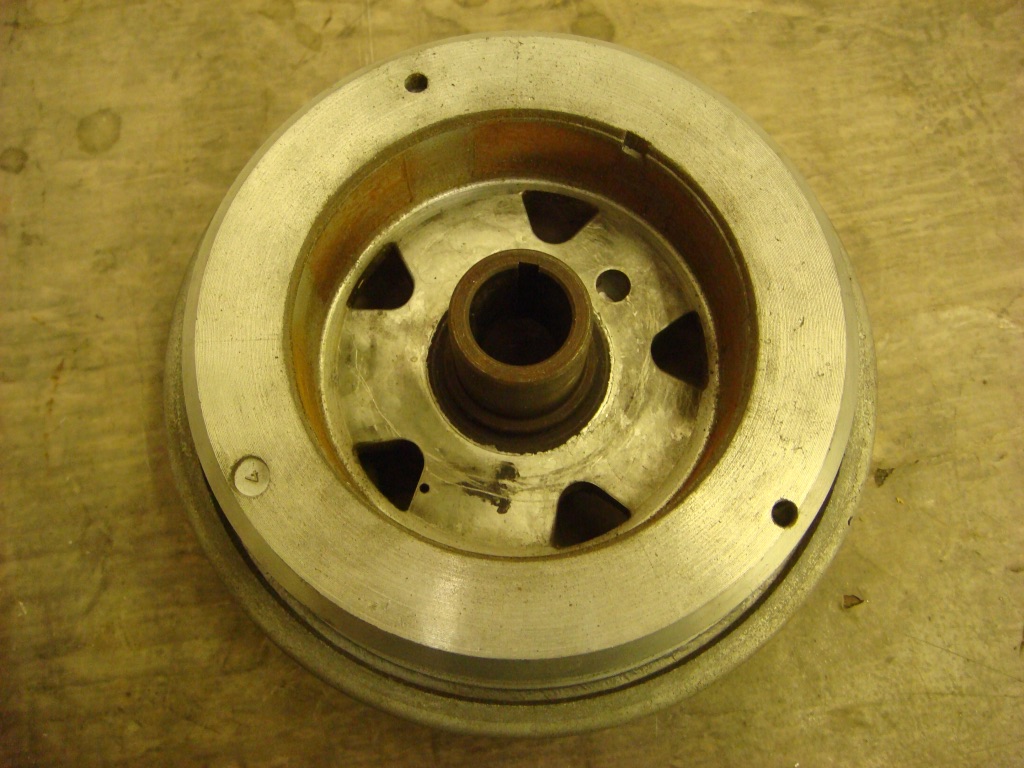
Motoplat inside flywheel
Motoplat dust cover
Converted flywheel to use plastic fan
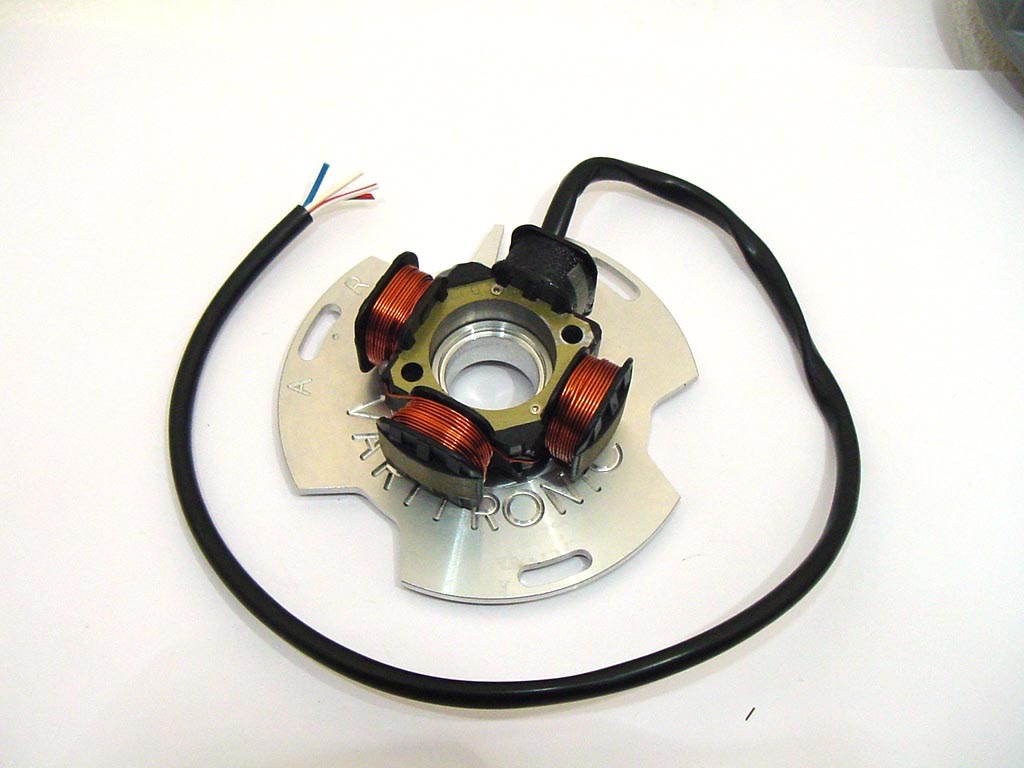
Early one off Vape stator converted to Lambretta
One off Vape flywheel made to fit a Lambretta
Any questions ask Mark mark@mbscooters.co.uk


3 Comments
Comments are closed.

Thanks for taking the time to post this Mark – I’m reasonably competent but have always avoided electrics, your explanation of how it all works from the very beginning has made this much easier to understand. See – we do read the tech page….
hey up mark im using one of your stators and flywheels and there bang on but im just wondering how i find the correct hight for the pick up … theers paul
Its not a job I do as I have a cutaway flywheel to check. I think most are using something like plaster scene.