


TECH ENGINE CRANKSHAFTS
All crankshafts have a stroke of 58mm, the only difference was the TV175 series 1 which was 60mm and is not interchangeable with any other engine. All crankshafts use the same flywheel bearing with the exception of the series 1 (this has a totally different bearing) also the GP200 has a wider bearing of its own. All crankshafts apart from the GP200 and some GP150’s have a stepped crank pin with a smaller crank pin hole at 20mm. GP 200 and some GP 150’s only use a straight crank pin of 22.9mm. Today there are lots of crankshafts with 22mm crank pins. All Lambretta pistons and con rods use 16mm small end bearings and gudgeon pins. With tuned Lambrettas where possible use a GP 200 or later GP150 type crankshafts or better still upgrade to racing crankshafts using their relevant high load flywheel / drive bearings and ignition systems.
Firstly you need to identify your crankshaft.
Series 1 Li125, 150
This has a short thin type flywheel taper with no shoulder for the flywheel bearing, 4 large balance holes in its crank webs, it usually has a bronze bush in the small end eye, and the con rod length is 107mm. It uses a different flywheel bearing, mag housing and only one mag seal compared to the later models, for tunes beyond stage 2 upgrade to series 3 or GP and change the mag housing bearing and ignition system.
Series 1 TV 175
This crankshaft is totally different to all other crankshafts and are not interchangeable.
Series 2 Li125, 150
This has a thin type flywheel taper a 13mm flywheel seal shoulder, 4 large balance holes in its crank webs, it could have a bronze bush in the small end eye or could have a needle bearing, the con rod length is 107mm. Apart from slight con rod differences it is basically the same as a series 3 type.
Series 2 TV175
This has the thin type flywheel taper a 13mm flywheel seal shoulder, 4 large balance holes in its crank webs. The con rod length is now 116mm.
(By using a longer rod the piston height from the gudgeon pin to the crown is shorter that all of the other Li range.) Apart from the con rod difference it is the same as a series 3 type.
Series 3 Li125, 150, SX125, 150
This has the thin type flywheel taper a 13mm flywheel seal shoulder, 4 large balance holes in its crank webs, and the con rod length is 107mm. Apart from slight con rod differences it is basically the same as a series 2 type.
Series 3 TV175
This has the thin type flywheel taper a 13mm flywheel seal shoulder, 4 large balance holes in its crank webs. The con rod length is now 116mm.
(By using a longer rod the piston height from the gudgeon pin to the crown is shorter that all of the other Li range.) Apart from the con rod difference it is the same as a series 3 type.
Series 3 TV (GT) 200
This has the thin type flywheel taper a 13mm flywheel seal shoulder, four large and four small balance holes with flats on the crank webs close to the big end area, the con rod length is 107mm. Apart from balance features and slight con rod differences it is basically the same as a series 2 and 3 Li type.
Series 3 SX 200
This has the thin type flywheel taper a 13mm flywheel seal shoulder, 4 large balance holes in its crank webs, and the con rod length is 107mm. Apart from slight con rod differences it is basically the same as a series 2 and 3 Li type.
Series 3 GP 125
This has the new fat type longer taper with a 13mm flywheel seal shoulder, 4 large balance holes in its crank webs, and the con rod length is 107mm. It uses the Li type con rod with a stepped crankpin of 20mm and wasn’t hardened. It uses the Li type flywheel bearing. Consider this as strong as the Li type crankshaft so up grade to the later GP 200 type.
Series 3 GP 150
There are two types. Type one is the same as a GP 125. Type two is the same as a GP 200 but the only difference is the flywheel seal shoulder is 13mm long and used the Li type flywheel bearing.
Series 3 GP 200
This has the new fat type longer taper, a straight crank pin of 22.9mm. No balance hole features and has the shortest flywheel side seal shoulder of 10mm to suit a wider flywheel bearing than all other crankshafts. The GP200 or the later GP150 crankshaft is to be preferred for all tuned engines.
MB always recommends replacing the crankshaft with the latest race crankshaft or converting the GP 200 crankshaft to an improved con rod conversion.
The list above is presuming they are all Innocenti items but of course there has been others manufacturers in India, Spain and South America (I’ve never seen any of these)
Spanish cranks
To my knowledge these have also always been the Sx, Li type design. Spain has made Scooters from day one but never upgraded to the GP type crankshaft, there has been Series 2 types and Series 3 types used. Some used genuine Innocenti parts. Later models 72 onwards used Spainish made crankshafts which were not as strong and would regularly snap crank pins and con rods, non of these are recommended in any thing other than a standard engine, but you still had problems in standards. Obviously we recommend fitting a modern made hardened standard crankshaft if restoring a Spanish model.
Indian cranks
Again India have made Scooters for a very long time and have made Widestyle and Slimstyle Scooters using Series 2/3 and GP style crankshafts. The GP style is the most common, but over the years they have changed designs many times to the trained eye. Flywheel side shoulders vary from 10 – 13mm and could have been miss matched between models! Big end pins have varied from stepped GP125 types to straight GP 200 22.9mm types and we have known them straight at 24mm! Later cranks use the straight 22mm pin. Indian webs are easily identified as they look really rough from new, the machining marks are poor as is the forging marks and should have a SIL S stamp marked. Con rods always look rough and these have also altered from a 60’s Innocenti design to a more beefed up Yamaha looking design, all rods and bearings are very poor, we do not recommend them but others do! Today this crankshaft is used to do a lot of cheap rod conversions to Yamaha. The cranks do look rubbish but we said many years ago these are usually well made and machined true which made them good donors to re-work a con rod conversion. But beware we are seeing them coming through too hard and they are cranking from the pin area when stripped. As with standard Italian GP cranks they can crack at some point if the crank is built really tight and requires a lot of hitting to re-align it. This crack will appear in the thin area next to the cranks balance weights, we have known them to crank in half.
Li/SX/TV (GT) CRANKSHAFTS
These crankshafts have their faults. The crank webs are not made from hardened steel and the thin flywheel taper can snap off! (modern copies are hardened). Stepped crank pins have been known to snap also. Soft crankshafts if rebuilt can spin out of line as the soft metal gets pushed out on each rebuild. Some con rods are thinner and can snap below the gudgeon pin. When using any crankshaft with standard con rods regardless of con rod type always use pistons either with no small end side float or use piston shims, if you don’t big end failure will occur.
There have been over the years various crankshaft manufacturers, all have been interchangeable between models. The main differences were con rods but some had GP style crank pins and were hardened. These cranks had smaller balance holes of 19mm. The standard con rod is OK for mildly tuned or low revving engines, but the standard con rod is the weak link of all Lambretta crankshafts.
GP RACE CRANKSHAFTS
There have been in recent years a number of up-rated race type GP crankshafts introduced.
In the early Eighties Omega made a short stroke 54mm GP crankshaft was available mainly for racing purposes, along with a long stroke 60mm GP crankshaft. Both crankshafts used the standard type con rods either 107mm or 116mm, apart from using standard con rods they were very good.
In 1985 a supposedly new race crankshaft was introduced by MDP/MEC, this was only a standard crankshaft with blackened crank webs, a polished standard con rod and with a silver-plated big end bearing. As with most MEC con rods they used the Innocenti ‘I’ emblem forged into the con rod. Another common manufacturer is Mazzucchelli, these have made 58 and 60mm crankshafts early ones were very good but later ones can be suspect on hardness. These are identified by a MMC on the con rod and are still used to day. Early MEC con rod and big end bearings failed they were like butter! If they didn’t the webs would spin out of line as they weren’t assembled tight at all! At the same time a standard looking version was introduced by the same manufacturer this was also loose on the crank pin.
In the same year after a con rod snapped on me I started developing Japanese con rod conversions to fit the GP cranks. I learn’t with failures but developed bulletproof con rod conversions often copied still used to day by MB.
In 1987 we saw the new first batch of real race crankshafts. These cranks had beefed up polished con rods and improved big end bearings with smaller crank pins of 22mm and used 0.5mm big end crank shims, the crank webs were black in appearance. The crank pin was solid to the drive side crank web, unfortunately they were designed with a under cut around the crank pin building in a fault and did they go wrong!
The next smaller batch was introduced with a 22mm crank pin, pressed in both sides as normal, these used 0.5mm big end crank shims and these cranks were OK. Scooters Indian introduced their own uprated crankshaft, this used a 22mm crank pin with no shims either side of the con rod eye, but as usual it wasn’t done well enough and some failed! They are still available today! They look a mess but are very tight on their crank pins and stay in line, it’s a shame they didn’t use a good con rod!
Another batch of race type cranks came but this time the webs were too brittle and the crank split from the crank pin scrapping the crankshaft! Some of this batch still exists but mainly in the 60 and 62mm type, this type is very difficult to assemble and either crack if too tight or spins out of line if to loose.
Welding was the only cure as these cranks are used for high-powered motors.
As time went on another batch was introduced these were basically the same but black in appearance with polished race con rods. These had their faults too, most came from the manufacturers assembled out of line and some were also loose on the interference fit with the pin.
A similar crankshaft is still available much cheaper through European suppliers beware! For a time MB stopped using them! Some were out of line from the factory, when realigning them you find that they are very loose and spin out of line! Some when reassembled with over sized crank pins didn’t line back up! We went to Italy to visit the manufacturers to see if they would make us MB cranks, we pointed out the faults built into the their cranks, they said ‘we have been making these cranks for 20 years and your the first UK dealer to say we are making them with faults and thanked us’! Why no one had told them they were making crap cranks I don’t know. We did see cranks coming from MEC after our meeting with OUR improvements. These have been improved over the years and are commonly known as the black MEC crank, older style ones used a thick polish con rod marked with MEC which were fine, later ones use a copper coated standard looking but with a wider big end………. beware these rods are known to snap! Most of these cranks come from the factory out of line and still spin regularly!
If you listen to a forum thread everyone says these cranks are excellent, but these people are not experts, it is not our chosen crankshaft! After seeing how the factory made cranks we didn’t choose them to make our RT cranks and made them in the UK instead.
For years the cranks were copies of the Innocenti GP200 crankshaft, but as the race crankshafts were developed the crank pin was reduced from 22.9mm down to 22mm the same as most high performance Japanese engines, this then made mine and everyone else job easier when converting to Jap style con rods.
MB CON ROD CONVERSIONS
Since 1985 MB have been at the forefront of designing and developing con rod conversions in Lambretta engines. After my con rod incident in 1985 when my TV175 rod let go without warning at 70 mph and shot myself and passenger straight over the handle bars I thought it’s time I did something about improving the con rods! At the time I had already been using Jap pistons and Water Cooling engines, the rod was the next stage in the process but snapped before I got around to it.
Lambretta in their wisdom used very strange sizes apparently to stop people copying their designs. Their sizes were not normal to the rest of the world! Non standard metric con rod lengths were used between center point of the small end eye to center point of the big end eye, this is called the con rod length. Innocenti used 107 and 116mm (the rest of the metric world would have used either 105 or 110 or 115mm.) Non standard crank pin diameters were used, 19.9 and 22.9mm the rest of the world would have used 20, 22 or 24mm straight not stepped crank pins. Non standard con rod widths were used for the big end bearings width. Rod widths altered over the years between 12.9 to 14mm, some had wider bearings than the rods allowing a lot of side float, Innocenti used the pistons or piston shims to keep the con rod central and let the bearing move around as it wants. When using non centralised con rods the rod would not stay central and move to one side therefore wearing away at the crankshaft causing heat then failure would occur. The rest of the world used wider big end widths with shims either side of the rod to centralise the rod.
Given this basic information it was apparent with out finding a totally odd ball rod or having one remade (which I did get prices on, but was beyond a joke for experimental purposes) that this was not going to be easy!
The first cranks I used were the SX/LI/GP125 with the soft crank pin holes which were bored out to take shortened Japanese crank pins and the crank webs needed machining down to take the larger width con rods now been used. These failed due to the soft nature of the cranks and crank alignment was difficult! The second method was to use a Jap rod and pin, this time the pin was ground down and stepped to fit into a GP200 crank. After trying various ways we found a local company who made parts for Ford in Daggenham to make our own crank pins done to our design. These pins were stepped using a GP crank with 22.9mm crank web holes, the pin was stepped down in the center to 22mm, which allowed a greater choice in con rods. Normal big end bearings could not be used as they didn’t go over the 22.9mm crank pin of a Lambretta, so special Honda and Suzuki race bearings were found that has done the job ever since. The first conversions used no crank pin shims these over time wore out (today people advise crank conversions using no shims, this s totally wrong, ALWAYS use shims) I moved onto 0.5mm crank shims for a short while but they were found to be unreliable and would buckle and eventually break which we used to see in PX engines. 1.00mm shims were used on latter conversions with no problems at all and are still used to day either in brass or silver plated it makes no difference. Crank pin diameters, chamfers and lengths were perfected so all types of cranks assembled tight and in line without the need to weld them, unlike the earlier conversions were we did weld cranks. Today people advise welding cranks…….. this is a NO NO, any heat through welding pulls the cranks out of line from assembly and is difficult to get them re-aligned after welding and then how do you get the crank apart at a later date?
Various con rods lengths and designs were used from different manufacturers, this in the end came down to con rods that fit in the crank webs, that fit in the crankcase, that were of suitable length and had the correct gudgeon pin size that suited the pistons used. Crank pins were made to fit all types of crankshafts that appeared as time went on. These methods are still used to day by our selves and other scooter dealers who all bought MB crank pins and now do their own copies of what we did.
Over the years Lambretta have used various crank pin widths, MB started at 40.5mm but in an effort to improve the conversions the width was increased to 41 mm. This increased the surface area in the crank webs which made the cranks much tighter on assembly, only by a little but in these instances a little is a lot. By increasing to 41mm some cranks were too wide and could hit on the mag face, to get around this originally MB used 2 magneto gaskets. Now all MB rebuilt engines have the mag housing internal face machined down to suit the wider crank. It was found that 2 mag gaskets over time would become loose and would leak, today MB offer 3 different thickness to get the clearances correct between the crank web and mag face which should be 0.040” or 0.50mm, any tighter and the crank will move over and touch the mag in normal running. This is very important to check on assembly, make sure you get the gap right, this still needs checking on a standard engine! Mag housings and casings vary so it doesn’t hurt to check!
HOW DO YOU CONVERT A CRANKSHAFT FOR BETTER CON RODS
You need to think, what piston with what crown height (the height from the center of the gudgeon pin to the start of the dome) is going to be used and what gudgeon pin size is required. Pistons vary in sizes so these need to be chosen to get the correct crown height, dome size, ring peg positioning, skirt length and cutouts, holes or full skirt as required! Once chosen the rod needs to be made to fit in a crankshaft. There are lots of ways to do this, get these wrong and the crank won’t work for long.
Lets take a crank to be made to fit the Yamaha con rod at 110mm, with a big end bearing width of 16mm and a small end of 16mm, this is by far the most common rod conversion we have done and is often copied! There are, to complicate matters, many styles of the this rod from Yamaha, all work. This rod was the first rod we used, it uses the smaller outside diameter big end bearing and the rod fits into 60mm cranks with no casing mods.
This is how a crank should be designed to work.
- The crank needs to be stripped, press the pin out from the outside in, using special wedges made to suit the cranks design, do not press the whole pin straight through the webs.
- Start with the crank pin length, these vary from 40 to 41mm. We use 41mm, this means less machining of the crank webs and gives a little more surface area in each crank webs, always use new pins, bearings and rods, don’t cut corners it’s not worth it
- Take the crank pin width 41mm, take off the rods width which in this case is 16mm, take off 2 shims which we recommend 1mm then take off the side float, we recommend 0.30mm, divide this figure by 2 and what is left is what each crank web needs machining down to
- We machine down the inside face where the bearing and rod runs with a surface grinder as the metal faces are hardened, you can also do it in a milling machine. I chamfer the leading edge of the pin hole and polish the machine marks before assembly
- Then you need to be very skilled to assemble the crank webs, pin and bearing, this can be done with a crankshaft assembly jig or by hand, great care is required to assemble the crank and keep the invisible center line as true as possible. Then make sure the crank is assembling correctly with a special crankshaft alignment jig. Ours is from the 1960’s made by Alpha bearings who made our cranks and was designed by our piston manufacturers father. This jig uses knife edge rollers which run on the seal surfaces as close to center as possible and you measure at the cranks extreme points near the flywheel and drive threads.
It is a very skilled job and not one you do in a shed without the right equipment! Of course you need a press, one to do 15-20 tons, tonnage varies from press to press, we see standard figures of 3 – 5 tons, when assembling with oversized pins and different loctites we see up to 10 tons, the tighter it gets the harder it is to hit the crank true. By hitting it we mean…… check the run out on the crank shafts either side, if it’s running out the crank will need hitting with a copper or alloy hammer at the right point to knock it back true. A crank may also pull in or move out so it may need pulling in a vice or opening with a chisel. The job is not easy, it can be frustrating and take hours to get it perfect. Perfect is zero run out on the dial gauge 0.000” which is near impossible when building a Lambretta crank, the dial gauge can vibrate more than 0.001”. We try our best to get as near as 0.000” – 0.001” run out, but this maybe 0.003” on a bad crank that was machined wrong in the factory. Sometimes it’s a compromise to get each side the best you can and it’s not unheard of to spend a few hours on one to only find it is scrap! It’s not uncommon to see new after market and rebuilt cranks at 0.015” which is MASSIVE and the engine will vibrate beyond a joke!
A simple way to check alignment without a jig is to look at the flywheel bearing inner race, run the crank over a smooth surface, it should show movement signs where the bearing has run, if it it moves in and out with wide and not so wide colouring then it’s out of line. The very easy way is to put a straight edge across the crank webs 90 degrees to the pin and see if there is a gap on either side. If your engine is still running and you suspect the crank, spin the flywheel with a pointer on the outer edge to see if the gap increases and decreases.
As said the only real way to find run out is with a correct jig, there are a few, our Alpha true has never let us down but it comes down to operator over the jig, there are commercial jigs I wouldn’t go near as I envisage problems to the crank builder. Most of the time we use loctite when assembling the pin and webs, these come in different strengths and it’s a skill to know which one when you get a feeling for how tight the pins are. The real trick to perfecting these crank rebuilds from the 80’s was crank pin size to suit crank webs which all vary. Until we made our own RT cranks we had different over sized pins to suits all rods and cranks, some of these pins where tighter one side to the other because cranks where machined wrong in the factory.
The main problem with all Lambretta cranks is the pins can be loose in the webs, they may press together at 8 tons but hit it once and the webs just spin on the pin. Some may seem tight but can nearly spin 90 degrees, it wouldn’t last two minutes in an engine! The trick is a combination of getting a tight pin to suit the web hole size, and a combination of oil, grease or correct loctite to keep a pin tight. The Lambretta crank design is totally wrong for the use we expect it to do! The webs are just not wide enough to have strength in to grip the pin. If we had another 10mm width each side to play with then lots of problems would disappear, cranks would stay in line on assembly and wouldn’t twist out of line. Wider cranks don’t need loctite, which does cause problems on assembly, you can grease pins as they are fitted but the increased surface area locks onto the pin. Just making pins larger and large each time does work! The crank metal deforms each time, there is not enough meat and strength from the pin hole and the outer edge of the crank webs, this is also an area that needs looking at if we were to design a perfect crank.
All Lambretta cranks can spin or move out of line, spin is the pin moving in the crank webs. Lambretta webs are so weak they move in use on their up and down stroke, this is normal. Its the point where they move so much the webs spin, this is what we do not want.
Whether a crank spins depends on many factors
- How tight the pin is in the crank web
- How its is assembled and with what
- How the bike is ridden
- And if there is terminal damage once running
Most cranks built correctly in normal circumstances will stay in line, especially the milder tuned engines. Get a seizure or a lock up and the crank will try to keep spinning with rotation of the engine when the piston stops! We have known one crank assembled at 12 tons, it took 3 days to get it perfectly in line and after one minor nip it was out of line! Some race cranks push the pin out of the webs on their own locking up on the mag housing! Cranks really are a lottery from manufacturer to manufacturer!
Apart from all the hundreds of cranks I have hand built the best cranks we have ever used are our Race-Tour cranks, we have put so much time, effort and experience into them that we think they are the best cranks ever made for a Lambretta engine. Our RT cranks are made in the UK with some of the best equipment to keep crank pin holes true and machined to such fine tolerances and each one is hand assembled to run true. Compared to other manufacturers who quickly assemble cranks and use spring loaded crank aligning jigs were the webs get pressed together, then the method is to measure run out in the center or on crank webs, this is wrong, you can not measure with a dial gauge on roughly machined Indian crank webs! We think our method of running centers on the seal surfaces and measuring run out at the outer edges is much improved.
COMMON CON RODS USED BY MB
| Manufacturer of con rod | Model of con rod | Con rod length | Big end pin diameter | Big end width | Gudgeon pin size |
| Yamaha | RD125/DT175 | 110mm | 22mm | 16mm | 16mm |
| Yamaha | RD400 | 115mm | 22mm | 16mm | 16mm |
| Rotax | MB Special | 115mm | 22mm | 15mm | 18mm |
| Rotax | Microlite | 115mm | 24mm | 14mm | 18mm |
| Rotax/Fantic | 120mm | 22mm | 15/16mm | 18mm | |
| Piaggio | Ape | 110mm | 22mm | 15mm | 18mm |
| Kawasaki | KDX | 106mm | 22mm | 17mm | 16mm |
| Kawasaki | KDX | 108mm | 22mm | 17mm | 16mm |
| AF | Race | 107mm | 22mm | 15mm | 16mm |
There are a number of con rod conversions suitable in all Lambretta applications, there are more but the ones listed are good reliable conversions. For example most racing Japanese pistons that could fit and work in a Lambretta cylinder had 18mm gudgeon pins, 2mm larger than a standard small end. There are ways around this by sleeving down using piston bushes but they go wrong with disastrous results and we do not do these conversions now, they are only any good in low mileage engines. To overcome this, con rods were found that used 18mm gudgeon pins and were made to fit a Lambretta crankshaft. This was not as straight forward as it seemed as these pistons used different compression heights and the con rods used different lengths so it was not uncommon to either machine the cylinder or pack up the cylinder.
Our first 18mm conversion used a Suzuki 120mm con rod length and had a bearing width of 17mm! We later found the Rotax Microlite rod which was 115mm long and had a 14mm bearing width….. near perfection apart from it used a 24mm pin so the rod big end area was big and took some fitting into engines. This rod eventually wasn’t made and a newer not so good version was supplied in it’s place, these rods were getting expensive and we see them at nearly £200 plus all the work to fit it! For most parts the best con rod conversion we found for most pistons with 18mm gudgeon pins was the Vespa Ape rod at 110mm with a 22mm crank pin, the only down side is you can only use the standard bearing, we use a slightly wider bearing than the rod with shims, it’s not correct but it has never failed us.
Early improved con rod conversions were invented to make better pistons work with in a Lambretta engine. Non Lambretta pistons and con rods don’t just fit straight onto Lambretta crankshafts. Crank webs need machining to suit the special crank pins, rods and bearings used. Today MB standardised tuning with our Lambretta forged RT pistons, yes these may be a little more expensive to buy compared to a cheap Ebay piston, but then take into account the price of a cheap Ebay rod and all the work that goes with it, you need to question which is the right way to go? MB as engine designers hardly ever do Jap piston conversions choosing to use simple parts that work, this is why we made our pistons and used in conjunction with the Yamaha 110mm con rod which we perfected from the 80’s. This method allows you to set up an engine much better using varying cylinder packing plates to suit the casing heights or set up port timings and squish clearances using head gaskets.
CRANKSHAFT CON ROD AND SHIMS
I’ve touched on crank shims, but it unbelievably crops up in forums too many times! There are experts on forums who have never designed or assembled a crank shaft giving technical advice. It’s like this……………… there are two ways to locate a con rod
- By the piston width where the small end bearing of the con rod locates in the piston, this can be centralised by the piston only or by using shims either side of the small end eye, this is based on the width of the con rods small end eye. This method needs the big end area to be loose so it does not touch either side of the crank shaft as it runs, the top end of the con rod keeps the rod something like straight.
- Or by having big end shims which lets the the small end float around, the big end is locating the rod something like inline with the piston
Con rods vary in size at the small end eye, there are two styles
- Some con rods are designed to be a wide fit to run between each side of the piston, these are mainly Lambretta rods either standard or after market performance rods. Some Lambretta pistons are either 20.2mm – 20.5mm between the gudgeon pin holes, these use no shims, the small end eye will be 20mm giving a clearance either side but not enough for the lower part of the con rod to rub when running. Some Lambretta pistons are 22.2 – 22.5mm these are designed to run piston shims either side of the small end eye. Either design works, the only down side is in performance engines these shims can break so it’s advisable to find a way to use no shims.
- Some rods, namely the very commonly used Yamaha con rods used in crank conversions don’t have very wide small end eyes…….. these rods can not be used to shim up the con rod by the piston. The rod can float 2mm no problem, which will rub against the crank webs and it will wear into the rod and web and it will go BANG! This is why all Yamaha engines are centralised the rod by using big end shims!
Con rod big end clearances, some say 0.5mm is correct, I have used this before in my early designs, but the problem is if you use Silver plated shims once run for a period of time the plating comes off and you can gain 0.2mm side float which can over time let the rod rub on the crank bob weights. I work to 0.30mm clearance which works fine, allow for some clearance and it’s perfect. I’ve used 1mm shims either side of the big end bearing, either in brass or Silver plated these shims do not wear out as people make out in forums. Well I’ve never seen one, we did have problems with 0.5mm so avoid these but there are plenty of cranks made from Italy which use thin shims.
ECCENTRIC CRANK PINS
We developed the Rotax Microlite 115mm con rod conversion in our Group 6 motors engines in the 90’s and perfected them for our road TS1 style engines using 70mm Jap pistons. This rod was excellent but it had it’s down side, the big end bearing was massive at 24mm (We have come across Indian webs with a 24m pin these are very rare) this meant the rod stuck out of the back of the crank webs and the casings needed grinding out to suit, we did use to grind the rod to help, but if you went too far the rod let go. MB offered special eccentric crank pins to take the stroke from 58mm to 60mm or 60-61mm, 61-62mm, 62-63mm and in some instances we made pins 1.50mm larger so depending on which crank was available you could have got 63mm. MEC through Teminei did make some 62 and 64mm full circle cranks many years latter so you could get 65/66mm from these. These one off longer stroke cranks stuck out further and needed to have a groove machined into the crank case to allow for the con rod. The long stroke version either involved welding to your casings or welding a strip to the back of the engine which made the conversion expensive.
LONG STROKE CRANKSHAFT OPTIONS
The beauty’s of the Lambretta engine or a cylinder kit is, you can offer a longer stroke crankshaft to gain cc’s with usually more power and torque if done correctly, unheard of in the 2-stroke world! If you know what you are doing, wangling a long stroke crank into a Lambretta engine and making a cylinder work can really help the Lambretta rider. This really needs to be understood from the tuner/engine builder. We have used every crank available because we have made most of the cranks and set the standards!
We have used these long stroke crankshafts, baring in mind a standard Lambretta crankshaft has a stroke of 58mm, today there are many suppliers and manufacturers making Lambretta crankshafts, most been the full circle after market race type. Suppliers are MB, BGM, AF, PM, JB, with manufacturers from the UK, Italy and Portugal.
- 58mm
- 60mm
- 61mm
- 62mm
- 63mm
- 64mm
- 65mm
We have made special one off crankshafts at 62mm 64mm 68mm and 70mm for very special engines. These need the back of the casing welding up and boring out to suit. We have taken standard cranks and machined new outer weights to increase the crankshaft diameter and by plugging with alloy we have made cranks that have won Group 6 races and championships many times.
Take into account each crankshaft will need to use a con rod which will need to be used with the piston used, expect to see crankshaft con rods in different lengths and sizes. Complicated it may seem but we invented this system, which has totally opened up the potential of the Lambretta engine and pushed limits that was only a low 20bhp when MSC was the main leading Lambretta shop in the 80’s and they were still using standard rods. To today’s Lambrettas which are hitting 40bhp all because Mark looked at ‘What is the week link of a Lambretta engine?’ and developed each section inside the engine for Mark to hit the 40bhp for the first time in the mid 90’s!
Con rods (connecting rods) vary, depending on what engine we nicked, sorry borrowed them from or just got hold of and used them, depending on which sized big end or small end was available or required.
One theory is a con rod should be twice the stroke, this makes a 58mm standard crank needing a con rod at 116mm the same as a TV175, with a low compression height piston this engine was considered the smoothest of all engines, so why did Innocenti make con rods in the majority of their engines 107mm? We may never know, this theory doesn’t always ring true in a Lambretta engine, when do you see a 60mm crank with a 120mm rod? We do it but no one else does! A 64mm crank would need a 128mm rod! We regularly use 115mm rods and engines set up with a longer rod does seem to run nicer! The longest I’ve used is 120mm because it gets difficult to fit a rod/piston combination using Lambretta cylinder studs and cowlings as this set up may require a 12mm + cylinder packer or plate welding to the casing! Modern Jap engines do follow this formula of rod lengths. So you may see con rods with these center line dimensions.
- 105mm
- 106mm
- 107mm
- 108mm
- 110mm
- 115mm
- 116mm
- 118mm
- 120mm
- 125mm
You may see small end bearing sizes listed below (Internal / outside diameter) Widths vary depending on con rod small end eye width, gap between the gudgeon pin
- 16/20mm
- 16/21mm
- 18/22mm
- 18/23mm
And you may see crankshafts big end pin diameters at
- 19.9mm
- 20mm
- 22mm
- 22.9mm
- 24mm
- 19.9/22mm
- 20/22mm
- 22.9/22mm
And con rod bearing widths of
- 12+mm
- 15mm
- 16mm
- 17mm
- 18mm
As you can see, mixing any of the above crankshaft strokes with varying rod dimensions, mixed with a piston to suit, and suddenly you have improved the basic 3 ring standard piston and con rod engine that was normal until the TS1 came along. We had already started to improve the Lambretta engine because we were finding weak links that needed curing as power was increased throughout the 80’s and 90’s. Know how to mix any of the above and you know a Lambretta engines.
PROS. Using a longer stroke crankshaft will increase the cc of the engine, this then done correctly should increase the engines torque, pulling power and speed!
CONS. Longer stroke increases vibrations. Fitting these crankshafts usually require some of the casing removing to allow the con rod to clear. In some extreme cases welding is required at the back of the casing for added strength.
FULL CIRCLE BALANCED CRANKSHAFTS
I’m sure these conversions were done before, the first I came across it was when Taffspeed started doing full circle crank web conversions in the 90’s by bolting and gluing pre cast alloy packers, we didn’t like the castings as cranks varied from manufacturer so took the step further and machined crank webs and used billet alloy and made singular packers and machined them in the lathe. To be honest this conversion was too time consuming and we didn’t like the vibrations the extra weight added to the crank, plus also a high tensile screw snapped in a race motor! We had already started cutting and drilling cranks to improve vibration on tuned motors, all this did was move the vibration point into a different rev range and found the balance factor of a Lambretta crankshaft was a compromise based on piston weights, rods, bearings and pins etc. We developed the hand made full circle crank and added new extra steel weights welded to the cranks in an attempt to improve balance, compression and how the big Rotax rod worked in Mike Davis’s Group 6 bike that won 2 championships and was clocked at 117mph! We had made a low compression, one off 64mm crank that was fitted to our 40 bhp sprinter in the 90’s! Teminei through MEC, Lornenzoni and Tino Sacchi introduced the first commercially available full circle crankshafts. We had some of these cranks before they had came to the UK (back doors) one only did 3 laps of a race before packing in and was one of the reasons why we went to Italy to try to improve the manufacturing. We took the failed crank to Italy but was stopped by customs at Stanstead as they thought it was an offensive weapon! (long story, but funny) After walking around the factory we decided not to bother following up our designs, Health and Safety would have shut it down in the UK, we learnt the back doors were bigger than the front doors and we knew we would be ripped off so developed our own cranks in the UK.
As you can see MB has been at the forefront of developing crankshafts for many years, demand for our product was so high that making one off crankshafts became hard work. We were buying other peoples cranks and modifying them and in the end just ‘said why are we doing this, why don’t we make a real crank’ So we did, we looked at lots of ideas and manufacturers. It’s the state of the country……. you do not just look up 2-stroke crank manufacturers in the Yellow pages! Today you would have to go to Italy, India, Taiwan or China, not so easy as they were talking up to 10’000+ items! Alpha had been making our one off pins for many years, they also made modern 2 and 4 stroke cranks. Between us we designed 3 one off cranks which I designed to fit n place of the drive plate and part of the mag housing, these cranks are still fitted today and I totally abused mine on a trip to Holland and racing around the IOM doing well over the ton! This design did not spin and is still fitted in the original engine. These cranks were great but did not easy so we used our experience to develop the RT crank as it is to day. A crank which fits, is balanced, works and does everything marked on the tin. Early batches had tiny little niggles as with any development we tweaked away until we were 100% happy that what we produced was the best crank ever made for a Lambretta. We tried various balance effects and as described, balance is effected by the smallest thing……….. it really is a compromise! A crank set up and balanced for a TS1 piston is different to one set up using a 175 piston, based on piston weight alone! You have to do an average that suits the majority. We think we cranked it and haven’t seen a come back from our RT crank in many years!
Today many dealers have become involved with other manufacturers doing their versions of full circle cranks. Each have tried different ways to balance the engine and have used different methods to do this with different materials. To get balance you need to use light weight or heavy weight materials in certain areas. We could be talking alluminium, tuffnol or tungsten weights, what is good depends on assembly, it’s hard enough to get the pins tolerances right let alone working on where and how to plug a full circle crank! Most of these other aftermarket cranks have gone through periods of change through many problems.
In the end manufacturing cranks in the UK has been effected by the recession, some UK companies really are hard to deal with, it’s like hitting your head against a brick wall, this is basics of manufacturing, if you can not get the service right then good ideas fail. The world has changed, at one point minimum orders abroad where 10s of thousands, now it’s down to 500! We were making 10 – 20 – 50 at a time, it comes down to costs and sales!
As MB slowly move away from our UK made cranks, Scooter Center and BGM have made their version using some of our technology and parts supplied from us. SCK have used their take on things, we’ve used ours, as mentioned it has all comes down to price dictated by the customers. BGM can produce cranks cheaper than us with the same quality. AF Rayspeed, PM and JB tuning do their versions of crankshafts, all vary in price and quality.
LOW COMPRESSION OR HIGH COMPRESSION
The theory mongers out there always want to stir things up about low and high compression crankshafts! What is the best? People want an answer! Well as with most things there is no answer. What works on one level of tune doesn’t work on another, fit a low and high comp crank to one engine and you may not even know the difference! We have made special MB bob weight cranks for racers who have dynoed back to back and found no power increase but found smoother running. But tune an engine to the absolute limit, with razor edge power bands and one may work better than the other depending on say exhaust development……… one could argue and argue, one tuner may find a ounce of bhp over another tuner, the other tuner may look at another area of the engine and find an ounce from a different direction!!!!!!!!
We have used modified standard low compression crankshafts and high compression crankshafts in very similar engines and have seen 35+bhp from both!
In the old days when it really wasn’t normal to dyno an engine I used the seat of my pants to tune and develop engines, knowing what I know now over that 20 years of really hard work I would have bought a dyno! But a dyno is really not the be all and end all, you really do have to ride these things to understand the tuning direction. I know one well known tuner who lives by the dyno and hasn’t even got a bike license! However you look at it, whether it’s a power figure from one dyno to another which we all know can read different depending on a million things. It maybe you look at who is front at a race meeting or reading the latest forum thread!
I’m more of what works for the person sat on the Scooter riding it the way he wants………… this is where MB have been at the forefront for many years……………… using common sense and practicality.
THE FUTURE
By reading this feature it should give you an insight into the basics and how a modern Lambretta crankshaft can be very complicated indeed. We have made special wider cranks to fit in place of the drive seal plate and into machined mag housings, these have worked perfect but are just too complicated to give Joe Bloggs. Dealers are moving around with con rod lengths and crank designs and balance features. There are theory’s to whether a low compression crank is best to a full circle high compressioned crank. It’s always swings and roundabouts, one race engine may suit one style of crank. The best way for 99.9% of people is a smooth running reliable crankshaft that fits and works, we think over the years we have standardised Lambretta engines for the better. Others complicate things too much. For instance the RB20 now only uses a 116mm con rod! When the RB22 and RB25 use the 107mm rod, yes it will make a smooth engine and works with the Yamaha piston used but it limits the customer when things go wrong……….. this is why we standardised engines based on all the complicated engines set ups we have done.
We are looking at a new casing to fit wider longer stroked crankshafts, which opens up lots of ideas with a new cylinder, ignition, clutch 5/6 speed gearbox etc etc etc, capable dreams if enough want this kind of things.
At the end of the day if a crank fits and works and you are happy, then great, but when you ride a very fast, smooth reliable motor you will see perhaps your cheap Ebay cobbled together forum engine isn’t quiet that good.
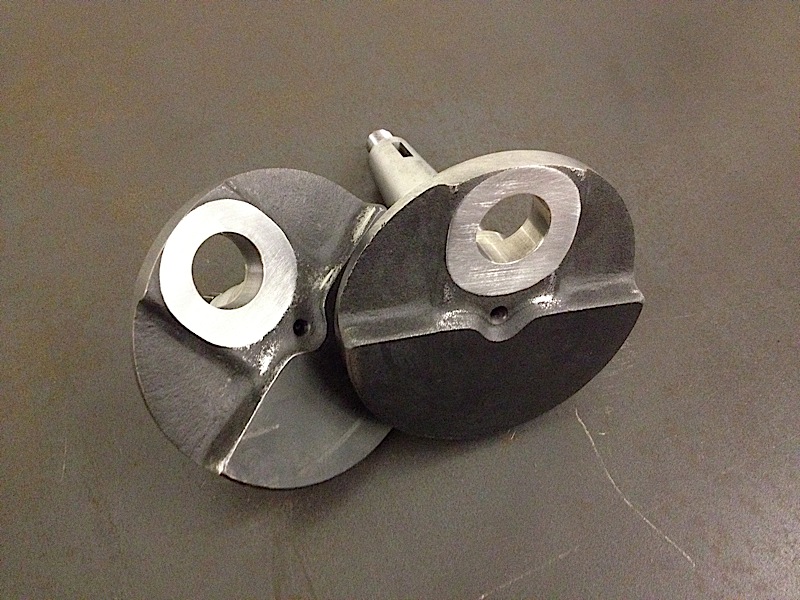
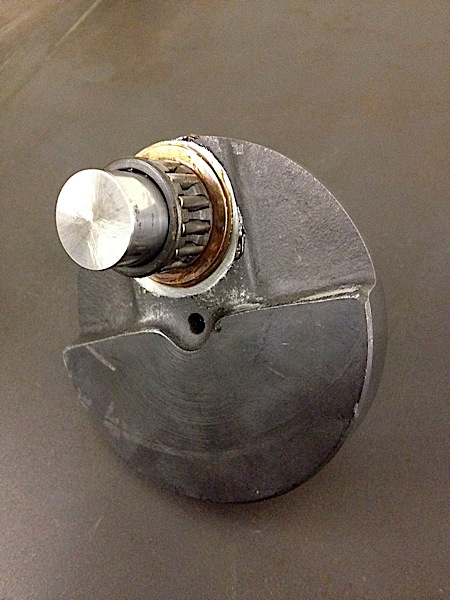
The start of a crank conversion using an old crankshaft, both webs, machined down to take a wider con rod width and with chamfered leading edge
.jpg)
Sometimes the pin supplied with the rod kit can be used or a specially made pin, you always need to measure pin diameters and know what you are doing with sizes, this way you can tighten a crank up
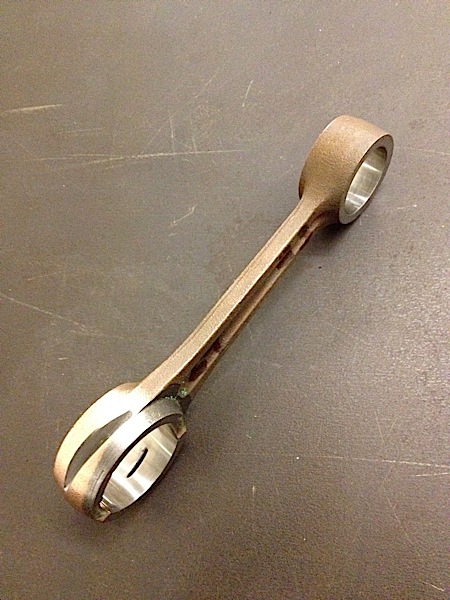
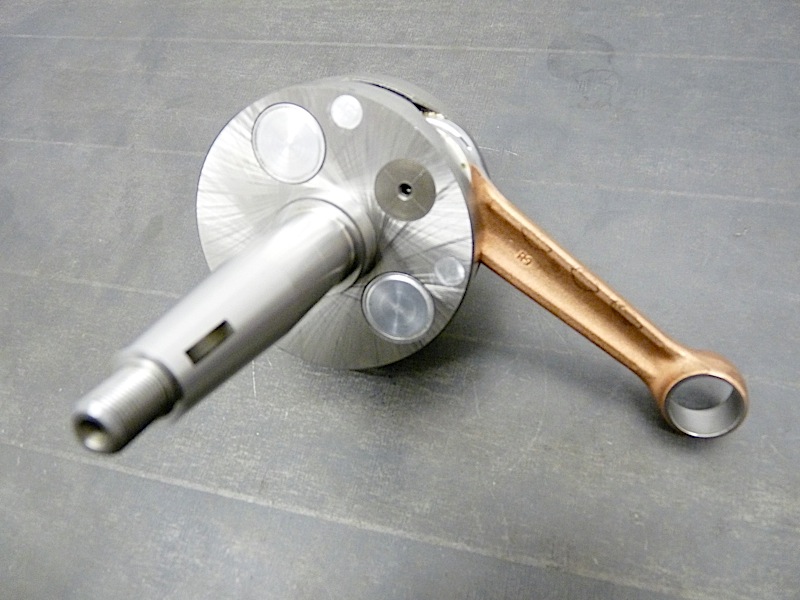
This conversion is a Piaggio APE, note the machine marks on the right side of the rod, this is from a Rotary Valve motor, the APE rod comes with no lubrication slot, I’ve put one in for this conversion
I like to fit the flywheel inner bearing first before a crank rebuild, tight bearings can knock alignment out and ALWAYS loctite them on or they can come loose
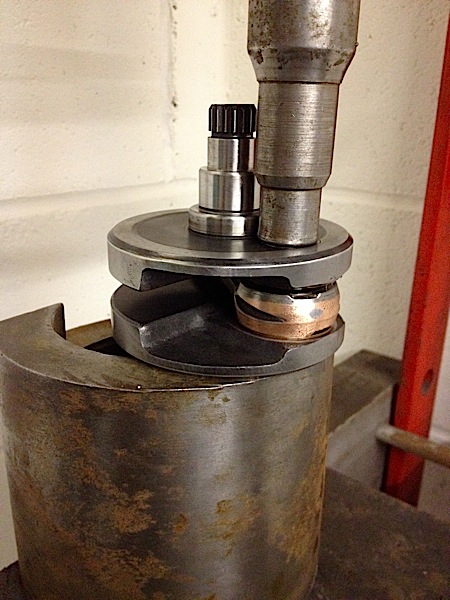
First the drive side needs a pin pressing in this crank, always use a loctite on the crank web hole and the pin, vering types can be used depending on how tight the crank will press together, this took 12 tons! A real tight one
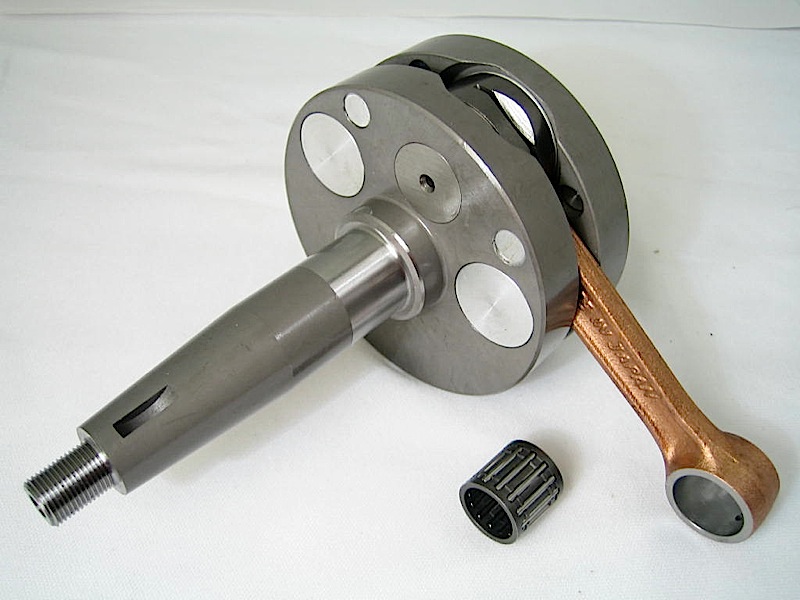
Assemble the pin with shims, and bearing and plenty of grease, it helps when assembling the next side
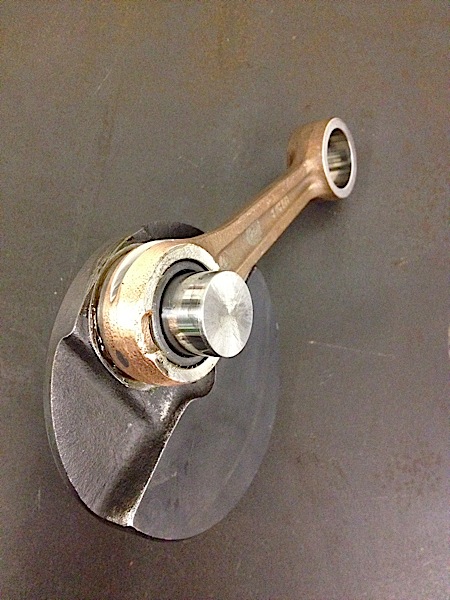
Fit the rod and make sure it spins
If the crank conversion is worked out correctly, the the rod will clear the web, if tight either machine the web or the rod, note the slanted lubrication slot
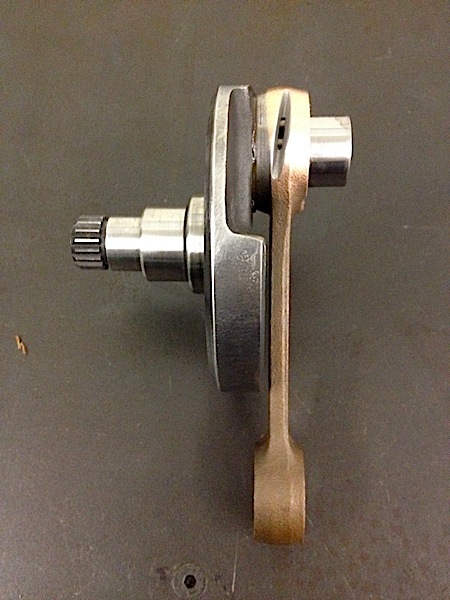
I manually line up by eye and with a square on each side of the webs, most Lambretta cranks have a different diameter each side so its not so easy, you need a good eye
When your ready press the pin fully home, you should check alignment a few times before the pin fully pressed home
When you check alignment, the crank may press together wide at the webs and need pulling back with a very old workshop welders vice, joking any decent vice will do
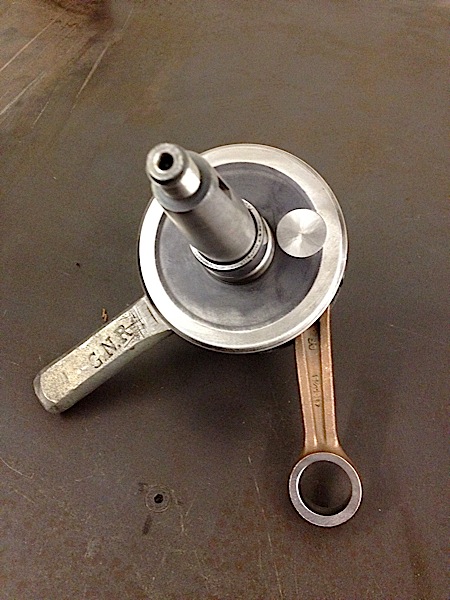
Some times the crank may pull together at the web so it may need spreading apart with a Genuine Great Northern Railway chisel which I found digging in my garden as a kid in Hexthorpe not really any tapered chisel will do
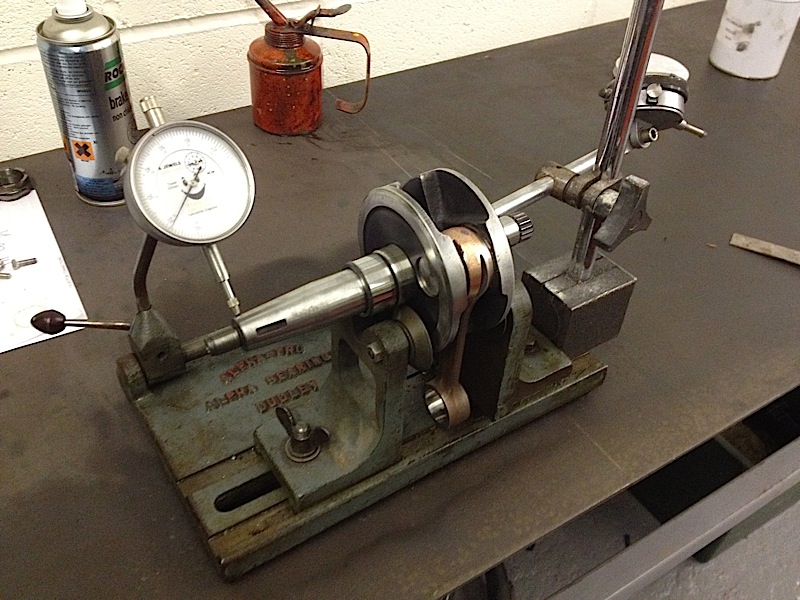
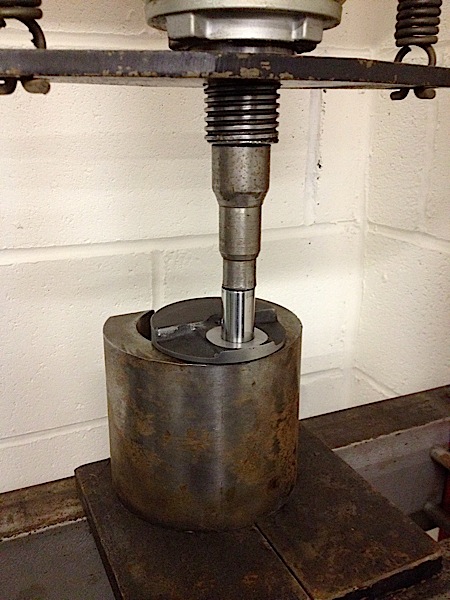
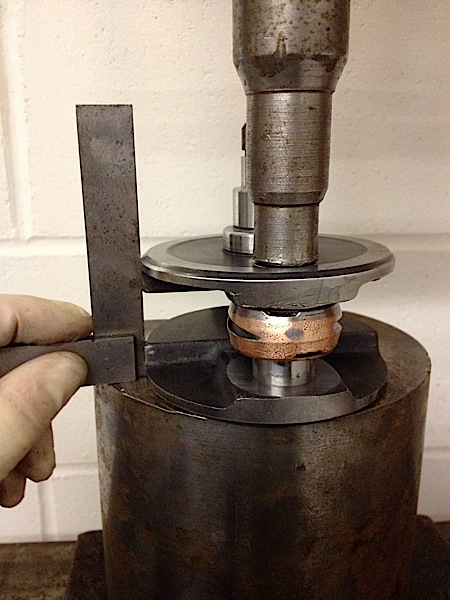
Our Genuine 1960’s Alpha Tru, note knife edge rollers which we had made in the 80’s on the seal surfaces and DTI at its furthest point is the best way to measure run out
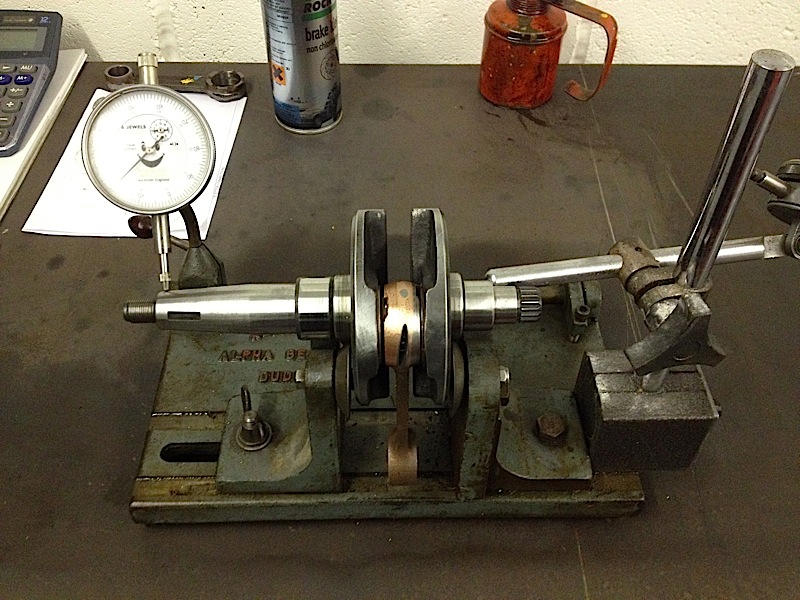
Note the DTI stand on the right this stops the crank floating on the roller/bearing surfaces with a slight push towards it with a sharp pointer, if it not kept still the DTI on the left will move up and down the taper and show the wrong readings
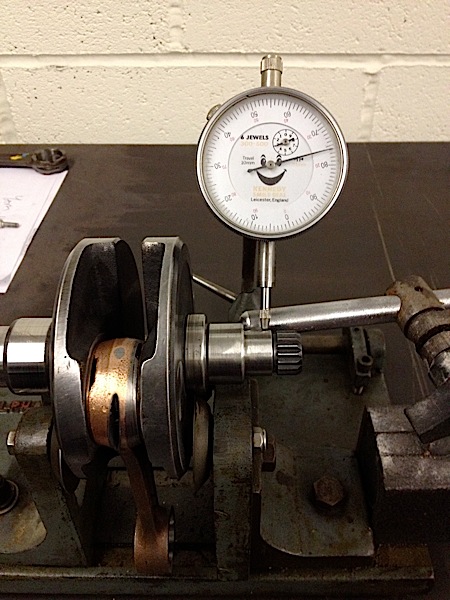
This is the outer edge on the drive side, not as long as the flywheel side so the movement is not as much, note the DTI – the needle is between the 70 – 80 that is 0.10mm – .004” I try to get .000” which is near impossible on a Lambretta made crankshaft, the DTI vibrates .001” I try to get cranks assembled within .002” either side. On early RT cranks you can not measure on the right side but on the next inside face
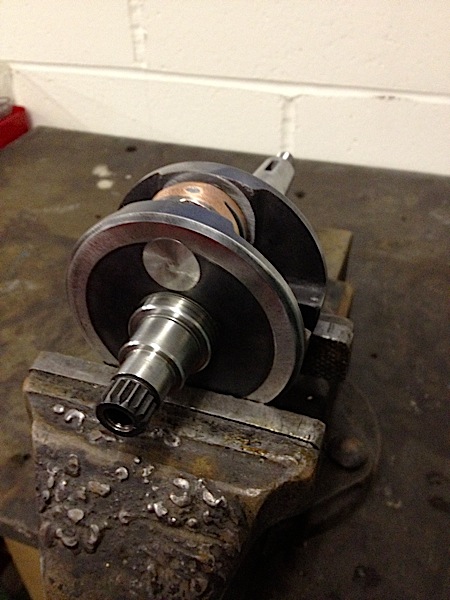
A fully assembled second hand MEC black crank, it pressed together at 12 tons, (which is very tight on my press) and to within 0.001” – 0.002” each side
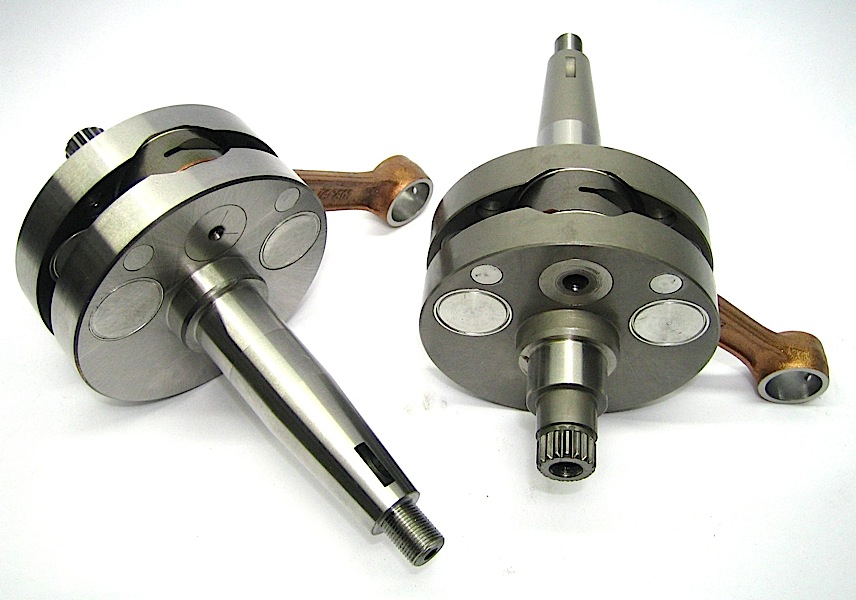
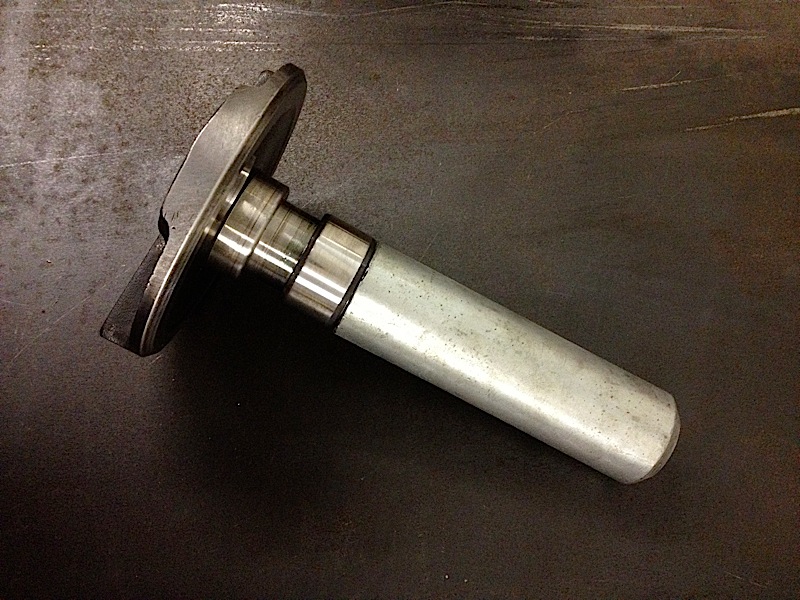
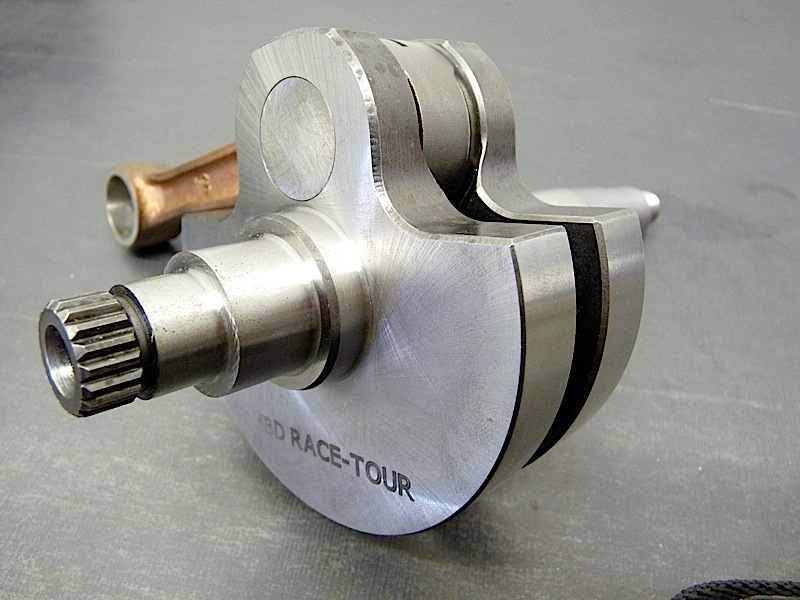
We think the ultimate Lambretta cranks, on the left is the later RT and the right is the early RT, note the right hand side is dark in appearance, we developed newer heat treatments as we tweaked cranks
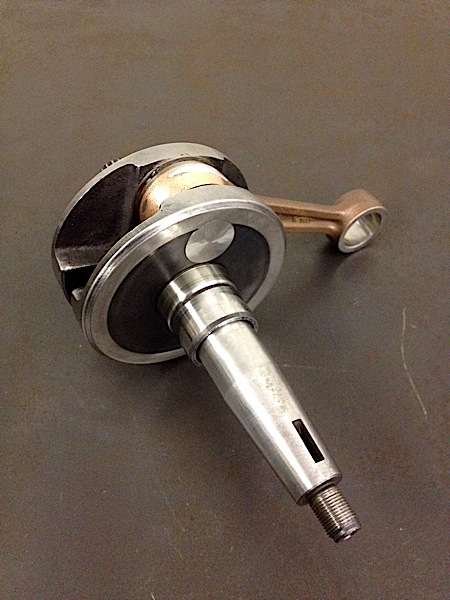
A specially made MB RT 64mm crank with Rotax 120mm con rod fitted
And a special MB RT bob weight crankshaft, still out in test stages comparing hi comp to low comp, the feed back is a smoother engine
RT Crank showing our balance features, with alloy plugs pressed and locked into position

This is a Teminei/MEC/Evergreen crank note the difference balance features
Crankshafts rebuilding is a mine field and very difficult to do, only trust it to someone who has done lots of them and know what they are doing
Mark Broadhurst. Ask Mark mark@scooters.co.uk


Brilliant article may think twice before I change the crank in my 1980 Jet/SX 200