


IDEAL IGNITIONS AND AUTO ADVANCE / RETARD IGNITIONS
This must have been the hardest article for me to ever write. Not because I don’t know or understand the subject but it’s so difficult to take it out of your head and put it to paper. It’s fine doing it in front of a white board or piece of paper and explain it with loads of scribble to a customer. What I have to write has to be as near as perfect or at least make sense to the thickest of us. The idea of our Tech-Site is to take the pressure off answering these questions everyday. We know by the lack of constant silly questions that our Tech-Site works. If I get the tiniest fact wrong some clever little know it all sod will have a go, not to me but on a forum! It does not help that I have to read every paragraph at least 20 times to make sure it’s right and the next one flows. It does not help I have my good lady constantly talking to me at a very difficult point or the fact that I’ve done hours and hours and pressed a wrong button and have lost so much information having to re do it all again. After doing it night after night my brain gets fried and some nights I can’t see the screen because of a migraine! I’m always thinking about something so have to shut off and get in the zone so I don’t miss something out. And the fried brain needs time off and I need to re address the subject some weeks later, then when your finished you go and remember something in your sleep. I can only hope that there is enough information to help the reader understand a very important subject that will get more common as fuels decrease in quality. This is an important subject people should understand ……..
Ideally a tuned engine needs an electronic ignition, these are usually much better than a points type system. It aids starting and produces a better spark keeping the engine firing in time with every revolution. All common Electronic ignitions – Innocenti, Vespa, AF, SIL and BGM only use a fixed firing point. This means the system fires once every revolution in the same place and does not move. The exception would be the Varitronic ignition, which is not interchangeable with any of these systems, this system uses a built in retarding spark as the revs increase.
For now lets not talk about the Varitronic system, we will cover this later but all the information on advancing sparks applies.
Please note; All electronic ignitions will move the spark to some degree from zero revs to the tick over area, some more than others. This shows up when you are strobing up an ignition. This usually only takes place on a standard electronic ignition up to around 2000 rpm, the reason for this is all the electronics from the flywheel to the the stator and coil windings take time to catch up. When strobing a standard ignition always remember this, it’s best to set timing above 2000 rpm when everything stabilises…….. this is not an advance retard feature, but be aware of it if setting up an advance retard box! No engine rides below 2000 rpm so this is nothing to worry about.
Because we’ve only ever had these fixed timing electronic ignitions we have taken an average timing firing degree to suit our engines, compression ratios, power outputs and lately the fuel we have to use.
When I started tuning engines in the early 1980’s I used GP timings at 21 degrees, this was perfectly fine with silly high compressioned engines but we had good 4 star fuels with high octane and added lead. As I developed my tuning, cylinder heads and compression ratios the timing had to reduce to 19 degrees because of pinking and melting pistons, this simple step cured the problem. A standard where others followed. When the fuel decreased in quality and we lost lead in our fuel, timings needed to decrease further to 17 degrees in my style engines, power was lost but this kept the motor running cooler for reliability, again others followed by this, some went further to advise 15 degrees. At each step it decreased engines power but kept motors running.
It’s all about a compromise to keep power yet keep a motor running reliably. Over the years it’s without doubt we have pushed limits of power from our Lambretta engines, ignition is one very important part to keep power and keep a motor running reliably.
This fixed timing is only an AVERAGE to work over the full rev range but mainly in its power power band. Why? Well, we set the ignition to work when the engine is in full power where it creates the most heat so we have to time the motor to be reliable here. Lower down in the rev range this fixed timing doesn’t effect reliably as the engine usually runs cooler because the timing is not in the right place. This fixed ignition timing doesn’t do anything to improve low down running especially on a high revving engine.
Most of you running a over tuned motor with a peaky expansion chamber will know it’s hard to jet in a Scooter low down in the rev range especially between 4 – 5000rpm. This is a little different, this area can be over lap of the expansion coming into it’s own and the port timings working. This has been cured in the bike world by varying ignition timings and the use of an exhaust power valve controlling port timings. But we don’t have a power valve! The clever tuners with Scooter riding experience should tune to suit this area low down to make a cleaner running engine or we design an expansion chamber better than others to improve this area. What we do have now is auto advance ignition boxes or Advance retard boxes or ignition add ons, what every you want to call them.
To advance further on this. The ignition should have some type of advance and retard feature, which varies the firing point and moves the spark of the ignition depending upon revs. It gets rid of the Mr Average fixed ignition timings and moves the spark around as the revs increase to push the power higher in some circumstances.
Mainly a varying ignition box will
- Improve acceleration by burning fuel better lower down and cleaning out carburation
- Create a smoother running engine by progressing the spark as it moves in time with revs
- Have a safer higher rpm from lower temperatures and lower risk of knocking from poor quality fuel
- With clever development you should improve the motors power across the rev range
If you look at the development of Lambretta engines the basic fixed timing has decreased from 23, 21, 19, 17 to 15 degrees. Remember these are timings as an average to work at the hottest part of a running engine.
- 23 degrees. Standard Sx, Li, Tv ignition timings, based on lower horse power and lower compression ratios
- 21 degrees. Timings changed when the Gp engine was introduced based on higher horse power and higher compression ratios
- 19 degrees. Timings changed as I developed the head design away from Innocenti’s tapered squish design to a real squish design based on the dome shape of the piston and then corrected compression ratios, even with old style 4 star the timing needed decreasing
- 17 degrees. When the fuel altered and lead was taken out the timings needed decreasing again
- 15 degrees. When the fuel altered and ethanol was introduced timings needed over decreasing to be safe
If we could control these timings in our engines then we could use all these timings to get the best of all engines to get a smoother quicker more responsive engine but still get that all important reliable, fixed, cooler running ignition at say 17 – 15 degrees. It shows a motor with a timing that adjusts from say 23 – 15 degrees should work much better. But remember this 23 – 15 degrees is still an average to suit the whole rev range as an average across the whole of the Lambretta engines power out put. Remember every engine is different, there is so much involved. Imagine an ignition that would move from tick over through the rev range to the all important average setting and beyond. Lets say from 30/28/26 degrees down to 17/15/13 degrees. All modern engines run such ignition systems but not the traditional Lambrettas or Vespas.
Today with our poor fuels an advance ignition comes into it’s own if only to make an engine run cooler and be more reliable and ALL engines should have some sort of box fitted.
As already stated in our ignition section some oddball ignitions had this function. I did my first road going Electronic Ignition off a Suzuki in 1988 which worked with a moving auto ignition spark. Later I used add on boxes for my Motoplat race ignitions and usually the quickest race scooters found them to be an advantage.
For years I wanted to find a road system to use an advance retard feature to gain the benefits I’d learn’t on the Suzuki conversion. This at the time wasn’t an easy plug and play as it is these days. In 2001 at last, through looking and trying, we finally found an electronic coil, which was a direct replacement to the Vespa electronic coil. This coil could give nearly 10 degrees ignition advance depending on how much your engine revved. This was not a lot compared to the Motoplat race system that could give around 25 degrees advance. Our early coils were Red or Blue, but after some testing we found they only worked on the Indian steel flywheels. For some reason they did not work on either the AF flywheel or a Vespa flywheel. And in some cases only 70% worked on Indian flywheels. For this reason we disappointingly took these coils off the market. Basically if they sparked then they worked and worked well. We found with testing that on an average road scooter you got between 6 and 4 degrees, not much compared too the Motoplat system but just enough to feel the difference in pulling power as you accelerated. For 2002 we found and introduced another CDI and separate coil set that worked on all systems including the AF, Indian and Vespa flywheels. It still only gave a small advance but is worth it on most engines. In the end we stopped selling these through the hassle factor from some working and some not working. Even with only 3 degrees movement of the spark over the working rev range you can feel this on the road! Even today some ignitions just don’t want to work with the newer add on ignition boxes for some strange reason.
ADVANCE AND RETARD IGNITIONS
To over come these ignition and fuel problems today you can take the ignition timing basics and fit either an after market Agusto, MTech or KyTronik Smart Booster. All as with a Varitronic system (which is not an add on) the spark moves towards Top Dead Center (TDC) as the revs increase which cools the motor. Clever ignitions use graph curves to plot where the spark will be at a certain rev range. This will vary from engine to engine especially engines over tuned which have become peaky with a high revving exhaust. You can push the degrees of timing to suit the flat spots of a pipe or tune to lift pulling power. But more importantly the timing reduces towards TDC, where the higher the revs means more heat, by reducing the timing, the cooler it will run and allow more over rev run, now you could run a higher compression head to increase power where in recent years we have been reducing compression ratios to gain reliability! It’s not uncommon to see flat out timings at 13 – 10 degrees at say 9000+rpm, this is normal in high powered modern race engines and high compressions.
There are a few ways to look at what Advance/Retard means, in simple terms the closer the spark fires towards TDC is retarding the ignition but is usually referred to as advancing the spark to TDC (you are actually retarding it away from the previous spark nearly one full revolution back). Retarding the ignitions spark will make an engine run cooler, stop pinking but will reduce low to mid range pulling power, this is the compromise.
Today with a Lambretta and a Vespa there are different ways to achieve this new found advancing of the ignitions spark
- You can use the MTech or Agusto type addon ignition box which have a linear curve (not a real curve but called a curve) with these the ignition add on curve is a straight line if you look at a graph. You need to look at a graph to understand this, you can not see this by strobing the ignition. But you need to strobe the ignition to see where the spark moves in conjunction to the timing marks and rev range
- You can use a Varitronic ignition system which only has one built in curve (yes it uses a real curve or a pre plotted curve which just so happens to suit most average engines) or you can use the bolt on KyTronik which has 15 built in varying pre plotted curves and one fixed straight line curve giving the best bolt on box to suit more engines than ever before
- Or you can use an adjustable computer programmed ignition box, where you can program and plot your own curves in a computer and down load these to a special electronic coil. There are at the time of writing 3 due out, but these are complicated for the average man and are aimed at race engines and are expensive. There are numerous boxes and programs already available in the bike world to suit modern engines but don’t work on the common systems we are using
LINEAR STRAIGHT LINED ADD ON BOXES
These simple MTech or Agusto ignition boxes which are very similar to the old Motoplat race boxes which delay the spark by milliseconds every 1000rpm. When we were using the Motoplat ignitions we had a choice of say 1 degree per thousand revs, or 1.5 degrees per 1000 revs or 2 degrees per 1000 revs. The MTech has these built into it’s ‘one box’ with 16 settings, the Agusto box only has one built into ‘one box’.
Lets look at setting up 3 engines
- 1) Road/Race tuned, say a TS1
- 2) Mild tuned or kitted, stage 4/5 type
- 3) Standard, Gp200
1) ROAD/RACE TS1 TUNED
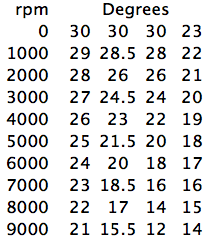
Lets start from not running at zero revs per minute to revving to say 9000rpm with a 1 degree advance per 1000 rpm with a static (fixed) timing of 30 degrees and see where we get at 9000rpm. On row 1 you can see at 7000 – 9000 rpm we hit around the old standard timings of 23 – 21 degrees, but a tuned TS1 won’t be safe to run at 23 – 21 degrees at these revs. So ideally we need to reduce it to around 5 – 6000rpm. If we fitted an add on box with 1.5 degrees per 1000 in row 2 then things change and we are getting near to where we want to be, 23 – 21 degrees at around 4 – 5000rpm but 19 – 17 degrees is too high at around 6-8000rpm as most bikes don’t rev so high or get used so high and ideally an average engine needs a static timing of 17 degrees at 6000rpm where porting and exhausts come on song. So we need to try a 2 degree add on box in row 3 which gets 17 degrees at around 6500rpm with an over run/rev to give 14 – 12 degrees to really keep it cool absolutely flat out, so we are nearly getting there. But at low revs the timing maybe too much and cause pinking and holed pistons as you might try to ride in this new found low down pulling power causing the engine to over heat. When really the engine needs to be revving catching up into it’s power band, but you become lazy using the over advanced spark to pull the motor. You could tweak this system by setting the static timing to 28 – 26 degrees and you would get 17 degrees at 5500 – 6500rpm – near perfect. Looking at the graph you could work backwards if you knew the progression of linear advance which Chiselspeed give with their instructions. Aim for your 17-15 degrees in the rev range you want and work back with the graph to 3000 rpm and set the static ignition advance on the stator plate setting. Ideally to get the best of all worlds, you could choose a linear graph that doesn’t move as much. Check out row 4 with 1 degrees per 1000rpm set from the real working start revs of 3000rpm. At 6000rpm your near perfect at 17 degrees, at 9000rpm flat out your at 14 degrees keeping the motor cool, but importantly at very low revs your at 20 – 19 degrees not over doing it as even a race tuned motor will run at these low speeds at these timings……. so you have a timing moving from something like 19 – 15 degrees over a real work rev range of 4000 to 8000rpm.
2) MILD TUNED AND KITTED STAGE 4/5
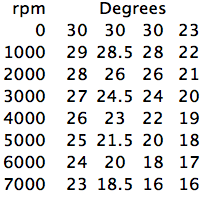
Again lets start for a kitted stage 4/5 from not running at zero revs per minute to revving to say 7000rpm with a 1 degree advance per 1000 rpm with a static (fixed) timing of 30 degrees and see where we get at 7000rpm. On row 1 you can see at 5000 – 6000 rpm we’re not quiet at the old standard timings of 23 degrees, but a tuned motor won’t be safe to run at these degrees at these revs. So ideally we need to reduce it to around it’s peak pulling power of 5 – 6000rpm. If we fitted an add on box with 1.5 degrees per 1000 in row 2 then things change and we are getting near to where we want to be, 23 – 21.5 degrees at around 4 – 5000rpm, 23 – 21.5 degrees isn’t too bad but not right. So we need to try a 2 degree add on box in row 3 which gets 17 degrees at around 6500rpm with an over rev to give 16 degrees to really keep it cool flat out, so we are nearly getting there. But at low revs the timing maybe too much and cause pinking and holed pistons low down in the rev range as you might try to ride in this new found low down pulling power causing the engine to over heat when really the engine needs to rev into it’s power band. You could tweak this system by setting the static timing to 28 – 26 degrees and you would get 17 degrees at 5500 – 6500rpm – near perfect. Looking at the graph you could work backwards if you knew the progression of linear advance which Chiselspeed give with their instructions. Aim for your 17-15 degrees in the rev range you want and work back with the graph to 3000 rpm and set the static ignition advance on the stator plate setting. Ideally to get the best of all worlds, you could choose a linear graph that doesn’t move as much. Check out row 4 with 1 degrees per 1000rpm set from the real working start revs of 3000rpm. At 6000rpm your near perfect at 17 degrees, at 7000rpm flat out your at 16 degrees keeping the motor cooler, but importantly at very low revs your at 20 – 19 degrees not over doing it as even a race tuned motor will run at these low speeds at these timings……. so you have a timing moving from something like 19 – 16 degrees over a real work rev range of 4000 to 7000rpm.
3) STANDARD ENGINES
A standard engine won’t rev as much as a tuned bike so the timings need to be a bit more conservative because the motor won’t rev but should have a wide spread of power.
On row 1 it doesn’t work as none of the timings get close to any standard ignition timings new or old. On row 2 we’re still not getting near to where we want to be. Row 3 is getting closer but not right. Row 4 is nearly there with a 1 degrees per 1000rpm setting from the real working start revs of 3000rpm. At 6000rpm your near perfect at 17 degrees, but importantly at very low revs your at 21 – 20 degrees which should be fine, with this setting you could move the stator anticlockwise a degree or so, so you get 17 degrees nearer 4-5000rpm……. so you have a timing moving from something like 19 – 16 degrees over a real work rev range of 3000 to 6000rpm. But because a standard engine uses a very poor burning squish design and large squish clearances with low compression you could push the timings from say from 24 – 15 degrees and the motor should run better throughout the rev range.

These are examples – scenarios which I hope you can understand the basic principles to set up a linear advance ignition box. Engines vary in how they work, especially with different exhausts fitted. If in doubt then set them safe, run them and adjust from there. Others would say do plug chops, plug chops is something I’ve never done, modern fuels and oils give false readings, I only do it on high mileage motors which is pointless as you know the high mileage you have done safely.
When I used to set up our race engines in the 90’s using a Motoplat and a Motivation addon box it wasn’t uncommon to set the static timing at 35 – 30 degrees! Yes that’s right it’s massive, I would basically set it so you could just kick over the engine or bump the engine without it running backwards or just kick back at your foot or to try and lock the back wheel as it was trying to run backwards. I would then set it to run down to around 15 – 11 degrees depending on which engine it was. I know this worked with the results we would get at the time. I once set the group 5 bike up on the Friday, for it to be collected for Cadwell the next day and the rider dropped the clutch as he was doing the previous week and winning every race only for the bike to have so much more power in the race and he flipped the bike over and broke his collar bone. That’s the effect of a well set up motor.
Always remember there is no working spark until 2000rpm, obviously the spark works below 2000rpm but what I mean is the firing point doesn’t stablise on most systems until 2000rpm. So you would set the basic start of the timing to start from there and work down progressively to where you want the timing to average out at its mid to peak power. With the MTech it’s much easier as you can adjust the various spark settings in the little add on box once static timing is set on the stator plate. With the Agusto, once you’ve set the stators timing you would have to swap the 3 boxes offered making the Agusto a more expensive way to go over the MTech. But give the basics of the engine one of the three boxes should fit the bill so this should save money. If you don’t get the timing to where you want it, it would be a case of removing the flywheel and resetting the stator plate and again playing with an Agusto box or setting the MTech switches!
All sounds easy, but throw into the mix – Stators, flywheels and coils which all vary as does these bolt on boxes things can vary from bike to bike. I’ve found with the MTech when you flick the switch to another position they do not follow the instructions at each switch position. You must take what the instructions on the graph says as a base setting and work with your motor individually. Making these, sometimes on one bike harder to set up compared to another bike.
Remember with these linear systems they are only a compromise of trying to get the spark where you want or need it. If you can get your motor to only get say, a ignition movement from 3 to 5 degrees within the working rev range of the engine from say 3 – 7000rpm (which is most engines) then you should feel a difference in the your motors running. But ideally if your clever and the engine needs it as shown you can run much more movement for the better over the rev range.
VARITRONIC SYSTEM
The Lambretta Varitronic system is totally different to any of the systems mentioned. It is a complete system Flywheel, Stator, regulator/rectifier and coil and has been adapted to fit a Lambretta. There are now a few versions of this to fit various Vespa ignitions. To get the advance retard type of feature you have to buy the total system in GP or Li types. This system is not interchangeable with any other system and only comes with one pre set curve.
The beauty of this ignition curve is it suits so many motors. It’s not a linear curve like the MTech or Agusto’s it has a built in pre programed curve the same as the KyTronic Curve 7.
This curve can be split into 3 areas
- 1) It holds the ignition from 2- 4000rpm
- 2) then drops around 7 degrees within 3000 rpm
- 3) then holds it flat again. This suits most engines. But that is it, as it only holds one curve you have no more settings, luckily it does work across all engine types. But it can not be played with to make further improvements to our engines apart from adjusting the stators position. This is where the KyTronik Smart Booster comes into it’s own.
KYTRONIC SMART BOOSTER, ADD ON PRE PROGRAMMED ADVANCE BOX
As I’ve pointed out the MTech and Agustos are only linear lined ignition module/boxes/add on’s so whatever you do are a compromise to try to get the ignitions timing where you want and where it should be.
The difference with the KyTronik Smart Booster add on (is actually a simple push on) box is the designer and manufacturer has cleverly built in real varying curves which can be moved by a flick of a switch. Not just random curves but curves aimed at Lambrettas and Vespas and 16 of them too. The real beauty is he has looked at dyno graphs of engines power out puts and where and how the engine comes on song with porting and how the expansion pipes are working. Short of using a computerised programmable box this bit of kit really has it all…….
Do you think I’m impressed? To right I am. Someone independently has done basically what I designed for the Vape system I worked on years ago and without the help of any British Scooter dealers, so well done to Antoine at KyTronic.
Ok what is the difference for me to be so enthusiastically about this system? A linear lined ignition graph starts at a timing point and decreases at a rate it’s designed for, so at some point it should hit the timing we know we need to run our motors. Getting this line to overlap at the point we want is difficult or at least a compromise as there will only be a certain rev range that they work in and this is only 500 – 1000 revs!
The KyTronic looks at timing in a different way, it’s the right way it’s not the compromise way. So what does it do and why?
To understand how these work you really need to understand how a dyno produces a graph of your engine, not the in depth tech side of dyno bollocks but the basics of you take a bike to a dyno and run it and you will get a dyno power output graph to look at. This graph will not only show you how much power you get but how it lays it onto the tarmac and in what manner.
You can read more about dyno graphs and power outputs here
A dyno run will show you on a graph scale, on the vertical graph is power output as ‘brake horse power’ ‘bhp’ on the horizontal graph is ‘revs per minute’ ‘rpm’ on the scaled graph a plotted line will show from where ever the operator starts the run and finished the run. I personally do it from 3 – 3500rpm to where ever the engine gives up. If you look at the example below I’ve run it from 3000rm to 10000rpm.
What goes up must come down, this is a fact of an engine so is a fact of an dyno run. An engine starts at tick over speed as we’ve said around 1000rpm but in ignitions we’re talking say 2000rpm so the electronics catch up starting a dyno run is best above this point and it’s rare a motor can do a run starting at 2000rpm. I tune my engines to run from 3 – 3500rpm up to where the engine wants to rev based on port timings, exhaust and carb, I try to make all my motors ride-able from basically nothing. Others you will see don’t use this low down rev range and only start a dyno run at 4, 5, 6000rpm depending on how the power comes in on their engine. I’m more for a road bike……………. should be able to ride in top gear at 3 – 3500rpm which in basic talk is 30 – 35 miles per hour.
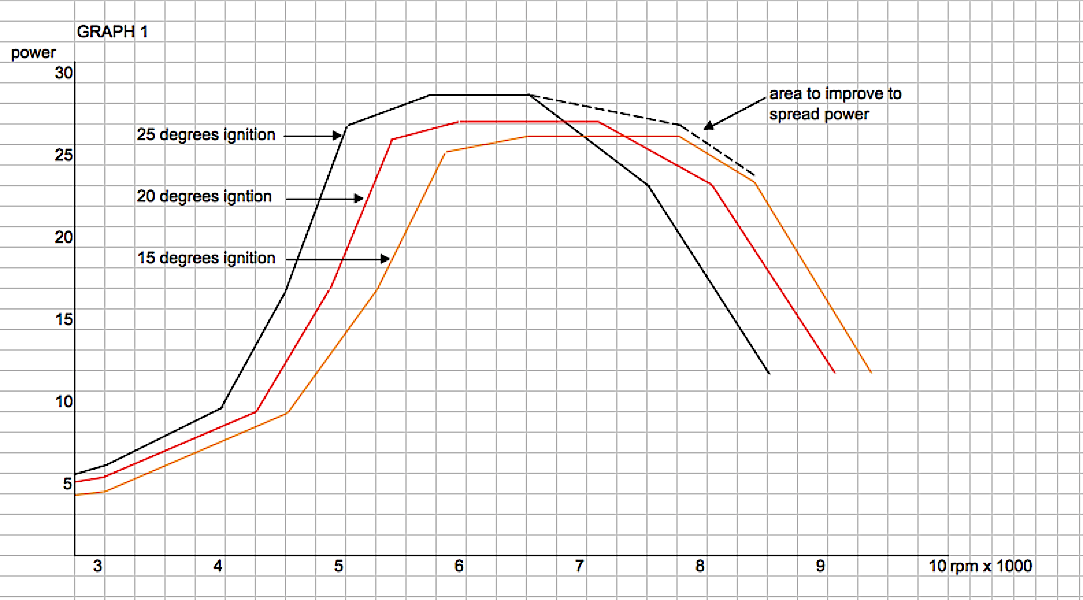
Look at the GRAPH 1 below. In theory if you take any engine, and run it with ignition timings at different points it should move the dyno graph up or down in it’s power spread. Take a motor which has a set ignition timing at 25, 20 and 15 degrees. At 25 degrees the motor should produce the best low down power and perhaps the highest power peak, 20 degrees will push the power slightly up in the rev range but loose a little peak power and at 15 degrees it will push the power even further up in the rev range and loose peak power.
Take 3 theoretical examples of a Scooter engine run on a dyno on the graph below. Black line is 25 degrees, Red line is 20 degrees and Orange line is 15 degrees. 25 degrees as a fixed timed ignition we all know will not work and will melt a piston if run for long at higher speed/revs, but power is higher which is what we all want. It’s doubtful a tuned engine will run for a period of time at 20 degrees but power is still higher than the 15 degrees we all know an engine will run perfectly but power is down because it is firing too near top dead center which is over cooling an engine through the spark been in the wrong place when we need it, but we need to run at these timings these days because of fuel problems. But look at the power differences 25 and 20 degrees is much better, 15 degrees is the compromise between reliability verses power out put.
So in reality on the road we would all like the benefit of joining the Black graph 25 degrees to the Orange graph 15 degrees by connecting the dotted line. This would be perfection for that one engine. You haven’t spend hundreds on tuning or buying and trying different exhaust systems you have used a moving auto advance spark but in a controlled way! This is the theory!
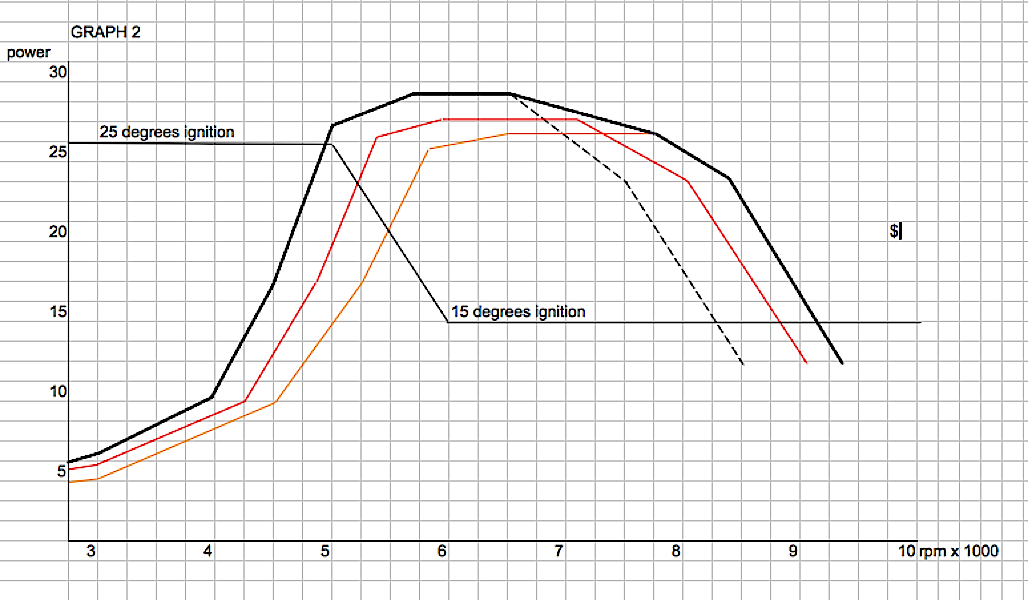
Look at GRAPH 2 It’s the same graphs as shown in Graph 1, overlaid is a theoretical timing curve/lines to connect 25, 20 and 15 ignition degrees. By holding the ignition timing high from 25 degrees to somewhere where the power really comes in on the graph of the engine, this timing pushes the low down pulling power of the engine where we want it, this is the area on the road that really impresses most people, it’s the acceleration people can feel and an area where it would be easy to pull a power wheelie. I know! But it gives you the feeling of what I’m trying to get over. At 5000rpm you can see the ignition timing drops down to 15 degrees over a 1000rpm rev range then importantly holds it flat at 15 degrees keeping the motor cool and running well into the motors peak hard pulling power as the revs are kicking in and holding revs, which is shown as the Black horsepower graph. Basically I’ve shown you in theory how to spread the power of your engine with out any expensive tuning or trying different exhausts. You can down tune this to give a slightly better power spread but create a cooler running more reliable engine.
This is the beauty of an ignition timing that you can control to suit the rev range of the engine and this is the beauty of the KyTroniks simple add on box. The KyTronik has 15 pre set curves and one fixed ignition built into it making it at the time of writing the most versatile add on ignition box available for Lambrettas and Vespas. If you look at the graph below I’ve done a theoretical engine horse power graph which is the blue plotted line, there’s nothing special about it, it could be say; a TS1 with a Franspeed Race pipe for no reason but this is the usual style of graph with this common type of exhaust and is similar to many engines. Pick any of the KyTronik pre set ignition timings to suit your power graph.
Below in graph 3 I’ve left the theoretical pre set KyTronic ignition timing graph to show where you would expect the power to be increased over the Blue power graph. Again showing the expected improvements of a real ignition bolt on box.

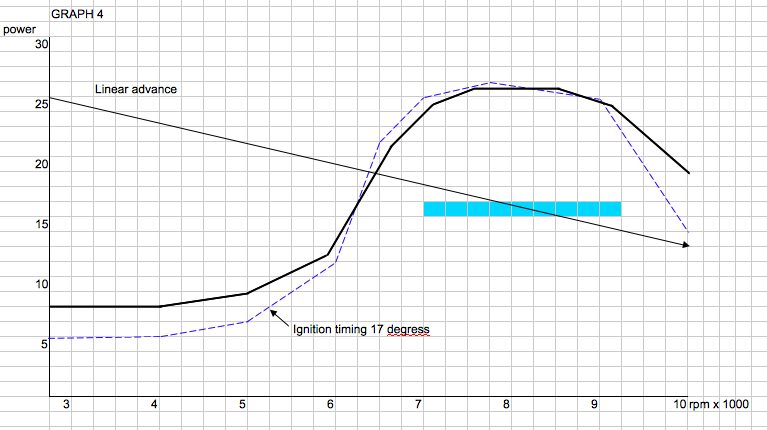
Below in graph 4 I’ve plotted the same engine and graph using a linear straight lined ignition setting from an Agusto or MTech to show it’s difficult get the timing where you want it in the engines pulling power. You have to set the timing line to try and hit the area marked in blue by taking an average/compromise over the rev range. Look at the straight line from 3 – 6000rpm it’s constantly declining and because of this the power graph is down in power compared to the upper graph 3 with a pre programmed curve from the KyTronik where it is designed to push the power by forcing the ignition timing in the area of need from the engines power output graph.
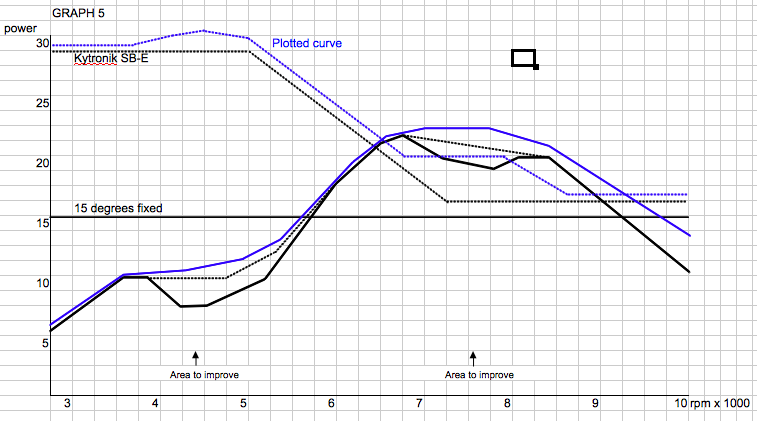
Below in graph 5 shows one of the most common graphs I see on forums. Most expansion chambers commonly used today JL, Franspeed, NK, ADS, Taffspeeds show a graph that looks like this. Used with mainly TS1, Monza, Super Monza, RB with big exhaust ports or tuned.
Follow the Dark Black dyno graph it starts at 3000rpm shows 5 bhp, the graph climbs to 10bhp at around 4000rpm then it drops to 8bhp, then starts to climb again into a normal graph. At around 7000rpm the graph drops again at it’s peak, if you follow it to 8500rpm there seems to be another peak or power band. Most say these dips are because the ports are not talking with the expansion chamber. On the road you can feel this 1st dip in acceleration, at 7000rpm as it dips again the bike will loose power, you will only manage to hit the 2nd peak in 1st and 2nd gear, doubtful you will in 4th. So even though the graph is showing the Dark Black line revving onto 10’000rom the motor won’t do this on the road, in reality it will only rev to around 7-7500rpm. This graph is commonly seen using a Taffspeed road and JL3 type of exhaust. If you’ve followed our dyno article you can read all about these dips.
Any way the point is this graph is shown with 15 degrees static ignition timing. Now if you use the KyTronik Smart Booster on position ‘E’ (thin doted Black line) you can see how different the ignition timing curve is over the static 15 degrees, see how it lifts the gap at the 1st and 2nd dip, this is the effect a variable ignition curve could have on an engine. Now to go a step further, if you had a computer programmed advance retard ignition you can plot the points even further to lift the dips in the bhp graph, this is the Blue dotted line showing the new dyno graph in Blue………… This is the theory, it may take lots of testing from a good dyno operator to get this to work.
The graphs shown are made up and slightly exaggerated to help show you what does and can happen by fitting auto advance boxes, some work better than others by working in a slightly different way. You could spend ages and ages fitting one of these and seemingly gain very little. Even with 3 degrees movement on the spark by seeing it as you strobe up the ignition you should feel it in how the bike works. The more you get movement of the spark the more you should feel the bikes improvement. But remember these movements are all a compromise to make the motor work better, each engine will be different.
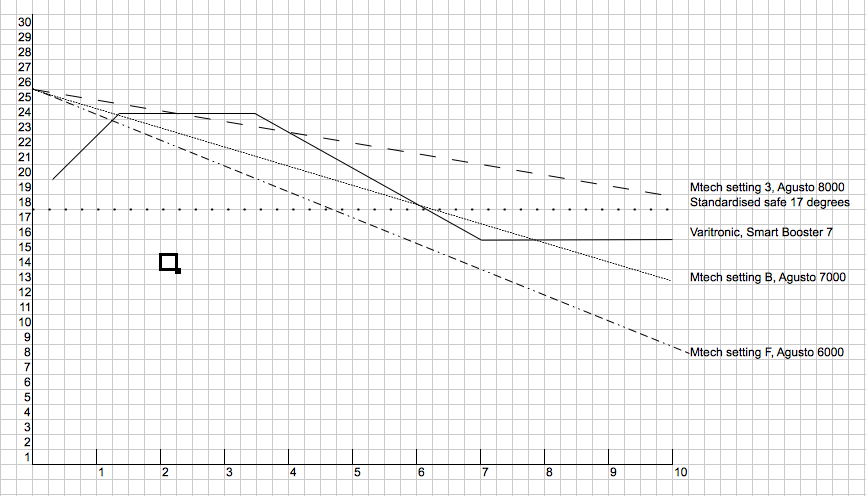
Look at the graph below this shows an ‘ignition graph’ not a ‘dyno power graph’
It shows and compares MTech/Agusto linear curves verses the pre programed Kytronik Smart Booster SB/Varitronic curve. It shows the MTech setting 3 same as the Agusto 8000, MTech 8 same as the Agusto 7000 and the MTech F which is the same as an Agusto 6000 (all as near as) and the dotted line is the commonly used fixed ignition at 17 degrees.
Look and study the graph comparing to the static 17 degrees, each linear graph will need the stator plate moving to adjust the timing within an engines peak rev range, on this example has the linear graphs set at 25 degrees. Lets for example say we want 17 degrees at around 6000rpm. MTech 8/Agusto 7000 hits it perfect as does the SB7/Varitronic. The other two linear timings would need the stator adjusting to get to the same point.
But it shows the linear lines are only a compromise where as the Varitronic and KyTronk controls and holds more ignition timing lower down in the rev range where the timing is needed, it progresses as an average over a 3500rpm similar to the common Agusto 7000 again where it is needed, then at 7000rpm it stops and holds 15 degrees to as far as the motor would rev to. The SB7/Varitronic hits the 17 degrees in the right place and adds that extra cooling of 15 degrees from 7000rpm.
Again you can tweak the stator for each curve/line to push the boundaries of ignition timing for the better, if you want. Remember none of these are perfect but are as near as dam it. At least it tries to give you an idea of how these things work.
Today there are so many people quoting to get a bike jetted in on the dyno, there is no substitute for the open road to set up an engine.
But a dyno is a great place to see your engines power graph, to see how it works low down in the rev range, how it accelerates and how it pulls the top end power. Given this as a known you can plot a curve/line of ignition advance. A dyno is an easy tool to run up the engine and check where the spark moves to at a given controlled Rpm, making it great to set up a auto advance add on box. You should then be able to do another run on the dyno and see if power has lifted for the better. If it has then it would be time to adjust your jetting to suit the add on. Expect jetting to alter especially lower down in the rev range, if set up correctly with more over advance lower down in the rev range before the engine comes on song, you may find if your motor was rich that it cleans and smooths out the jetting.
Hopefully I’ve simply explained how an advance box works and it’s benefits especially the KyTronik smart Booster.
MORE READING AND MORE INSTRUCTIONS
- Simple setting up instructions for the MTech/Austo and Chiselspeeds instructions can be read here
- Setting up Electronic ignitions can be read here
- KyTronik’s Smart Booster fitting instructions can be read here
Mark Broadhurst, If you have a question please email mark@mbscooters.co.uk


