


PART 1 Introduction to tuning a Lambretta Engine
PART 2 Introduction to tuning cylinders the MB way
PART 3 Explaining advanced tuning
PART 4 Explaining advanced port timings
This is the start of explaining Lambretta tuning, I’ve had to split it up as it’s so long so it comes in 4 parts……………………….
Is a tune just opening up the ports as big as possible, fitting big carbs and a noisy exhaust? Is a tune making that one engine go faster at the expense of blowing up 100 yards down the road? Or is it something else! I will try to explain! There are so many ways to tune a Lambretta, these being the main engines I have tuned. I’ve also tuned many Vespas, Autos, quads, and other 2-strokes which will be covered in other sections.
The basic factory Lambretta has changed very little over the last fifty years. Lets face it, the top of the range and probably the most powerful engine was a GP200 at around 8 to 10 hp, that was considered as a factory tuned engine. Today a modern 125 can be over 30+ bhp as standard! As you can see Scooters have been left behind.
A modern racing two-stroke has come on so much over the years it is already tuned from the factory even though they are mass-produced. A tuner then needs to do very little but to clean up the castings, ports and checking vital clearances, it’s all been done for you. High spec Two strokes can get very complicated. What works on one engine might not work on another type of engine. You may do a modification that you are convinced will work only to find it doesn’t!
Two Strokes can have a mind of their own. It takes a lot of what doesn’t work to find out what does actually work, this can only come with experience. Compared to a motor cycle engine a scooter engine will need much more work to be done to get it to perform better. Therefore scooter tuners need to go back to the basics and have some understanding of the two-stroke engine. For this article I don’t need to bore you with the workings of a two-stroke engine. There are plenty of books telling the theory of all different types of two strokes and how each work.
I don’t confess to be the brightest man in the world, I failed miserably at Maths and English O levels getting unclassified results. In Art and Technical drawing, I gained, a grade A and B, I enjoyed those subjects! I found myself being more practical and good with my hands than with a pen. I struggled at Technical College all through my apprenticeship; hard work paid off and gained the ‘higher national technician’s certificate in motor vehicle technology’. This is where I learned heoretical aspects of engineering but only briefly covering the basics of the two-stroke engine, for this I was self-taught by reading the odd book but mainly experimenting by the seat of my pants and grinding.
So you don’t have to be brains of Britain to become a tuner. But then again two stroke engines are not that simple and I find a little bit of common sense helps.
WHAT SETS A STAGE TUNE?
Who says what a tune is? There are no rules, only other peoples opinions and ideas, which have been around as long as two strokes have. If there are no rules then what is a stage tune? Different tuners have different ideas. A motorcycle experts idea would be different to that of a scooter experts idea of a tune.
Motorcycle tuners tend to have three basic tunes.
- Stage 1 Road tune
- Stage 2 Road / Race tune
- Stage 3 full race spec tune
What work occurs between each tune can vary from engine to engine, or who you talk to or what book you have read. This seems to be where scooter tuners have shot straight to stage 4 road tunes. It doesn’t mean a stage 4 scooter tune is better or higher spec than a motor bike tune. Perhaps it suggests more stages of tuning to get to a similar spec of tune compared to a motorbikes engine tune!
Over the years I’ve seen scooter tuning getting to stage 8 and stage 9. This could be getting a ridiculous selling point! One opinion is when fitting a Japanese piston, a barrel suddenly becomes a stage 5. Why? You can fit a Japanese piston and still keep standard port timings, carb and exhaust with no extra speed! This doesn’t seem to be a stage of tune but presumably a stage of reliability.
Are they both connected?
In the Fifties and Sixties, stage 1 and stage 2 seemed to be used, by 1980 only stage 4 was used, by the mid 1980s stage 5 and stage 6 had crept in. Nothing was mentioned of stage 1, 2 or 3 where did they go? So much confusion. Customers have being asking for a tune they haven’t really wanted.
Let me try and put some sense to a scooter tune, I must point out these are my ideas and may differ to other scooter dealers. There are so many ways to tune one cylinder I won’t go into much detail here but will elsewhere. I base these on the amount of tunes I have done, listening to what the customer has required over the years and my own common sense.
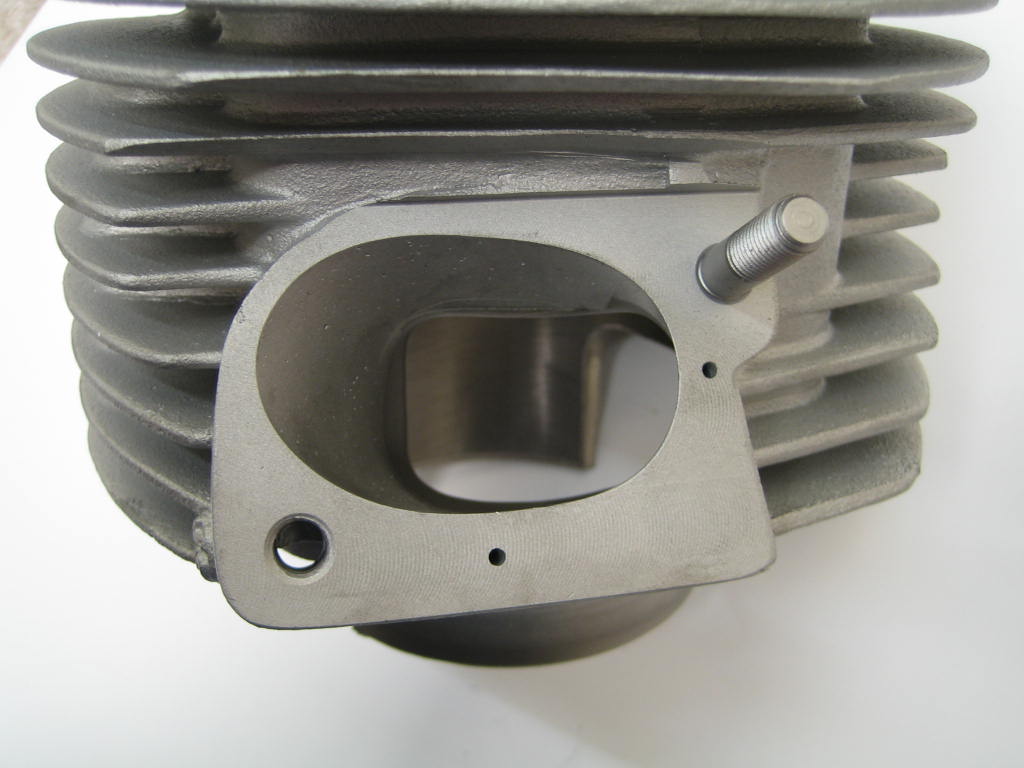
LAMBRETTA CAST CYLINDERS
These are genuine type Oval exhaust ported cylinders. Today we have tuned kits available from different sources which may alter a stage of tune a little as most are pre tuned of sorts!
- Stage 1. Basically clean up ports, keep standard carb and exhaust.
- Stage 2. Clean up ports, raise exhaust port slightly, use either standard or slightly larger carb, Standard or Clubman exhausts.
- Stage 3. Lower inlet port slightly, raise exhaust port, flow transfer feeds. Increase carb to 22 – 26mm, Standard, Clubman or a touring expansion chamber.
- Stage 4. Increase inlet size and port timings to match to 28 – 30mm carb, raise, widen and open exhaust port to larger big bore gasket. Flow transfer ports. Use a Clubman or touring expansion chamber.
- Stage 5. Increase inlet size and port timings to match to larger carb 30 – 35mm, increase exhaust port size and port timings to slightly larger than a stage 4, use a full expansion chamber.
- Stage 6. As above but perhaps larger port timings to increase power higher up in the rev range, also increase size of transfer passages. Use 32 – 36mm carbs and full race spec expansions. (Usually classed as a full race Group 4 tune.)
- Stage 7. As per stage 6 but with a reed valve fitted and the extra work needed.
The above would be some kind of standard to say; a 200cc stud pattern engine, 190cc and below would more likely run smaller carbs as it is harder to get reasonable port sizes. It is not uncommon to see engines with mismatched settings i.e. a stage 6 cylinder with a standard carb and exhaust or a standard cylinder with a 34mm and expansion. I’m not saying they will not work but common sense says they might not set up as good in this way! Other factors come into the equation like cylinder head design and compression ratios, crankshafts, crankcase modifications, ignitions, clutches, gearboxes, clearances etc but are not too relevant to the STAGE of tune but to how the tune is to run. Today there are many ways to tweak a tune to suit the customer, it may not get a number or name but may perform better for the customer.
LAMBRETTA TS1 CYLINDERS
To take a TS1 and use the same stages as above doesn’t ring true, Compare a TS1 to a cast tune then you should compare it to a stage 7. A TS1 cylinder is classed as already tuned, but you could consider it as standard until touched by a porting tool! A TS1 is more like a modern day motorcycle cylinder so I drop back to motorcycle style tunes.
- Stage 1. Road tune. Polish, flow Inlet port, widen the exhaust port, check clearances.
- Stage 2. Road / Race. Widen and raise exhaust port, flow inlet port, widen boost port, check clearances.
- Stage 3. Full Race Spec Tune. Widen and raise exhaust port, increase inlet size, widen boost port, increase transfer passages and check clearances.
- MB Race-Tour Tune. This is a combination of all 3 tunes based on many hours of dyno testing which resulted in a much more powerful and ride-able cylinder tune.
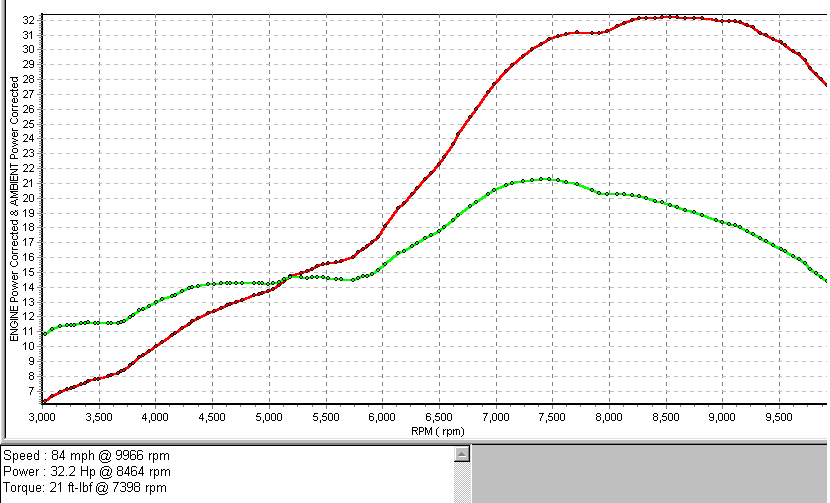
This shows the power output what can be gained from the MB Race-Tour TS1 tune, 70mm MB piston, 60mm MB RT crank, V-Force Reed Block, MB lighten flywheel, 35mm TMX, JL4 exhaust
Carb sizes vary upon application from 28mm to 39mm and you would expect to use a full expansion. Because a TS1 is made from alloy it opens up the possibility of exotic conversions, using iron liners, Re-nicasiling or Ceramic plating, Alloy welding to gain extra and increased port sizes along with Liquid Cooling can make a Lambretta cylinder look more like a Motocross cylinder! This then opens up Lambretta tuning to gain excess of 35HP. To my knowledge my 40HP race cylinder has been the highest ever gained by a Lambretta which has stood for 70 years, just lately others have pushed the boundaries even further and surpassed 40bhp.
I have in the past re-numbered iron linered and converted alloy cylinders to include Stage 4, 4a etc by adding an extra boost port or 2, welding casings and fitting inlet casing feeds. To be honest I gave up on these tunes as I could not keep up with how to number a job based on what type of work was done.
We also now have Monza, Imola and RB cylinders. Monza cylinders are a copy of the TS1 at usually 66 and 70mm and an Imola is a smaller copy of the TS1 at 64mm.
SO HOW DO WE SET UP A TUNE?
This is based on one person or engineering tuning company totally capable of doing all this work in house, if not each job needs subbing out to various experts.
Let’s give you an example; in the 1980’s and 90’s the Honda 205 kit was the kit to have, today these are hardly ever used for many reasons. This could also be relative to the Suzuki 190 kit which has become popular again based on people thinking its a cheap kit because pistons are available cheap on Ebay.
This is what was required to do a Stage 5 Honda 205 Lambretta conversion, this conversion is very old hat these days but in the 80-90’s it was the tune to have. There are still plenty out there still running but over sizes was always a problem, today MB have remade these pistons to reclaim old cylinders.
First we need a good 200cc barrel it can be any type for this purpose, these days original Italian or Spanish cylinders are rare or people just don’t want to touch them and keep them standard, times have changed! Indian SIL cylinders are easier to get. There’s are good and bad SIL cylinders the later type are ok and if you do the top and tailing ok they should work fine.
The cylinder needs a bore smaller than the required piston. In this case the standard Honda piston is 67mm. Any barrel below 66.6mm would be ideal. Clean the gasket faces so as to bore it true, set it up in the boring bar and rebore it to slightly undersize allowing for a final hone after all the work is complete. A Honda piston has a smaller crown height than a standard piston so the barrel needs machining. To do this we mount a mandrill in the lathe, it needs clocking by dial gauge to run true, when true we slide on the barrel, bolt it tight and machine what ever amount of metal needs to come off the top and bottom.
Once the barrel is top and tailed the piston requires shortening as it is slightly too long and can lock up in the casing. Mark the piston, cut off the desired amount, linish the cut square, chamfer and polish the inside of the skirt. Place the piston on a dummy port timing jig (or engine set up to check port timings using a degree disc). Drop on the barrel, you can now turn the crankshaft and mark with a scriber each port in terms of port opening period and to keep the port edges horizontal.
This is a stage 5 tune, depending on who would tune it an inlet period of 150-160 degrees would be required, transfers 125-130 degrees, and an exhaust timing of 170-180 degrees. When a line for each port height has been scribed remove the cylinder to a vice, now the port widths need checking, working to an easy formula you can mark the exhaust width (very important). To do this, use an engineer’s square working from the head gasket face. The width of the transfer and inlet port for this purpose is not too critical, but mark the ports to make sure the port edges will be vertical. Finally mark out the exhaust port to the gasket or exhaust flange size, in some cases an inlet manifold may require the inlet port to be marked in a similar way.
We can now tune.
TOOLS FOR THE JOB
I started tuning with only a drill and a couple of cheap cutting tools, that was perfectly good enough for years and you can obtain some good results. As time went on and the demand for my services increased I had to find a quicker and easier way. A drill is not designed to cut large amounts of metal from a cylinder, it’s for drilling. The tool for the job is called a die grinder, these come in various sizes depending on the application used. I prefer electric tools and I have various tools to do a particular job. I use a die grinder, which is very heavy for roughing out large amounts, it has a variable speed switch and has a anti stalling device this revs to around 8,000 rpm. You have to hold on to this as it can send you and it around the barrel and can be very painful to your face and hands.
I use a high-speed lightweight die grinder that revs to around 25,000 rpm this comes in for all sorts of applications. One tool I have is invaluable, it is variable speed tool resembling a dentists tool, but much heavier duty. It has a separate foot control for the speed, a separate motor with a hanging flexy shaft on to which I can have different tools to get into those supper hard places. This tool is usually used for the transfer ports along their passages and the entry into the cylinder.
Finally for polishing the ports, I prefer an old drill with a slotted 6 or 8mm rod in. I wrap emery cloth in this and use it for polishing. I now have over 150 mounted points to do the tuning work these can cost between £1 and £30 and don’t last forever!
GET PREPARED
Tuning is not a clean or glamorous job, tuning without any eye or breathing apparatus is a mugs game. Over the years I’ve used the lot, glasses, goggles and masks, I have been to hospital to have metal removed from my eyes even wearing this equipment, believe me it hurts! The only way to stop the problem was to spend £120 on a full-face respirator this kept my eyes and mouth separate and totally free from dust and the unexpected bit of metal traveling at 100 mph. I wear overalls buttoned up! I use thick gloves and ear defenders, I might look a pillock but I don’t care because it’s my health. In the summer it’s horrible I wear shorts under the overalls and still you sweat, in the winter it’s freezing cold with the cold air blowing around from the tools. Iron filings get everywhere and you dare not miss a bath that night. Tuning is hard work! Three tunes a day is about my limit, when you have done you are knackered! Its like a eight-hour work out! Over the years as things have progressed where iron cylinder tuning has become very rare, most cylinders are now alloy. I now use a fast fan above my head which blows the dust away from your face. Our new tuning room is set up perfect, extractors, fans and heaters, tuning has become a pleasure.
THE TUNE
Tuning is a case of using the correct tool for the job it is intended for. I use the heavy roughing out tool to do the exhaust port and some of the inlet port, (occasionally I use a universal miller for heavy cutting to save time.) The lightweight grinder will trim the transfer spigots, transfer feeds and inlet port. The flexi shaft tools clean and semi polish the transfers. (Tuning is like shading in a picture, it’s a lot of side to side movement but you’re taking metal off).
Finally the drill comes in for finishing off, I start with 80 grit and work down in stages to finish off at 230 grit for the exhaust port, I finish the inlet port and transfer feeds to 120 grit. The transfers I semi polish with a stone to clean out the castings. My idea is smooth porting with no lumps, bumps or holes, I don’t super polish choosing the satin finished effect. Done in this way I can achieve a nice sensible finish with no humps, bumps or hollows and is pleasant to see and touch. In some applications I have polished beyond 1000 grit but for ever-day tuning it is a waste of time and energy. I estimate my tuning tooling to have cost me around £20,000. When finished tuning I mark the barrel with its own number and log all the details, i.e. dimensions, port timings, customer, barrel number, crank, rod used etc.
The cylinder is finished honed and finally washed off waiting to be used. That’s it! A Honda kit including the head machined would probably take me start to finish a maximum of around six and a half-hours without answering the phone!
Experience pays and I believe I have had that experience!
To date I have tuned over 1600 MRB cylinder kits and have done hundreds of factory type cylinders along with hundreds of casing tunes and cylinder repairs.
MB Stage 6 Race tuning to a Mugello Cylinder
Special Classic 60’s tuning, this was the only surviving AF250 Bultaco conversion we did the MB way
MB Bike cylinder conversions, this casing is made to suit a Kawasaki KDX cylinder
.jpg)
MB Cast Iron tuned cylinders
Onto PART 2 Introduction to tuning cylinders the MB way
If you ask have a question Email mark@scooters.co.uk Mark Broadhurst


