


LARGE BLOCK MUGELLO 200 – 225
Read any forum and there are those who say that Mugello kits are great and – others don’t. There’s loads of complaint’s about lack of speed, blown pistons and are hard to jet in and others saying they have done thousands of miles with no problems!
Nearly every cylinder I see is different, there is no standardisation to any of them and there has been a few types. It’s hard to keep track and helping customers over the phone is near on impossible if they want gaskets, pistons, manifolds or heads! It’s easier to say just send in the cylinder, manifold, head and piston and we will look at it for you.
We’ve never imported these kits so have never had our ‘finger on the pulse’ as they say to make notes on alterations as they arrived from Italy, as far as I hear even the importers can not keep up with all the mods.
The Mugello kits come from Tino Sacchi and his company who also make the Imola and Monza cylinder kits. Mugello as with Imola and Monza are race tracks in Italy which I think is a great way to name a series of cylinders so thumbs up there. The Mugello is the piston port version with the carb coming on the standard side. To date I think there are 4 versions, identifying each one is a nightmare as each version varies. Large block cylinders use a 66mm piston which gives 200cc and the 225cc uses a 70mm piston but is different and called the Super Monza piston which uses a flat top piston and the head is machined to match, these are not interchangeable with normal Lambretta piston cylinder heads. All kits can be used with a 58 or 60mm stroked crankshaft, early kits may require some extra work to use a 60mm crank, later kits have the cylinder extended so no packers are required unless your using a 110mm con rod conversion.
CYLINDERS
Version 1 resembles a standard Cast Iron cylinder but as with all Mugellos they are Alloy with Nicasil plating and are not reboreable so should use graded pistons, we find you need to measure the bore and match a piston as grading is way out. The 1st cylinder used the standard 4 port design with an inlet, exhaust and two single transfer ports. Porting was increased to sort of stage 4 spec. Some I’ve set up use exactly the same porting as we recommend in our tuning sections, lets say Exhaust 170, Transfers 125, Inlet 150 degrees, near perfect. Others have mismatched porting which can be all over the place to something like Exhaust 180, Transfers 118 and Inlet 165 degrees, which will be why one engine seems great and others complain all the time about them. Inlet ports have always had a funny shape on early cylinders, it really wasn’t a good shape, it sloped downwards and became so wide the inlet skirt drops into it and knocks. Later cylinders added a bridge to support the piston. The inlet port always needs matching to a manifold and can required a lot of work to flow them correctly. The casting fins above the inlet usually fowl most inlet manifolds so need trimming/grinding to make them fit. To top it off you don’t know if the inlet port uses small or large block inlet stud spacings. Mugello inlet manifolds if you had one used a slotted hole for the small stud which meant it fitted small or large block stud holes, not perfect by a long shot but it works but inlet port matching is again not standardised!
Transfer ports are wider in the cylinder bore than a standard and again this is where power is lowered as the feeds from the casing are thin, not only are they thin but early cylinders don’t match casings and some where exposed to air at the base gasket when bolted down! Part of the problem with power with these cylinders are the thin transfer feeds along their length which open out into a wide transfer port in the cylinder and looses the pumping effect and doesn’t flow. Do a cast cylinder with the same port timings and standard width transfers in the bore and the cylinder works much better. Bridging the transfer port entries like a TS1 would improve the older cylinders which can only be done by iron lining the bore and indeed later Mugello’s got this treatment and later cylinders have 4 transfers like a TS1.
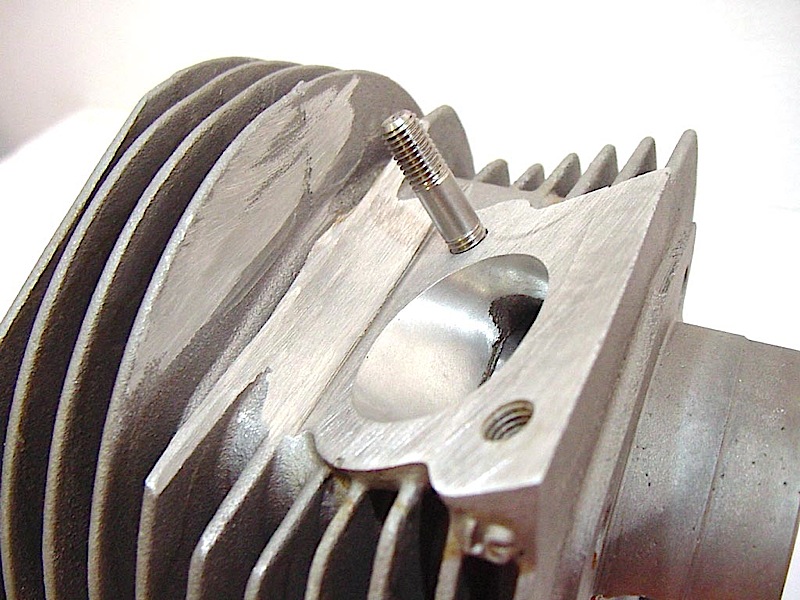
Later versions added a boost port above the inlet port and the piston came modified with a slit below the rings to open up this new 3rd transfer port. I say SLIT as the area from the top of the inlet port and start of the boost port is so thin it has to be a slit and not a proper feed hole. It is so close that if you set up the cylinder incorrectly the slit hole will open up direct into the inlet port causing poor starting and running.
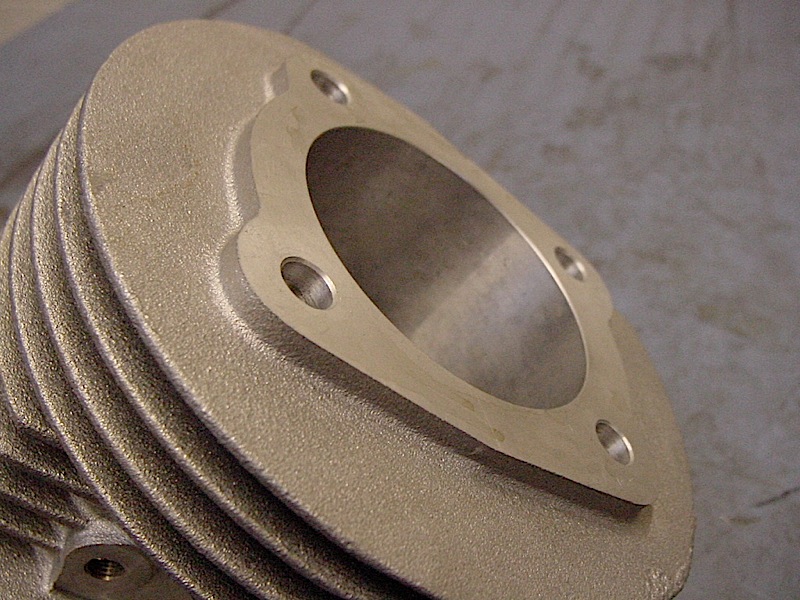
The exhaust port has been moved all over the place, early cylinders had the standard thickness and exhausts fitted fine, later cylinders for some reason that I’ve never sussed out thickens the flange area so an exhaust is 10mm towards the floor miss aligning exhausts! All I can think it gave more material for longer studs and strength where the early cylinders failed by been alloy with no depth. Not only was the flange longer but the port was offset and ideally needed matching to an exhaust. We offer a service to machine down the flange to standard and match the exhaust port correctly.
Later cylinders beefed up the transfer feeds so these can be made massive, you can do a stage 6 version easily which in race terms can improve the wider transfer feeds in the bore. The latest version has gone even further with a bridged inlet port with a boost port, thicker transfer feeds and now with bridged transfers in the bore. Most kits I’ve come across has staggered bottom transfer heights to exhaust port heights. Set the cylinder so the bottom of the transfers are level with the top of the piston at bottom dead center and the port timings are about ok but the bottom of the exhaust port is above the piston! Something you don’t want. Ok it works but can be improved by lowering the exhaust port by 2mm.
I’ve also come across cylinders that don’t slide down the studs and need drilling out and other cylinders where the spigot or the casing needs altering.
As a tuner I have come across many cylinders with poor plating on the bore, it shows up when you start to tune and reshape ports. I’ve known plating to become loose as you cut into it and you can peel it all off in one piece needing a replate from new! Most cylinders are poorly cast to look at, they are very rough in appearance both on the outside and inside of the ports. Externally it’s fine it aids cooling, inside the ports ideally even standards need a tweak. I’ve also known some cylinders to be very porous with small holes, where the casting process is incorrect, some cylinders are weak at the top and I’ve known cylinders to give once assembled and heads come loose on one side and repeatably blow again and again, the only cure is an Iron Liner to add compression strength.
HEADS
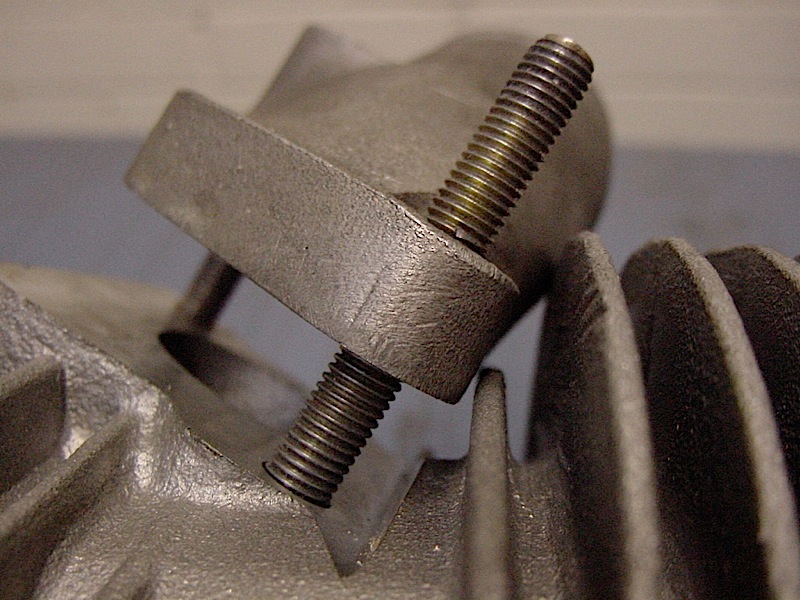
Early cylinders used the normal bolting the head to the cylinder method just like Innocenti. Head misalignment is always a problem with this design, later Mugellos addressed this problem by machining the head and cylinder where the studs are and using dowels to align the head, but even with the dowels fitted the head was machined offset! So what was the point? The idea sounds good but there is another problem with this method, the area from the cylinder bore to a cylinder stud is too small and only weakens the already problem of head gasket failure as with all Lambretta cylinders. For these cylinders special head gaskets were available with holes to suit the dowels, all very oddball. Later cylinders added 3 or 4 more extra stud holes like our RT cylinders making a total of 8 areas where the head is tightened. The latest cylinders have been extended and the head is dropped into the bore again same as our RT kits, we use a good 5-6mm drop making location easy, these only have a 1mm drop so its possible to catch and cross over the head joints. But I’ve come across cylinders which are shorter than standard and have a head supplied recessed making setting up the squish very difficult so you need head gaskets but again whats the point of a dropped head when it doesn’t centralise! Then add the complication of a common long stroke 60mm crankshaft.
Heads have changed many times over the years from not supplying one and needing one doing separately, to heads supplied with too high a compression ratio and holed pistons, to heads supplied with too low a compression ratio and lack of speed and with some about right depending on who you talk too. Then heads where made and matched on later cylinders with a center combustion chamber with a standard off set plug, which I’m not a fan of. I would prefer the plug central to the combustion chamber or the plug offset with the combustion chamber as per standard. We have dynoed all types and have found the standard offset type is always the best. Some of these later heads are machined to suit the extra bolt holes, some were not and the very latest are dropped into the bore or more like just dropped in the gasket area. The latest heads are a new casting which is beefed up and looks ok.
It’s the head which cause the most problems with Mugello kits. We’ve seen so many Mugello’s set up on lots of dynos only to have them blow up through too high compression, after the 3rd blow up they bring the kit in to check it over and it was the head every time, totally missed on 3 different dyno sessions. So if in doubt GET THE HEAD CHECKED by a professional! Whilst we are on with dyno’s when we had two dynos running back to back, one would have a Mugello kit with 30mm and expansion and would regularly show only 12 – 14bhp, on the other dyno we would run a RT, SIL or something similar with the same carb and exhaust and they always beat the Mugellos even with a standard SIL cylinder showing just how under powered the Mugello’s can be.
The latest V4 225 with bridged inlet port and boost port uses the Super Monza flat topped piston, the head is machined to suit the flat top piston, compression ratios in this form are about right, maybe a little high, ok if the jetting and timing are perfect, but set wrong and with some bad fuel and you could be in trouble. Pistons seem hard to get, it’s not a case of grab any normal Lambretta piston from whoever and fit it! The squish machined on the head is incorrect and the compression ratio become massive! This isn’t the only problem, the standard head is only dropped into the bore 1mm this will give 2mm squish clearance with no gaskets! If used with a 60mm stroke crank the squish gets better but port timings suffer.
MB offer the standard piston conversion, using our own MB or MBgm 70mm 225cc pistons or any standard 225 pistons now freeely available. The slit needs cutting to suit the boost port. We can modify the head to suit, including getting the squish band cut correct and have the combustion area reduced to get the compression ratio somewhere like standard or slightly lowered. At the same time the drop is improved to have a 2mm drop making location on assembly better and less chance of the head cocking over and causing damage! If you use this on a 60mm it’s a case of pick the correct head gasket thickness to get the squish correct. Or you could use a MBgm CNC head and have it modified to suit then compression is set correct for todays fuel, plus you get improved cooling!
PISTONS
Pistons have altered again over it’s production run and has pegs moved and the slit port added making after sales very difficult, it’s this lack of standardisation which I don’t like about these kits that’s why MB has tried to make life easier for customers by standardising our own products. All pistons use the wrong dome height so heads need re cutting to suit. The 66mm piston is different to the 70mm piston by having a different dome so heads need machining to suit.
TUNING AND MODIFICATIONS FROM MB
There are three areas to look at to improve the Mugello cylinders
- Porting work and matching to flanges
- Cylinder heads, squish clearance and compression ratio
- Piston designs
As with all cylinders, who ever makes them some clever person can always find a little area to modify and improve it. The thing with the Mugello is every aspect can be modified to improve it so there is a lot which can be done especially on the earlier kits. The hard part as explained is sussing out the cylinder version, cylinder heights and setting up the port timings then make a head to suit the cylinder, each cylinder should be considered a one off job. Don’t listen to the forums because you just don’t know if you are comparing like for like.
- First job is to match an inlet manifold to the inlet port, whatever the manifold is it will need matching and will possibly need the casting of the cylinder and manifold altering to suit. Exhaust ports need looking at to suit the flange been used.
- Cylinder heads, these always need checking, then they also need altering to suit the bolt down method used by the cylinder. It could be a case of mismatching heads and designs to make for a better set up. For instance using a doweled cylinder you could use a normal head and do away with the dowels which are only trouble. Get the compression correct and look at the squish clearance issues. Sometimes it would just be a case of altering the combustion area to make the compression safe for our modern fuel or it maybe a case of supplying a totally new head.
- Porting can be improved, it’s a case of first checking port timings. When the cylinders are machined in the factory they are machined differently top and bottom this will alter port timings. Machined incorrectly in one plain and the Inlet port will be to big, the transfers will be too small and the exhaust port maybe perfect. Done another way and all ports maybe ok, done the opposite way and you could have a good inlet timing, good transfer timing and then have a large exhaust port. From my point of view it’s a case of stick the cylinder on a port timing jig look at inlet, exhaust and transfer timings and work out what you can do to improve it. This may involve needing a cylinder packer to lift the cylinder and it may involve machining the top of the cylinder or machining the head to drop into the bore or have a recess in the head. It may be that the transfers need grinding to increase port timings as these can be low but the inlet and exhaust maybe be ok. And as with all piston ported cylinders it would also be an advantage to do our shorty Reed Valve conversion, by doing this it doesn’t matter if the inlet or exhaust port timings are too big, it would be a case of doing a Reed tune and get transfers to somewhere workable.
- We make special pistons which should suit most kits, we even make short crown height pistons so a long rod can be used with the kit. But as explained some have a boost port and some rings can fowl in these bores so it’s always worth supplying the old piston which came with the kit to check out peg spacings and to see if the slot is correct.
Ok so I’m not a fan of the Mugello and I’m sure people will disagree with how I am about the kit, but we can alter them in many ways to improve them. You may think you have a good kit, go on one modified to a MB Touring Torquey Tune and these kits can nearly double in bhp. But it’s not just raising the the bhp it’s about making a kit work low down and respond throughout the throttle range.
- Tune, match inlet manifold and flow
- Stage 5 tuned
- 200 Cylinder head
- 225 Cylinder head
- Prepare a cylinder for Ceramic plating
- Ceramic plate to repair a worn or damaged bore
- Iron liner to repair a badly damaged bore
- Reed valve tuning to cylinder
- 6 petal MB Shorty reed valve 22-25mm Dellorto
- 6 petal MB Shorty reed valve 24-30mm PWK
- 6 petal MB Shorty reed valve 26-30mm Dellorto
- 6 petal MB Shorty reed valve 35 Mikuni
We offer over sized 66, 66.5, 67, 67.5, 68, 68.5, 69, 69.5, 70, 70.5 and 71mm pistons to bore out a cylinder to either repair damage or to gain cc’s in both standard and Tv compression heights
Mugello slotted inlet manifold
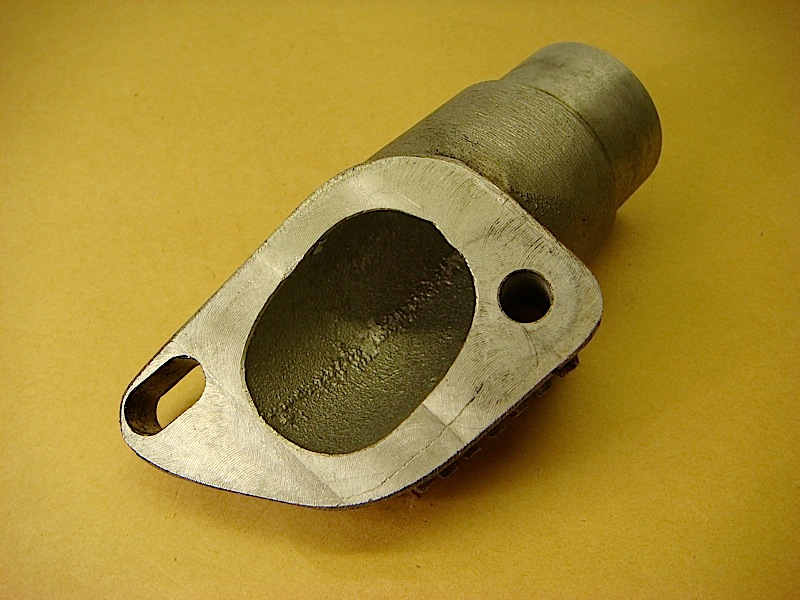
Slotted inlet manifold, this is actually a large block inlet slotted to fit a small block cylinder, it’s not right
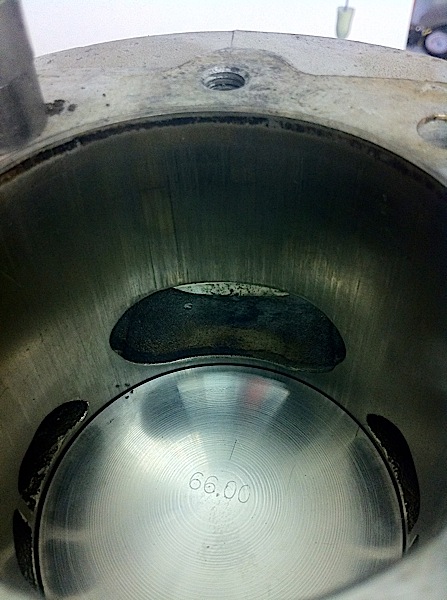
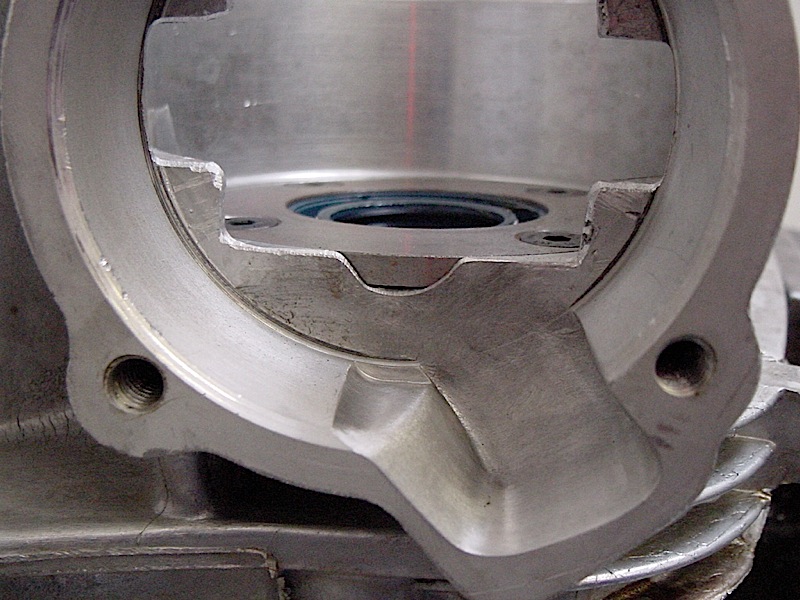
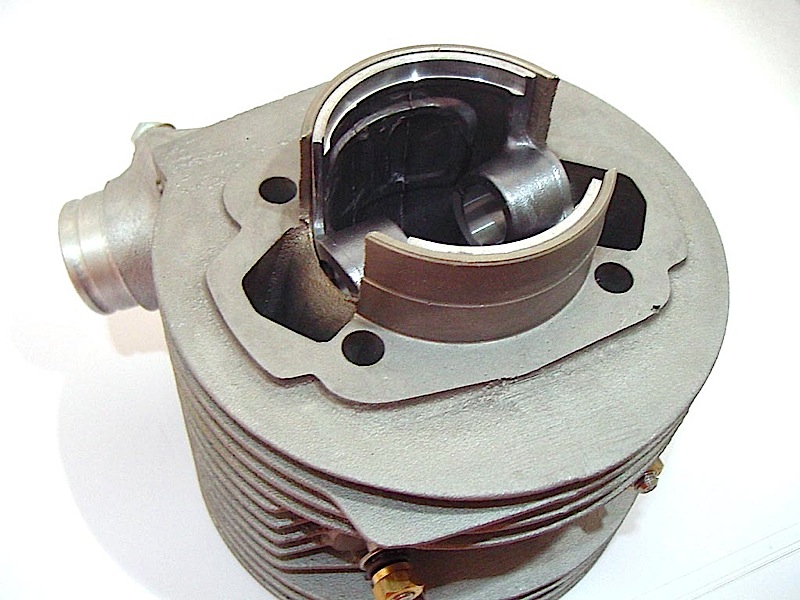
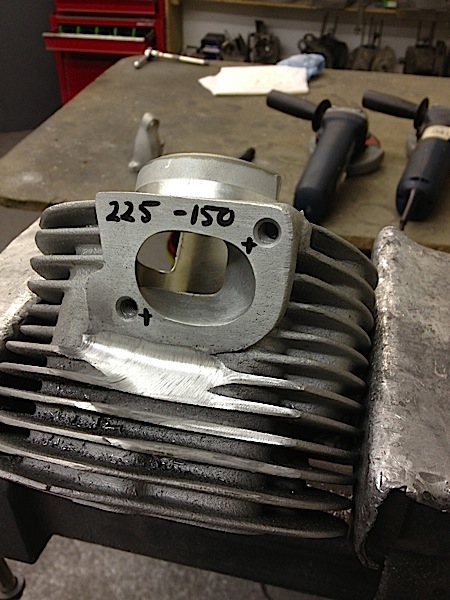
Showing how far out machining can be, the ports should be level at BDC
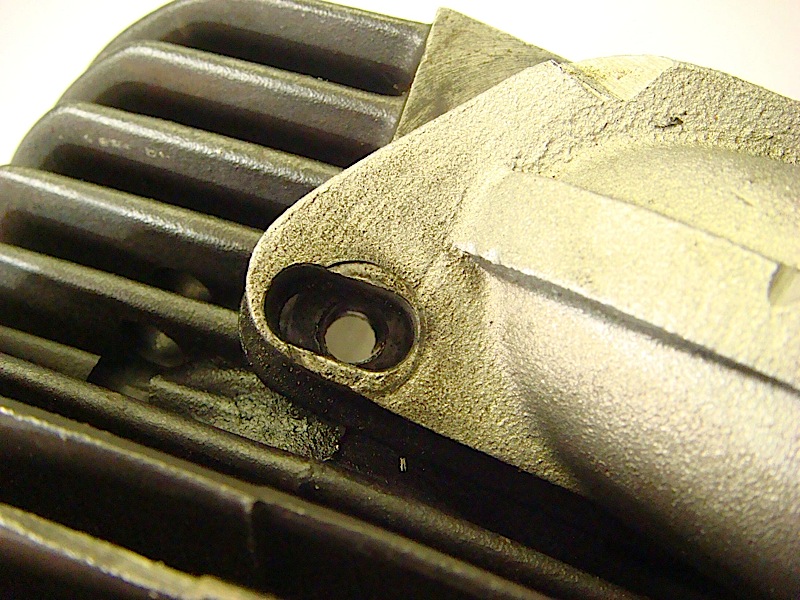
Extra 4 head studs but only 3 is used?
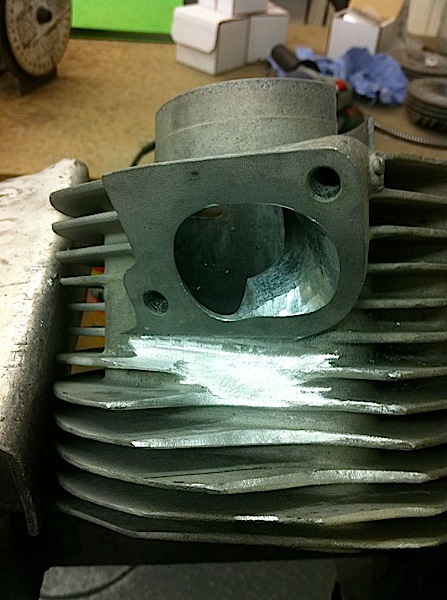
Shows how much needs removing to match to a decent flange

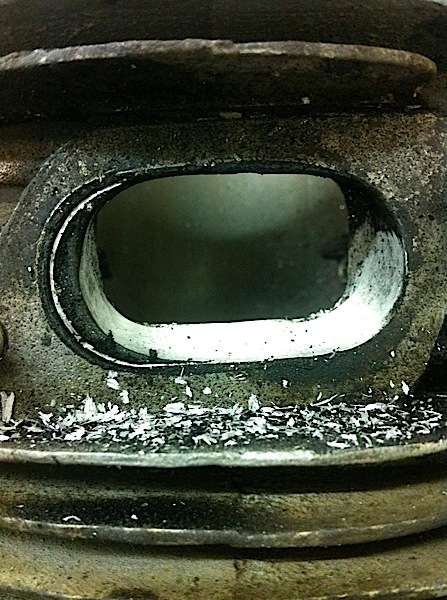
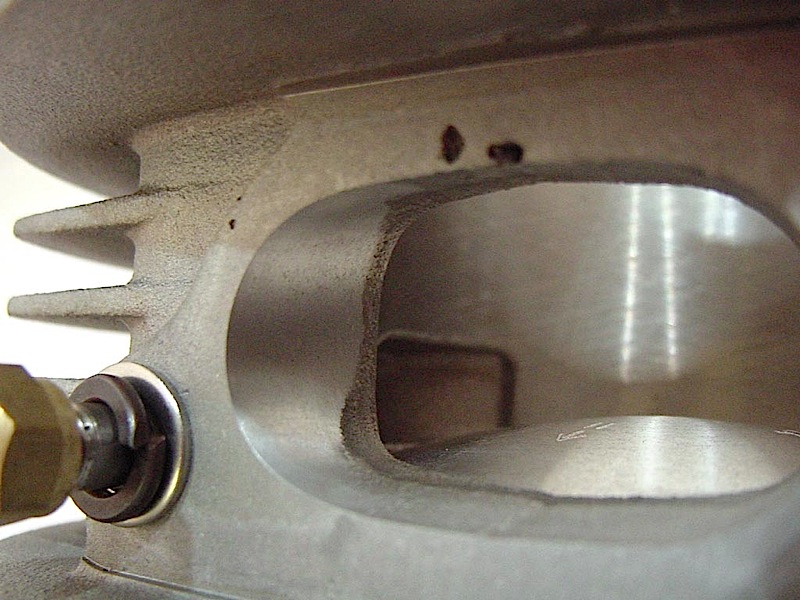
A later version with piston port boost port above the inlet port
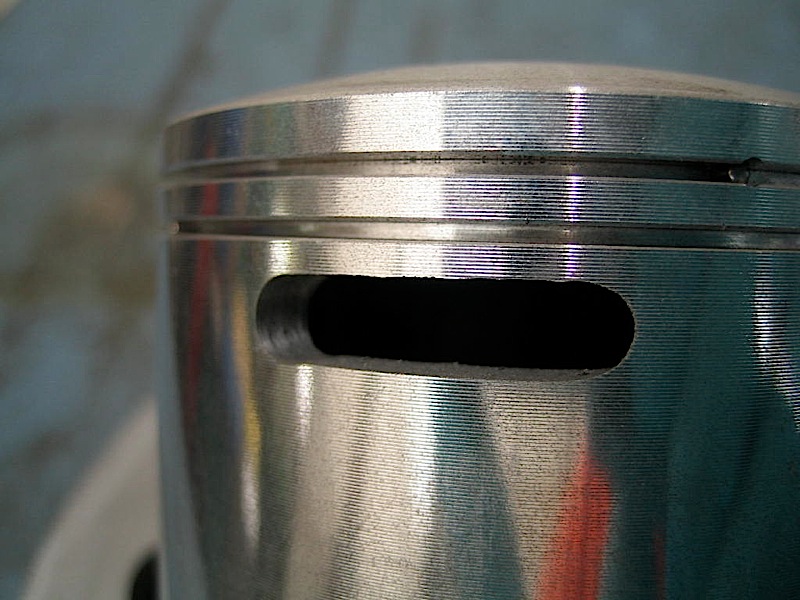
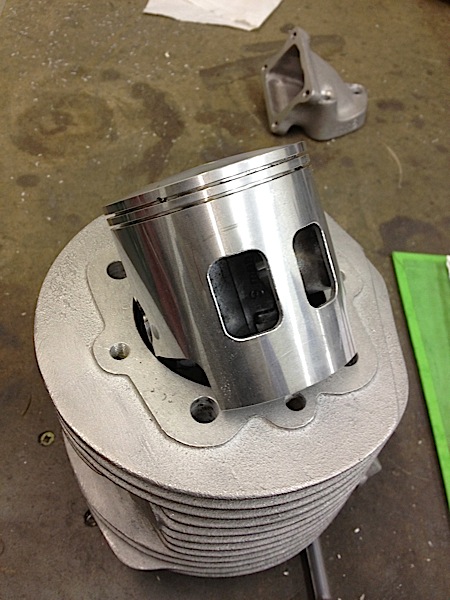
Slotted piston to suit the boost port
3rd port in some mid/late cylinders
.jpg)
Solid inlet manifold, not my favorite, they also do a rubber mounted version
.jpg)
Some cylinders used dowels to locate the head
.jpg)
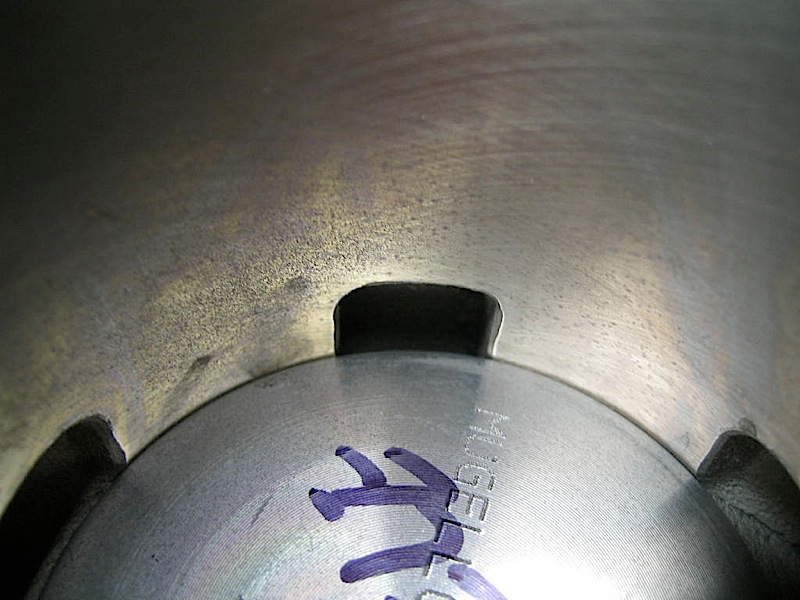
Shows not much sealing area for the boost por and slit in piston
.jpg)
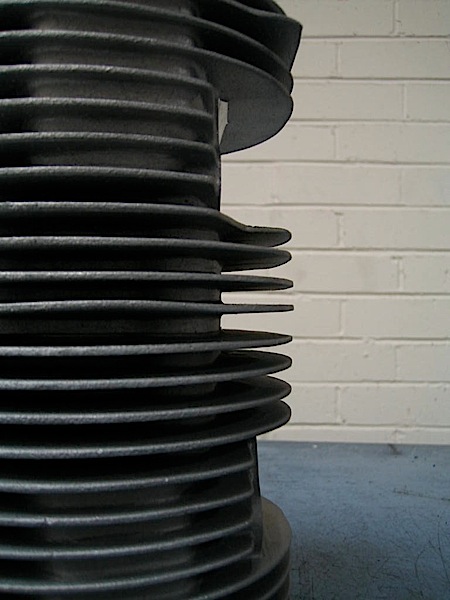
Later cylinders have beefed up transfer feeds, but the ports are thin
.jpg)
For some strange reason there is a beefed up lump below the inlet port
Ideally casing need matching to suit the cylinder

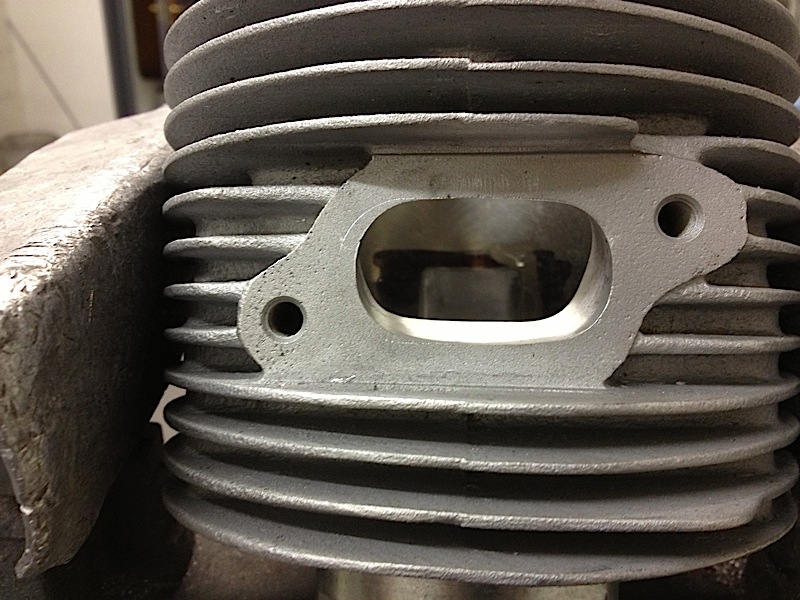
Shows how far out the inlet port core is, nothing like a large block inlet port like the gasket
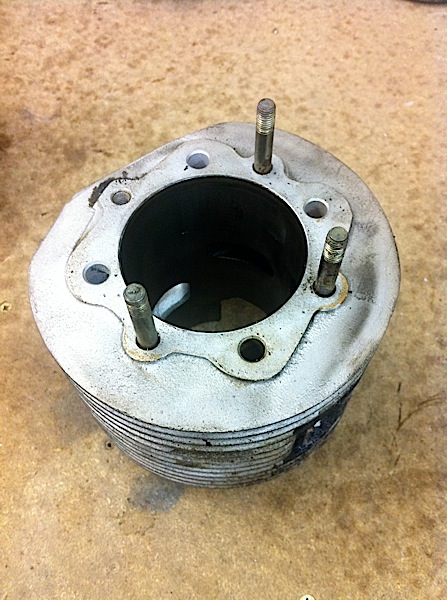
Some cylinders are raised, this is an early 4 stud cylinder

Shows how far out some exhaust ports are with a big bore exhaust gasket
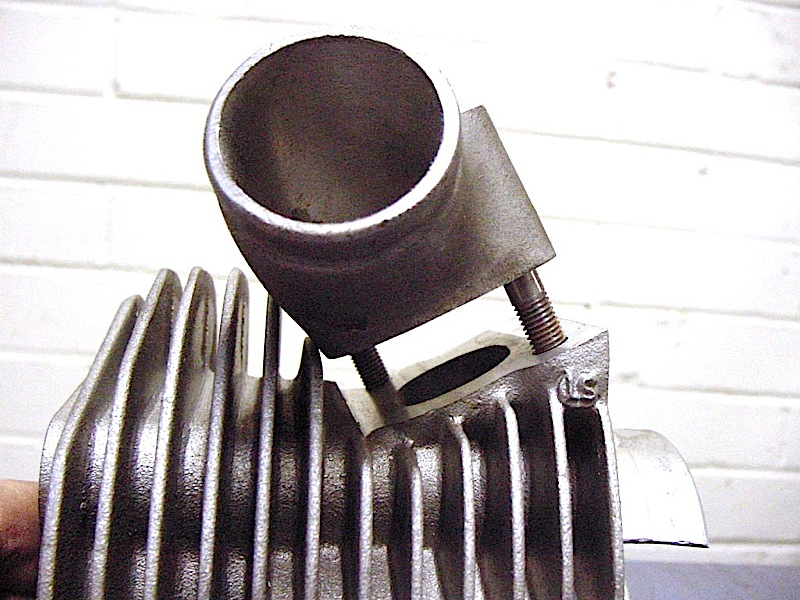
MB 34mm Amal/Mikuni inlet doesn’t fit, like most manifolds
Shows how tight it is
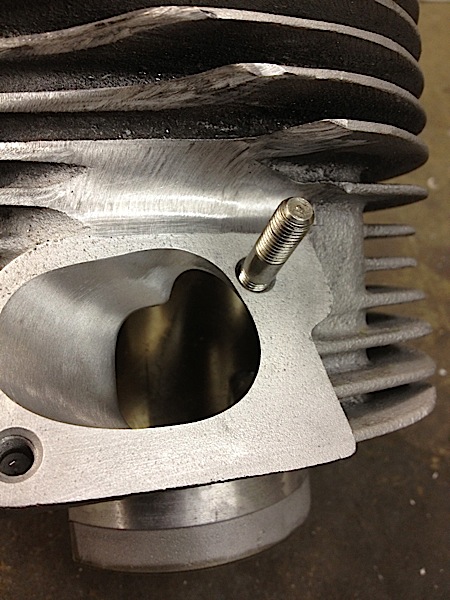
The area where the inlet port needs modifying for most inlet manifolds
Modified exhaust port to match to a flange
Shows an early cylinder (top) verses the later cylinder with thicker longer exhaust flange
An early cylinder with different shaped transfer feeds to late versions, this is with the older Imola piston casting

Another inlet port reworked to a manifold but shows how far out it is to a standard inlet port
Mid cylinder modified to a reed manifold
225 cylinder but has small block inlet spacing making it weak between the stud hole
Modified for a reed valve with extra boost porting, gives a strange shape because of the small block spacing, its tight to do
Tuned kit, still needs the port moving over to suit the flange
Super Monza straight piston modified for reed design
Mark Broadhurst, any questions ask Mark email mark@mbscooters.co.uk


