


SMALL BLOCK SR 175 – 190
MB were the designers of the Scooter Restorations cylinder, we spent 2 days reworking a Genuine 175 cylinder as a casting pattern. Many hours where spent in discussion about different ways of doing the kit and we supplied some of the information towards the piston design.
What you will now read is our explanation of the kit, its pros and cons and where we went with the kit as it developed to the present day.
The kit was introduced in 2001, it’s basically a modernised and beefed up 175 cylinder now made in aluminium with an iron liner and originally came with the newly designed SR 2-ring conversion piston.
Two kits were available.
- 62mm – 175cc
- 64mm – 190cc
The cylinder is aluminium with a cast iron liner cast into the alloy. In standard form the cylinder was designed, manufactured and modernised to a stage 2 or 3 spec. The kit can be fitted to standard small block 125 and 150 engines with no upgrading of crankshafts etc but we always recommend up grading to GP components. They can be fitted to Tv175 engines if fitted with a Series 3 crankshaft. They were designed with the idea that no extra tuning work was required in standard form if using standard carbs and exhausts. The cylinder was beefed up and designed to be able to take the tuning spec to very nearly a full 200cc stage 5/6 and even designed to easy liquid cool if required.
MB offer stage 3, 4, 5 and stage 6 tunes as extras to the bolt on kit, including cylinder head skims. The SR piston was designed as a cross between a Japanese and Lambretta piston, the rings are drawn wire making them difficult to break!
CYLINDER
MB originally remade the 1st cylinder as the pattern to be copied by the manufacturers. We took an Italian TV 175 cylinder and looked at it in terms of remanufacturing it!
The TV cylinder has been a very good cylinder for many years, this cylinder is now very difficult to obtain even second hand. There has been over the years various batches of cast iron pattern cylinders made these have been inferior in casting quality and were usually made from soft cast iron, this meant that they wore out easily. We looked at the port timings and other limitations of the cylinder. We considered that the original cylinder had slightly large transfer timings, the inlet port we were happy with but considered the exhaust port to be a little on the small size!
Given that the cylinder was now over thirty years old it needed modernising to suit to day’s traffic and to suit what a Lambretta is used for!
We decided that a new design could be done to cover nearly all possibilities.
- It should be as simple as possible and a direct replacement to the original cylinder
- Ideal for all standard and very slow 125 and 150 scooters
- It should work with standard carbs and exhausts
- It should have more power to keep up with modern traffic
- It should have enough scope to be tuned to any stage of tune
- It should be reliable
- It should be at a price to sell to all interested
With these facts in mind, the cylinder ports were modernised and tuned to stage 3 ideal for standard carbs and exhausts giving a good power to keep up in towns and still keep up with modern traffic on dual carriage ways and motor ways. The out side of the cylinder was thickened up around the inlet, exhaust and transfer ports. This allowed the choice if required to tune the inlet, exhaust and transfer ports to a full 200cc stage 5 tune! The area around the cylinder studs that are normally exposed was blanked off in the event of any one wanting to liquid cool one. The cylinder was made in alloy for good heat dissipation.
CYLINDER BORE
We considered our options here, it was a toss up between an iron liner or Nicasil plating. The chosen manufacturer didn’t do any kind of plating. Sending it elsewhere was out of the question so we went for the old trusted iron lining method, which also kept the manufacturing price down.
There are usually two trusted ways to liner a cylinder.
- Bore out the alloy cylinder, machine a groove into the top of the cylinder then fit a straight liner with a top hat shape to locate into the groove. This is the method used by MB when repairing alloy cylinders in the UK
- Manufacturers when using the older designed alloy cylinder with iron liner would cast the alloy part around a pre shaped iron liner. The pre-formed liner would be of a shape where the liner would not move once cast
We went for the second method, this method has been used from the early beginnings right up to modern day mass-produced bikes made by the Japanese.
The advantage for the iron liner method is.
- Price, it was much cheaper to produce a cylinder kit his way
- Allows rebores when required
PISTON
We had a choice, use an existing piston i.e. the Vertex one or make a completely new one. It was a Scooter Restorations funded kit and deemed the Vertex piston too expensive for the kit so had the new piston made. Lambretta pistons have always had their problems, Cast iron rings wear out and break very easily. The skirt was not strengthened below the gudgeon pin.
If a new piston was to be made then it would have to do a variety of jobs!
- Have the Lambretta crown height from the centre of the gudgeon pin to the start of the dome which was 39mm
- Have the same dome height to suit all Lambretta cylinder heads
- Have the same skirt length to suit all Lambretta cylinders, whether it was standard or tuned
- Have a ring peg spacing to suit all known Lambretta cylinders, including Imola and TS1’s
Again we looked at the piston design based on over twenty years of using various different pistons. We came across good and bad points from manufacturer to manufacturer. All put together we came up with an amalgamation of a number of pistons. We decided that the piston rings were to be the drawn wire type, these tend not to break and you can actually tie them in knots and they don’t break.
- The ring design and thickness was designed to be interchangeable with a ring already manufactured in Japan
- The alloy material and taper was chosen to suit the expansion required in a Lambretta engine
- The area at the top of the piston surrounding the rings was recessed to help the rings not to stick, in the event of a seizure
- The pistons weight was reduced above the pistons gudgeon pin.
It was a great idea and believed it could have been the best piston ever used or manufactured for the Lambretta engine, unfortunately this has turned out not to be the case. See later on.
CYLINDER HEAD
We did machine up a 175 cylinder head to suit the kit and it was sent to the manufacturers, only to find that they already manufactured a cylinder head. Our cylinder head was machined with the squish cut to suit the Lambrettas dome, giving a perfect squish clearance. Our head had the compression lowered to suit modern day fuels used. The manufacturers head used the internal shape of a 200 head but used the fins and stud arrangement of a 150 engine. This head could be used as it is or could be reprofiled to suit the piston and gain a little extra power.
SET UP
Engine casings vary in height where the base gasket goes, this tells you if a base gasket or head gasket is required. Early set ups showed no base or head gasket was required! Silicone sealer is then be required to seal the base gasket and loctite is good to seal the head. This usually gave a correct squish clearance of around 1mm but this should always be checked.
CYLINDER KIT
The original cylinder kit came with an alloy cylinder, piston, cylinder head, gaskets, studs, nuts and washers. Our kit came with fitting, running in and jetting in procedures as does all our kits.
WHAT MB USED TO OFFER
- The kit was supplied as a standard kit
- The kit was supplied as a standard kit with a re-profiled head
- The kit could be supplied as a blue printed stage 3
- The kit could be tuned to stage 4 or 5
- The kit could be supplied as a big brother tune as we called it at the time i.e. tuned to as near to a 200 cylinder as possible
PROS: Aluminium cylinders reduce heat build up. The Iron liner was very hard, ideal for a long lasting cylinder kit which it has proved to be over the years. The iron liner is reborable and has a large amount of oversizes available from 62 to 64.5mm, in .50mm increments. The standard cylinder kit is a direct replacement for 125, 150 or 175 engines and can be used with standard carbs and exhausts. The original piston was designed to be the most perfect piston available for a Lambretta standard or tuned. The cylinder head has a lowered combustion chamber volume ideal for unleaded fuel.
CONS: The porting came from the manufacturers on the rough side as the factory didn’t copy the original cylinder. The ports resemble a standard TV 175 cylinder not a stage 3-tuned cylinder. The cylinder would possibly be better off with a blue print to a stage 3 as it was originally designed for. The alloy casting is done in a sand-cast method and may appear a little rough this is not detrimental to the running of the kit and actually could aid cooling through surface area! Reprofiling the cylinder head would be a good idea for more power.
When the kits arrived in Nov 2001 the cylinders appeared to be very well machined around all gasket faces, the bores are machined well and within manufacturing tolerances, but on some cylinders the stud holes could create a problem latter on in life especially with rough big handed Scooterists. Basically some of the threads did not seem deep enough, but there was a mod to drill and tap further into the cylinder to get more thread area. All studs should be loctited into position. The piston varied very little in size, less so than Vertex, Honda or Wiseco pistons. To be correct MB matched a piston to a cylinder bore before sale allowing for correct piston to bore clearance.
At the time we took ten cylinders and measured the bore and piston sizes, the pistons were within 0.0004’’ (4 tenths of a thousands of an inch) very close indeed.
The cylinder measurements varied a little more, 0.0013’’ between the largest and smallest size, but given the large amount of pistons available MB matched a piston for every bore.
The worst case could be a tight bore with a large piston, this would still give a piston to bore clearance of over 0.001’’ (normal for motor cycle alloy cylinders) a small piston in a large bore would give 0.00279’’ normal clearances for Lambretta iron cylinders. MB sent out cylinder kits between 0.0015’’ to 0.002’’ clearance.
As always careful setting up of the squish clearance by removing either or both cylinder head or base gasket resulted in a quicker engine. Cylinder fitting instructions came with the MB cylinder kits, squish clearances are explained in here in depth.
The ports looked rough and varied in size from cylinder to cylinder. This meant one cylinder was quicker than an the other in standard form! The manufacturing process allowed for some liners to be slightly moved around, this shows up in the transfer passages, but made little or no difference to how the kit worked in standard trim. The SR 175 cylinder seems better than the 190 kit here.
Cylinders set up on our timing jig with no base gasket showed the approximate port timings to be, Exhaust 165 degrees, close to our pattern stage 3. Transfers 126 degrees, close to our pattern stage 3. Inlet 134 degrees, a little too small compared to our pattern stage 3.
The exhaust width varied from 42 to 46mm, this is where one cylinder varies in speed over another. (With these rings it could be possible to tune the exhaust port width to 48mm safely) The exhaust port was lowered 1mm by the factory more than our pattern, it made no difference at all but we normally like the exhaust port flush to the piston at bottom dead centre or 0.5mm lower. On some cylinders there is a casting gap between the liner and the exhaust port, it looks rough but wasn’t detrimental to its running.
The transfer ports were the roughest of all, both inside the cylinder and along the passages. Inside the cylinder the ports have been widened to suit a 200-cylinder size. But the transfer feeds are smaller! Around the out side of the transfer ports the casting is beefed up so tuning a transfer passage to near 200cc ports is possible depending on what casings you have.
The inlet port has been reduced in size compared to our pattern cylinder and a standard TV175 cylinder. The port gasket face matched a standard 175 inlet manifold but the port then becomes much smaller, more like a 150 port, but then inside the cylinder it reaches the size of our pattern cylinder. This is very obvious, as the factory has done a little cleaning up work inside the port. The inlet port timing is a little low to match the transfer and exhaust port timing, removing 2mm from the inlet side of the piston would put the cylinder ports similar to our original modernised pattern but without the port area.
The 175 head for some reason came with a very low compression ratio, larger than a 200 head. Not what we designed! This impaired power. Ideally these need machining quite a lot and will still work with unleaded fuel. Expect all 175 kits to need the head machining, standard or tuned.
The 190 cylinder head has come from the factory machined wrong, typical! And in standard, off the shelf form they were useless. But once reprofiled they should be ok for power and for using unleaded fuel.
The kits had good and bad points. As a standard kit it was good value for money in every aspect, it will reduced heat build up, it gains cc’s, gain horse power and help in modern day traffic and they proved to out last any kit as the liner was so hard.
We updated the information in Jan 2003 after a year or so of use and updates
Having kept an eye on the SR pistons we reported some good and bad news. One piston was fitted to a standard cast 190 cylinder and did 10,000 miles with no trouble! But on the other hand some only did 300 miles and the peg came out! Not so good. It was with great regret that, in our opinion, the SR piston has turned out to have too many problems to make it worth using. We had problems with noisy pistons which ended up been the piston ring lands were to big and gave ring flutter! We cured some by slightly bending the rings. For this reason we stopped using the SR piston. As a fill in gap we used the 3-ring Italian GOL piston in standard or stage 3 175 kits to good effect. As with Asso and Vertex pistons these ran out making supplying standardish kits hard to do. The SR 175 standard kit was good and gave performance that equaled or beat a standard Italian GP 200 so something must have been done right in the first place, we just needed pistons.
MB offered the bullet proof Suzuki 190 conversion which proved to be excellent in pattern and Wiseco.
We offered various conversions
- Suzuki 190 64mm piston using a standard 107mm rod, these were hard to do with the varying inlet port size, you never knew if a cylinder was a good one until it was too late
- Suzuki 190 64mm piston using a Yamaha 110mm con rod conversion, these could be tuned great, at the time the rod conversion and extra extra work was quite expensive
- Suzuki 190 64mm piston using a Yamaha 115mm rod conversion. This was the best kit of all, the rod was an expensive conversion but once done the cylinder kit was excellent
UPDATE
That’s where we got with the SR kits many years ago. We sold a few hundred kits and tuned as many in all forms with different pistons. At the time the best set up was the Suzuki 190 using a 64mm piston and a Yamaha con rod at 115mm, this way you could tune the ports to suit the customer. Using the long Yamaha rod meant no cylinder machining and you could tune the inlet port to the longer uncut Suzuki piston which worked well. The heads turned out to be not so good and we stopped using them in favor for the SIL Indian heads.
Eventually the cylinders ran out, some came up on Ebay at really cheap prices and lots of people used them their way mainly from the information in our original write ups. Rayspeed brought out a very similar 175 kit – well the same kit, they tuned them a little and used an Indian Escort type piston.
And the Indians picked up on the kit and produced an inferior copy at 200 and 225cc.
With all the bad or non perfect bits of the kit, they have proved to be very good and long lasting, we have not had one in for a number of years and its been a long time since we have rebored one, people are reboring them to 66mm and making a 200cc to good effect, but these have no oversizes.
DEVELOPMENTS
Looking back the aim of the SR kit didn’t fully work through a poor manufacture in India. A few years later the same basic ideas with improvements where put into our own MB Race-Tour UK made kit and this passed on into our MBgm Race-Tour kits, even down to the pistons! With better manufacturers our original MB Designs proved to out shine the SR kit.
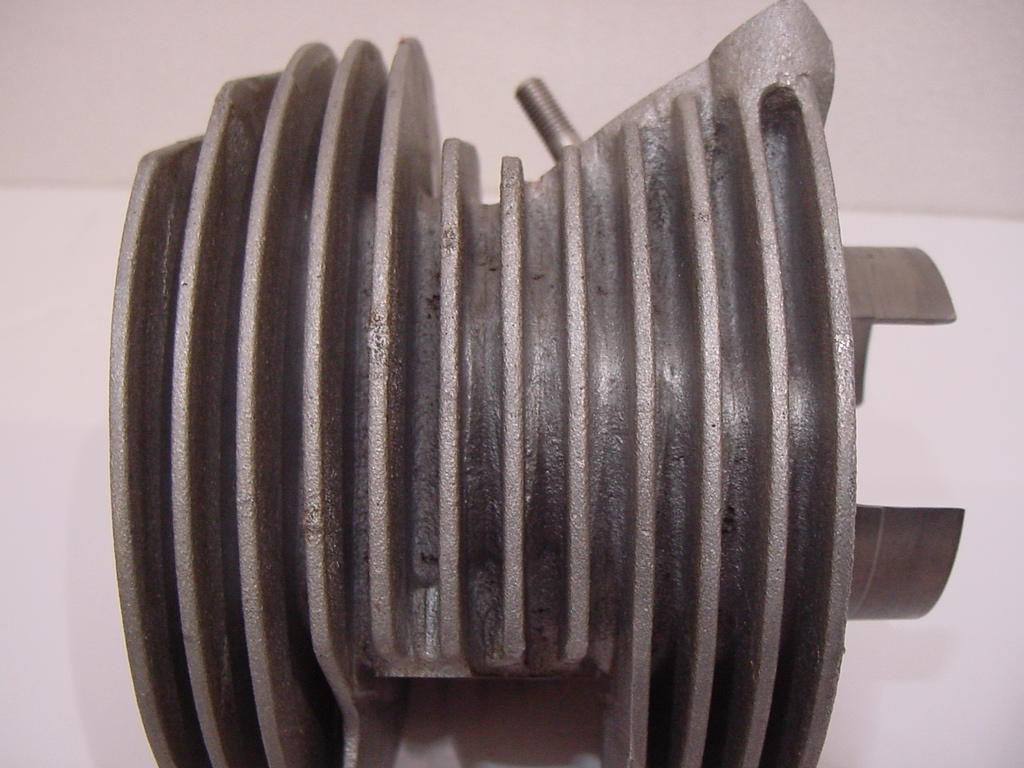
The SR175/190 is one of the roughest cast cylinders ever made, BUT it helps surface area and cooling!
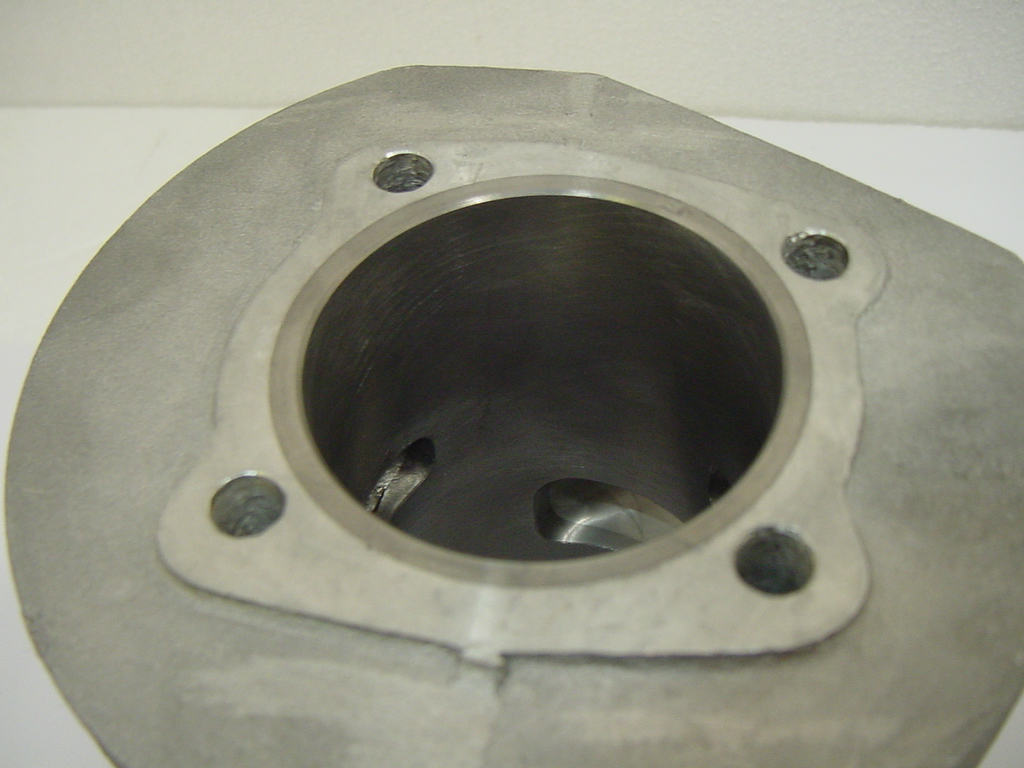
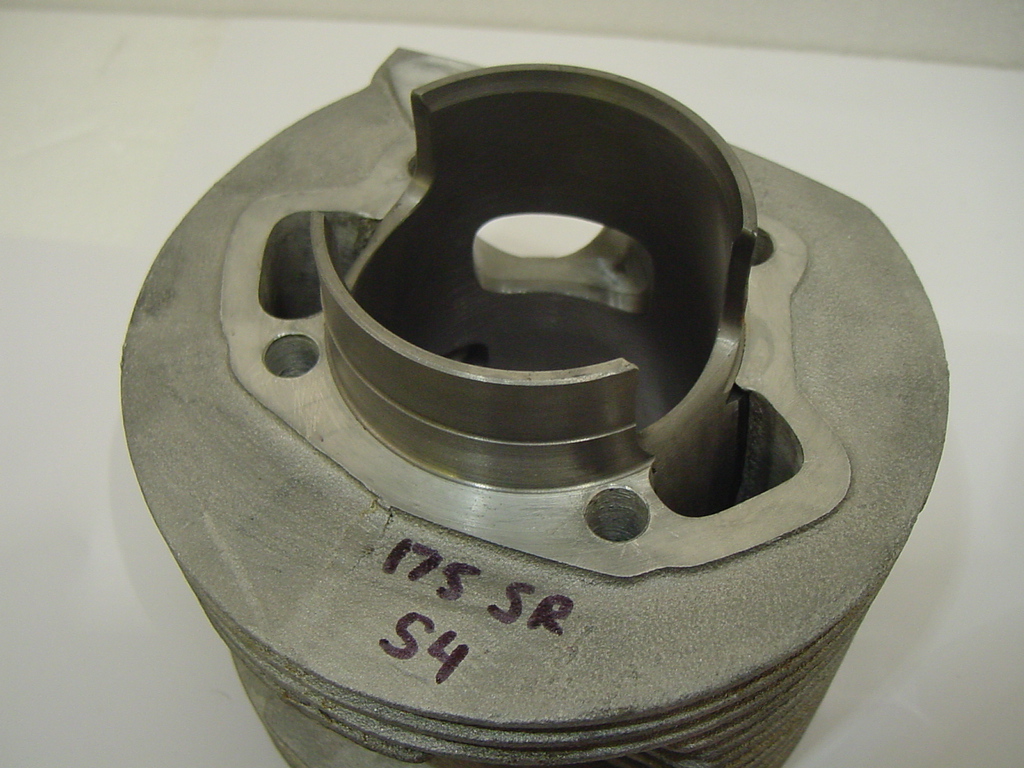
The liner is cast into the alloy cylinder, even the drilling is poor on the stud holes
Ports are very poor on the SR it needs lots of work to match and flow. Used as a standard they worked well
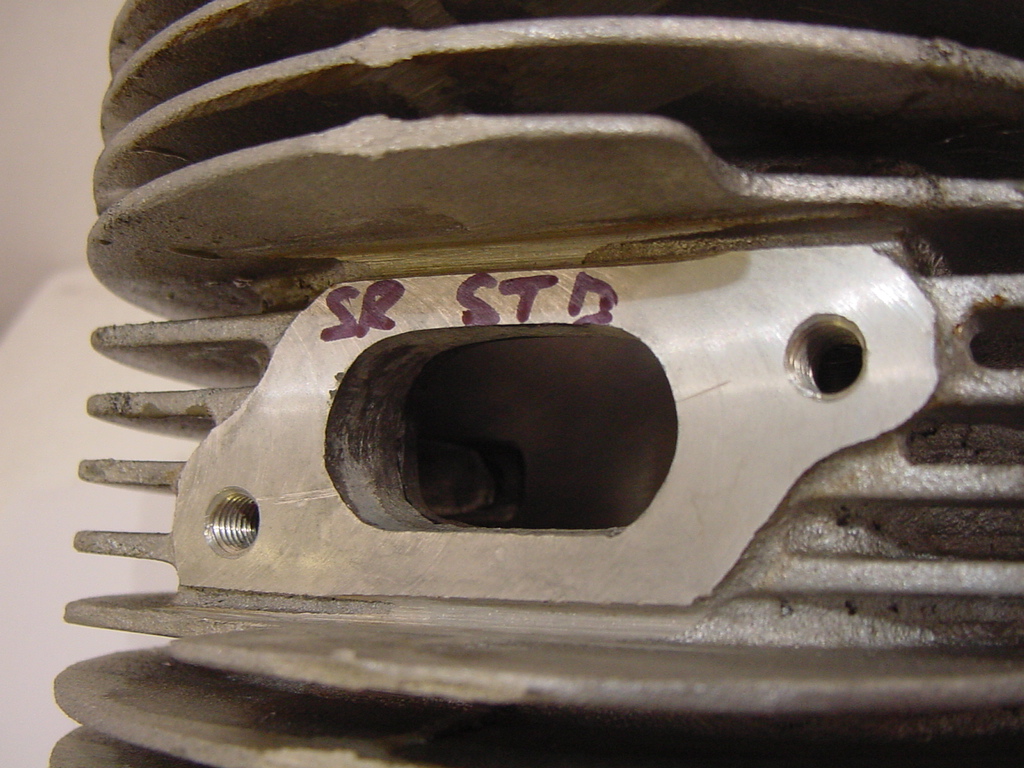
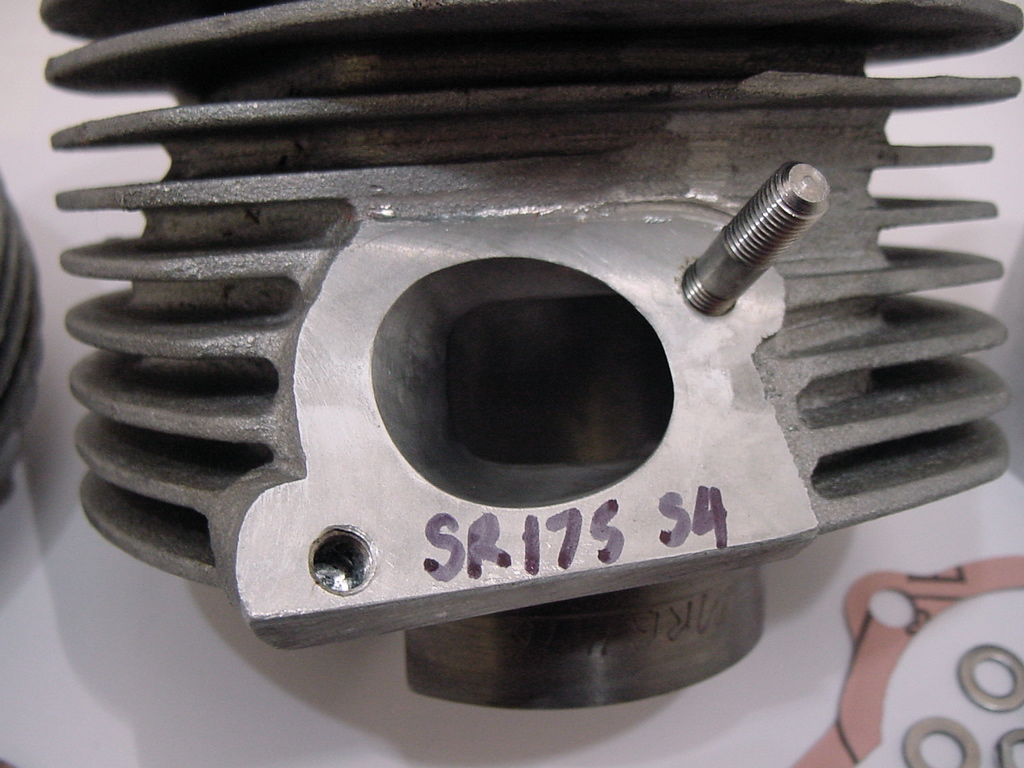
Standard inlets resemble a TV cylinder, but every cylinder varied so you always need to match it to the inlet port, note the low depth of the top hole, these used to strip, but you can drill and tap further, on a tuned inlet it’s normal to break into the stud
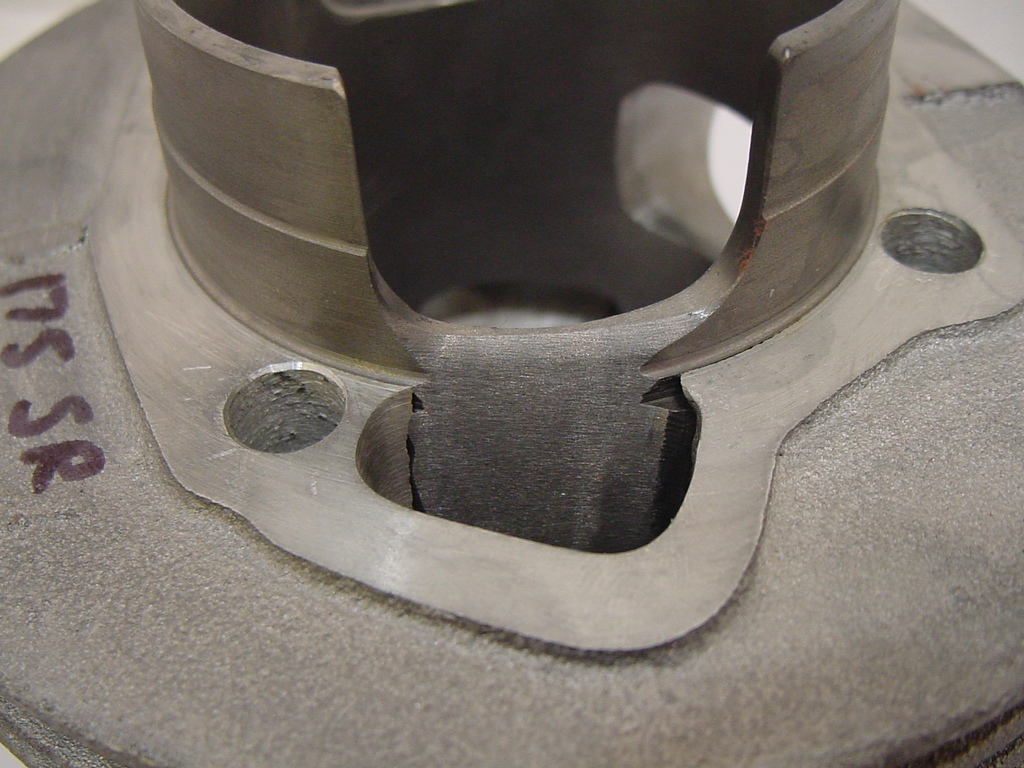
This shows how rough a standard inlet port is as standard
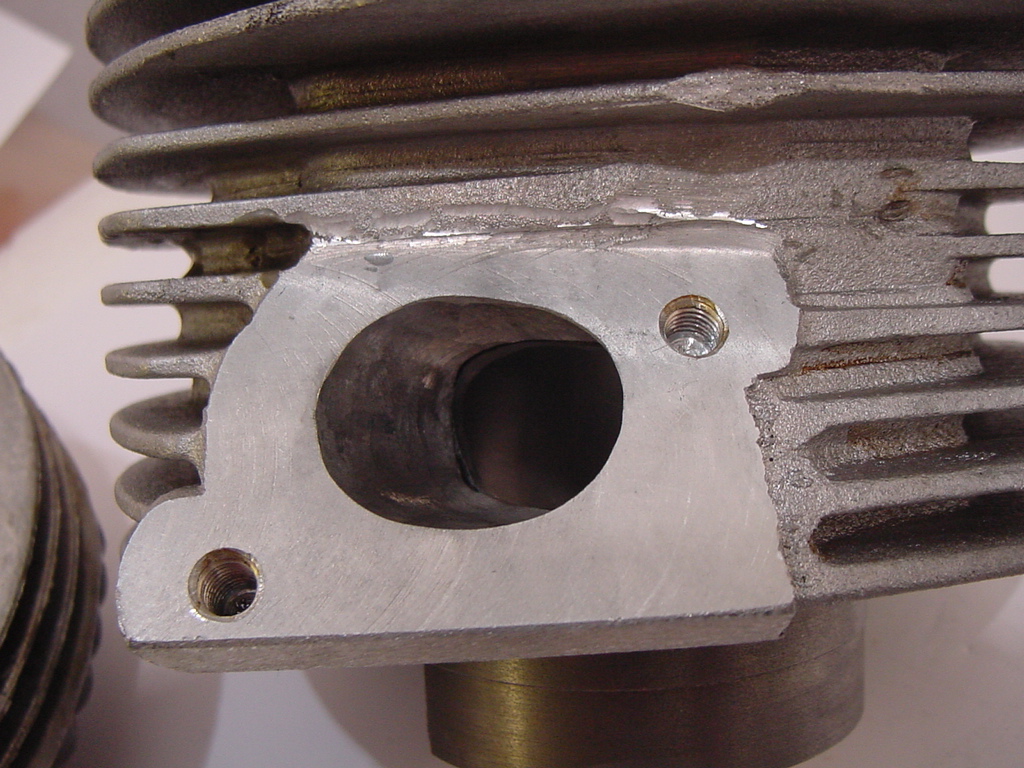
A Stage 4 tuned matched and flowed inlet port, to the left of the port the cylinder always has porosity marks but doesn’t effect running
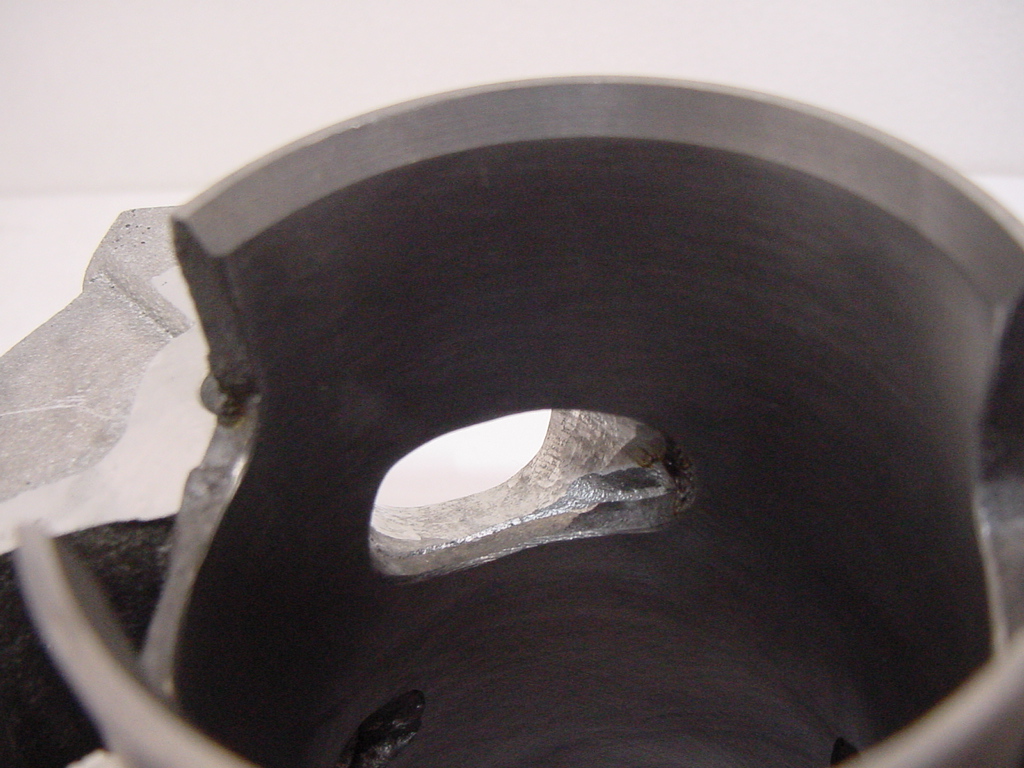
The transfer passages are really rough to start with and takes lots of time to re tune and flow correctly
Even after tuning and flowing you can see how poor the casting is between the alloy and iron liner, you just have to clean them the best you can

Again showing how bad the porting is between liner and alloy
Mark Broadhurst, If you have a question email mark@mbscooters.co.uk


