


Bella at jet speed, or: how to jet your carburetor.
We have all been there – a machine that just won’t run right. There are the usual suspects like the ignition with the ignition coil and points, the spark plug and the timing of the ignition. An oft overlooked part is the carburetor. Either because ‘it came with the machine and must be right’ or because we simply don’t know enough about it.
Time to get rid of the mystery. In this short article we’ll cover the basics of ‘jetting your carburetor’ and ensuring it works right.
Why bother?
A question often asked is ‘why mess with something that was tested by the factory’ when it comes to carburetors. A fair question, as in an ideal world that would be exactly right. However, here are some reasons why we should not take the working of the carburettor that came with the bike for granted:
- The carb may not be the right one (i.e. another type was fitted in the past for some reason). Carburetors are made for specific machines as a function of air intake design, engine size, exhaust pipe design, but also physical dimensions of the engine it needs to fit. Some are attached through a flange (e.g. Zundapp DB series), some directly on the cylinder (Bella R204) and some through a temperature insulator (e.g. Bella 203). So, check that yours is the one that goes with your machine (if you have all stock parts on your bike)
- The carb may have been fitted with the wrong parts. This happens much more often than you think. A jet needle will have been scrounged up from somewhere, jets mixed up when putting a carb back together again, air screw replaced with a wrong type, wrong size jets put in etc.
- Your machine may not be stock. This may be as simple as not having an original piston and cylinder with different performance characteristics or having used an after-market exhaust pipe with different performance than the original. We all know what an expansion exhaust can do compared to old models and many reproductions have a simplified design (they may have a simplified silencer or other design differences).
- The configuration of a carb is environment dependent. E.g. if you live high up in the Alps you will need different jets simply because of the air being much thinner. This means there is less air and standard carb settings will be too rich.
Hopefully, you are convinced to take a look at the carb as part of any restoration as a necessary step.
Do I have the right carb?
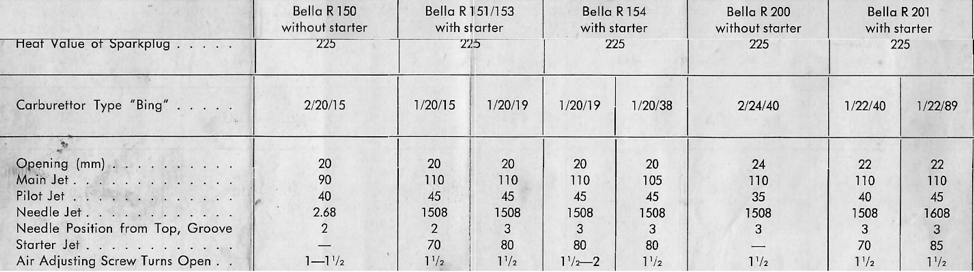
The right carb for your Bella is noted in the table. You may find the carb number on the side of the carb housing. The table holds the type, but also the jet sizes, needle positions etc. Very useful to have.

What to check before looking at the carb?
Before we take the carb apart, it makes sense to check the following when a machine doesn’t run right as otherwise, we’ll be wasting a lot of time:
- Ignition timing, spark plug and the ignition itself. Ensure they work as they should and that the spark plug is of the right heat type.
- If your machine holds back, or suddenly stalls, check first that the fuel cock is not clogged (is there a steady stream from the fuel hose if you detach it?) and that the air hole in the fuel cap is free (or a vacuum will be drawn in the tank and fuel will stop flowing after a few minutes).
- Ensure the air filter and exhaust are attached. The carb is designed to encounter a specific air resistance in the air filter as well as in the exhaust. If either is not fitted, or if the engine draws air from other sources (e.g. a broken crankcase oil seal) this needs fixing first.
- Ensure you have the right tools for taking the carb apart. Specifically, use ring spanners on the aluminium bolts, not normal spanners if possible. Use the exact right size of screwdriver. Jets and other carb parts are delicate and easily damaged by grabbing that screwdriver that happens to lie around. Do NOT overtighten bolts and screws. The aluminium housing is delicate.
So, all of that is fine; what now?
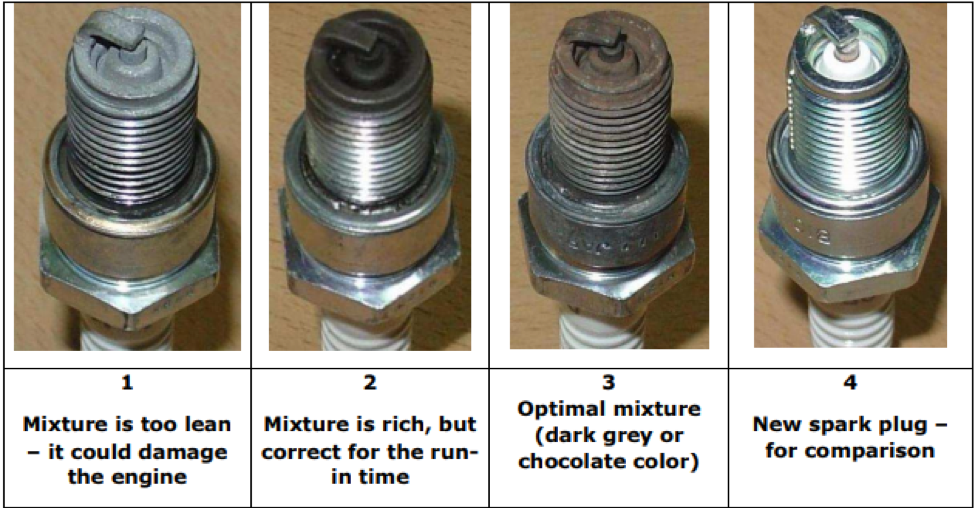
The first thing to do is to take a look at the spark plug. Drive your machine, let it heat up for a few minutes, drive at full speed for a few minutes and then shut the engine off. Remove the spark plug and look at it. What you should see is a coffee brown or slightly grey plug. If it’s black, oily or sooty, your mixture is too rich (too much fuel in the carb). If it’s white you’re too lean (too little fuel). The latter is worse for your engine than the former as your engine will run too hot when the fuel mixture is too lean. Here’s what that looks like.
So how does a carb work then?
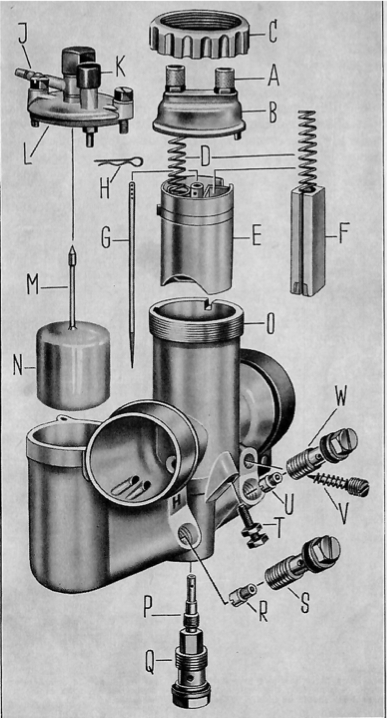
The Bella carbs are all made by Bing. They all follow a similar design. Here’s the carb for the R200:
- A float (N) stops the fuel from flooding the carb by closing the fuel inlet through the float needle (M)
- An idle jet (U) (a jet is a brass cylinder with a tiny hole through it to let through fuel) is used to stop the engine from stalling when the gas handle is not used
- When the gas handle is twisted, the air opening in the carb is increased by lifting a barrier; the air slide (E). This provides more air for the fuel to mix with. At the same time, more fuel must provided to go with the increase in air. This is done by the jet needle (G), seated in the needle jet (P) between ¼ and ¾ gas and by the size of the main jet (R) from ½ gas to full gas.
- An extra rich mixture (more fuel, less air) is provided when starting the engine in cold weather through a ‘choke’ mechanism (F).
- The fuel air mixture is regulated through an air mixture screw (V).
How to check the carb
First, we check whether the float is of the right type and whether it still floats. Do this by submerging it in a glass of water and leaving it there for a while. Unless you hear moisture inside in which case, we know it need to be replaced.
Next, we clean all the parts so there is NO debris (sand, metal flakes, grit) left. Ideally, use an ultrasonic bath to clean it, but don’t leave the aluminium in the bath too long. We blow the jets through to ensure they’re unblocked. Do NOT do this by poking something through them. This will increase the size of the jet and render it useless. Only use air. If you can see light through the jets, they are generally OK.
We check that the rubber at the bottom of the choke is in good working order (some Bella carbs have a small rubber disc at the bottom of the choke. If missing, this will allow false air to enter the carb.
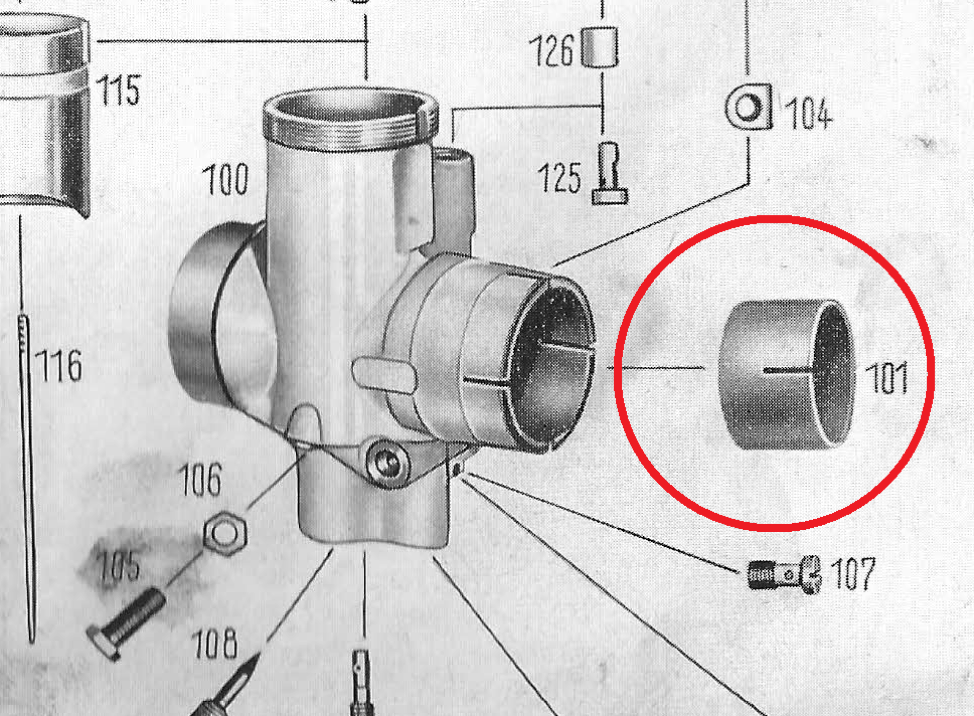
Bella specific and very important; some carbs are connected to the cylinder through a ‘pertinax’ reducer; the carb goes in one end and the other side fits over the air inlet on the cylinder; other models have a thin pertinax cylinder. As an example, part 101 for the Bella R204. Note that this part is not indicated as necessary by many parts sellers, however it’s critical as it is used as a temperature buffer on some models. Without it, the fuel will ‘cook off’ and too little fuel will reach the engine. Make sure yours is there and working. Also, you won’t be able to tighten the carb on the cylinder without damaging it in case of the R204 (as you’ll overtighten the carb body and it will likely break)
Now we have checked all parts we’ll need to ensure they are the right ones. The jets should be stamped with a size indicator. Ensure they are the right ones for your machine as a starting point. Note that jets U an R (idle and main jets) can be interchanged. The engine will not run properly if they are.
If your jets show any signs of tampering in the bore, replace them (they may have been drilled out in the past).
A common problem with old carbs is wear and tear. The air slide may be worn to the point that it doesn’t raise or drop properly or lets through too much air. In that case, replace it. You can see this by checking for wear patterns on the slide itself or if it is rattling in the housing. It should be a very tight fit. Note: replacing may not be easy as some parts like the air slide are hard to find.
Check the jet needle (G). It should be rust free and the right type. The problem is that this is hard to measure. If you continue to have doubts about it being right after we’ve jetted the carb, order a new one if you continue to have problems with ¼ to ¾ throttle.
Check the needle jet (P) – is it the right size?
All parts are good. How do I ‘jet the carb’?
Jetting the carb is just jargon for setting it up right and is fairly simple. The first time is the hardest, but as you get more experience, you’ll find it quite simple. Follow these steps:
- The jet needle has grooves at the top. Put the clip in the position indicated in the table. E.g. The Bella R150 should have the clip in the second groove from the top. Why the exact groove is important we’ll return to later.
- The idle jet size doesn’t change much with other variables, so if it is the original size, chances are it’s fine. To set it do the following:
- Fully turn in the air mixture screw (V). Then turn it out the recommended number of turns in the table above (e.g. the Bella R201 states 1 ½ turns). We’ll use this as the starting point (a turn being 360 degrees)
- Start the engine.
- Turn in the slide stop bolt (T) to reach an idle where the engine does not stall, but only just.
- Turn the fuel mixture screw out or in to the point where the engine reaches the highest revolutions (this may already be where you set it). From there turn the air mixture screw inward 90 degrees (a quarter turn).
- Screw the slide top bolt inward (T) till a good idle speed has been reached.
- Take your machine out for a test ride.:
- Ride at idle and low speeds. Ensure that the machine picks up well on the throttle at low speeds. If it hesitates the air mixture screw may be off. Try it half a turn in or out and see what happens. If the machine ‘bogs down’ or wants to stall, the mixture is likely to rich. In that case turn the airscrew out half a turn. If the machine can’t quite accelerate properly, the mixture is likely too lean. In that case turn the screw inward half a turn.
- If the engine picks up well, go to ½ and ¾ throttle and finally to full throttle to see whether the machine accelerates well up to full throttle. If the machine starts to stutter prior to reaching full speed, the mixture is too lean. In that case, put the jet needle up by putting the clip one groove lower. By doing so, the needle gets lifted further out of the needle jet and will provide more fuel. Conversely, if the engine bogs down the mixture is too rich. In that case, lower the needle by putting the clip in the groove above.
- When this work well, try full speed. The machine should reach it advertised top speed. The same principles apply: when stuttering, your main jet is too small, go up a size. When the engine bogs down, the main jet is too large and you should go down a size.
How do I change a jet?
Changing a jet is as easy as unscrewing the old one and putting a new one in. Jets come in increments of about 2. So if you you have an R151, your main jet is 110. If your engine bogs, buy sizes 105 and 108 and try both.
Is this jetting worth doing?
Yes. Each machine is different and it’s a standard part of the process of commissioning a motorcycle. For the Bella it’s more cumbersome as the carb is harder to reach, but most screws can be gotten to on the carb without having to remove the cover. Some people ride for years with incorrect jetting and can’t believe the difference when it’s right. Keep in mind, it’s not rocket science!
Are all carbs the same then?
No, each carb design is different. Some carbs have all jets accessible from the float chamber (e.g. some Mikuni carbs), some have a needle jet and some have only a main jet (e.g. Zundapp moped carbs are much simpler), but the basic principles are the same. Once you know these, you can apply them to any carb.
Any other tips?
The wrong fuel type can damage your carb. Modern E10 fuel can have up to 10% ethanol. This is a killer for aluminium carbs as E10 attracts water when fuel is stood for a while. Please use fuel with the lowest ethanol content you can purchase. Larger petrol stations will have this available.
Used carbs regularly come by on e-bay, so keep an eye out if you need one. For specific parts I would recommend Klaus Faak (klausfaak.de) or Greiner (greiner-oldtimerteile.de). With them you can search on carb type and they have most parts in stock. Imitation jets are as good as the originals and can be had on e-bay for much less than what they are offered for in the expert stores. Just make sure you order the right size (they come in M3.5 and M4 x 0.75 thread).
Article by Bert Zwiers ZBEC


